The Timeline panel
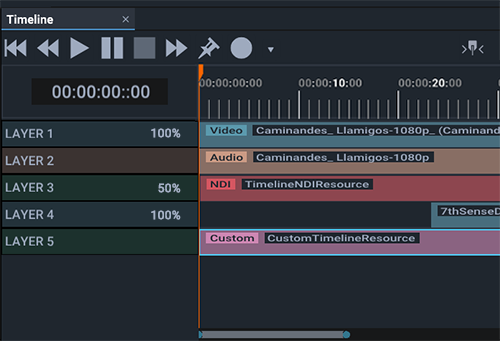
The top of a timeline panel has playback controls: rewind to start, frame nudge forward and back, play, pause, and stop. Pause will hold the frame/asset cache, whereas stop will blank all assets.
From the dropdown selector on the right we can see this is Timeline 1 (a user-editable name). Using the + button, timelines are added to the Project. They can then be populated with media assets, markers, keyframes, play controls, shaders – along with all it takes to make a show. Timelines can be controlled dynamically, saved, edited and reloaded.

Note the orange playhead and its time position shown here in HH:MM:SS:Frames. Time format is set in Configuration > Settings > Preferences [Timecode Format]. The playhead can be dragged, and will jump to a time position clicked on the time graticule (ruler).
The orange arrows show that there are keyframes present on this timeline, and the yellow pointer is a marker pinned to the timeline. Jump between markers quickly with Ctrl+arrow keys.
Hold: The icon next to the Timeline selector on the right allows the playhead to run only to a central position and then hold, when the timeline will instead flow behind a static playhead. When not toggled on, the playhead will continue running off to the right and the timeline will remain fixed.
Zoom the timeline in and out with the mouse wheel, or zoom to the left or right of the playhead position, using the round blue timeline scrollbar handles:

•The scrollbar represents the visible portion of the timeline, its length is relative to the whole.
•The orange marker is the relative position of the playback head, which may be dragged in the visible portion or beyond it, within the total timeline duration.
•With the playhead in ‘hold’ state, dragging the marker will drag the scrollbar with it. Dragging the scrollbar alone will disengage the ‘hold’ state.
|
•Timelines are added into the Timeline panel by typing ‘T’ or clicking the + icon on the right side toolbar.
•Timelines can be renamed and are listed and selected from the toolbar dropdown in the panel. It may be useful to open multiple Timeline panels, selecting a different timeline in each.
•The contents of the Timeline panel can be zoomed horizontally with the mouse wheel, or using the top row - and = keys.
•Use the horizontal and vertical scroll bars to navigate length and layers.
Playhead
•The playhead will track across during play and can be dragged to a position. Dragging to a position during play will place the timeline in pause state.
•Click on the timing graticule to bring the playhead to that point
Quick keys
•Start and stop play with the spacebar.
•Click on the timeline time ruler at the required time to position the playhead there.
•Ctrl+G will go to the specified time position (timecode format as set in Preferences)
•Ctrl+G+Return (=00:00:00:00) will return the view and the playhead to the timeline start.
•Ctrl+ arrow keys will jump the playhead forward and back between markers.
•Ctrl+Shift+arrow keys will jump the playhead between the start frames of assets in any layer on the timeline.
•Click the ‘Hold Playhead’ icon to run the playhead to centre and resume playing assets past the playhead instead.
•Use the mouse wheel to zoom the length of the timeline.
(Alternative: use the + and – keys to ‘zoom in/out time’.)
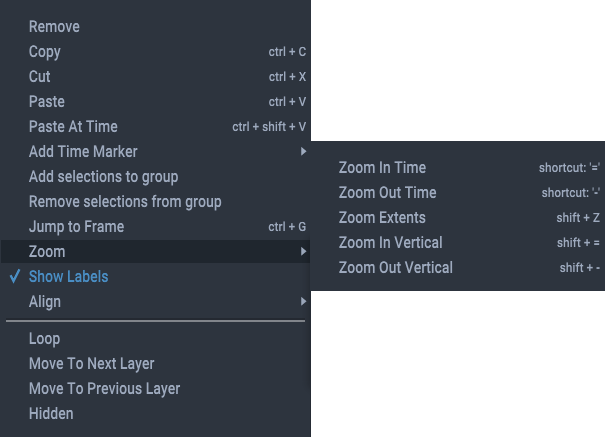
•Shift+z will fit all timeline assets into the current timeline view (‘zoom extents’)
•Use Shift+zoom (mouse wheel) to expand the height of layers for readability of the thumbnails next to the names. (Alternative: Shift plus the + and – keys to ‘zoom in/out vertical’.)
➢For other shortcut keys, see Keyboard Shortcut (Actor)
Context menu (right-click)
The right-click timeline context menu also lists the shortcut keys:
Below the line selections apply to the selected asset, and show when one is selected. Align allows accurate placement to other assets, markers, or the playhead.
‘Mute’ shows for audio assets, others show ‘Hidden’. Mute and Hidden are also in the respective asset’s property panel.
Selected assets can also be moved up and down between layers providing this is is legitimate move (i.e. the layer and occupancy at this time is available).
Layers
Layers on the timeline are created when assets or resources are introduced.
On the left of the timeline, layers are listed. Each layer can contain only media of the same type (video, audio, image, input capture, generative media etc.). The layer colour and icon indicate the media type they contain. The exception to this is effects and shaders that can be ‘attached’ to other assets in the same layer, shown underneath the asset.
•Layers can be reordered by dragging their labels on the left, but retain sequential numbering in the labels area.
Note that timeline ‘Layer 1’ (property = Layer number 0) when given the order property of number 3, will become ‘Layer 4’ on the timeline.
•They can be given a user name in properties, but this is not displayed.
•Visual Layers can be given opacity values (displayed in the layer label), and
•can be enabled or disabled (i.e. all assets hidden or muted).
The opacity value display is optional, toggled on/off under Settings > Preferences.
Multiple timelines
Multiple timelines can be played and edited simultaneously, each with its viewport directed to required outputs. Open new Timeline panels and select the timeline to run, build or edit in each. You could, for example, tab the timelines instances together in one panel.
Timeline properties
These properties apply to the timeline, not individual assets.
Audio DSP Connection
Enable or disable DSP connections (see Audio Playback).
Timeline Duration
The default duration is 24 hours.
Frame Rate Fraction
Enter the non-drop frame rate per second (e.g. 60 in the first field and 1 in the second), or for drop-frame timing, use the second field as a fraction (e.g. 60000 over 1001 for 59.94 fps).
Opacity
Sets the opacity of the entire timeline. Opacity can be dynamically changed using external controls and by using keyframes.
Volume
Audio level, all layers.
Pitch
Change the pitch of all audio on the timeline.
Contrast Overall
Applies to all video assets on the timeline. This and individual colours are around a normal value of 100, minimum 0.
Red
Applies to all video assets on the timeline.
Green
Applies to all video assets on the timeline.
Blue
Applies to all video assets on the timeline.
Brightness Overall
Applies to all video assets on the timeline. This and individual colours are around a normal value of 0, ±100.
Red
Applies to all video assets on the timeline.
Green
Applies to all video assets on the timeline.
Blue
Applies to all video assets on the timeline.
Gamma
Applies to all video assets on the timeline. Values 1 (min) and 8 (max).
Enable Preview
This works in conjunction with the Actor property ‘Enable Preview’ which configures a broadcast stream from each device. (Project Tree > Devices > [Actor/Conjurer]).
First ‘Enable Preview’ in the device properties to add the device output(s) to the broadcast stream (preview mode = NDI), and set the required resolution of the broadcast stream. This will broadcast all output viewports from this device that have also been ‘Preview Enabled’ here via the Timeline property.
Disabling a timeline preview with this switch will simply stop broadcasting from its respective viewports.


