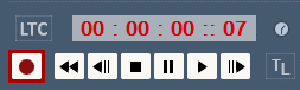
Clicking the Record button on the timeline controls brings up the following dialog.
Create the job
Here two recording jobs have been set up:
A Job is a recording event, comprising channel selection, duration, resolution, output format and destination. A number of jobs can be created, and checked items will run sequentially. In this example, two recording jobs are set up, one at full resolution and one at low resolution.
Start by adding a job (or double click an existing job to edit):
Path
Usually in E:\movies, append the folder name you want to use. (Here, we just called it ‘MyShow’). In this folder, if you are recording more than one channel, assign the channel subfolders using these variables exactly as written here, for automatic naming:
{channelName} will append the channel names you have given in your show (they can be renamed before you record)
{resName} will append the name of the resolution template (see below) that this job will use
Base Name
This is the name for the recorded movie, which will be the prefix for every frame, to be followed by the automatic addition of frame numbers and file extension. If the frame name is to be the same as the channel and resolution variables used in the path, type @@
Offset
This is the number from which you want the frame sequence to begin.
Number of digits
Choose enough digits for the number of the last frame (including any offset).
Start and Stop
These can be defined in SMPTE, frames or seconds, or ‘Set to Show Length’ for the whole length of the show.
Press OK to return to the main dialog.
Configure the Output
Resolution Templates
Multiple resolution templates can be added and named:
Channel Names
This is not local naming, but the names already assigned in the show. They may, however, be edited here.
Channels (to record)
Select the required job and use the checkboxes to select which channels are to be recorded for this job.
File Type
Choose your required format from the drop-down list:
Skip Existing
Skip any movie files already in that folder. If recording a large show in parts, use File Offset to resume numbering the frames at the right point each time and Skip Existing to avoid inadvertent frame duplication.
Filter Movies
With Filter Movies on, during recording, there is an additional filtering render pass performed (called MipMapping) which can improve the quality of the recorded imagery, especially if there is also a change in resolution such that the output recorded resolution is lower than the source material.
Force Patterns, Grid, Playback Statistics and Graph
Check this to ensure these diagnostic and alignment aids are turned off before recording.
Pack 7TH Files in 10
This should be left blank for an SSD based server, but for standard HDD based servers, this should be checked.
Record the Show
Pressing RECORD will start the server recording as configured above, the Recording button will go red and the record button on the main GUI is shown surrounded by red. You can press the timeline Stop control to stop recording or press the red RECORDING button:
![]()
Files output from this example
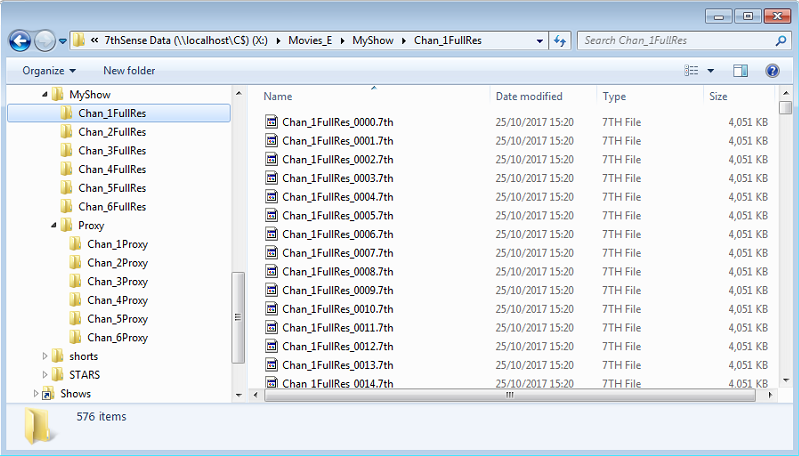
Note that for multiple channels, the frame is advanced, then all channels are saved to disk for that frame, before moving onto the next frame. |
➢See also: Carving Media for Dome Displays