
Delta implements simple edge blending, to allow overlapped display systems to be blended together, forming a single continuous display surface. By combining edge blending with warping, Delta can be aligned to any display system with no additional external hardware.

The Edge Blending page allows you to tune each blend (Left, Right, Top and Bottom) for position, softness, bow and keystone, as well as gamma and smoothness (s-correction). Blend Limits allow you to stop the blend at a hard edge part way through the image (used on some complex blends).
To edge blend a system, ensure softness on overlapping blends is the same, make the edges parallel, then tune the position and gamma to make a seamless blend.
A good blend is highly dependent on the fundamental display matching, so ensure the luminance and colour match between the adjacent display channels is as good as it can be.
A blend can be inverted (edit the resource on the timeline, Timeline tab), so the black part is in the middle of the channel, soft edges are outside this. This is used when blending insert channels which are blended to surrounding channels
•The Enabled button allows you to temporarily disable this group’s blending.
•The Softness button toggles between a hard edge or correct softness for this group so you can match up the two adjacent blends with a hard edge, then enable the softness to see the result. This is a temporary condition which is not saved to the file.
•If you put two blends (same channel) on the same frame, they will multiply together, so you can create complex blends using multiple blends.
•On the Mesh page of the resource editor (only available whilst in Mesh Mode), choose between normal Channel blending or apply the blend to the Source Texture from the Blend Target drop-down menu.

This is used to apply blending on the 3D model between different media and can be used in conjunction with other blends set to Channel mode for standard projector edge blending.
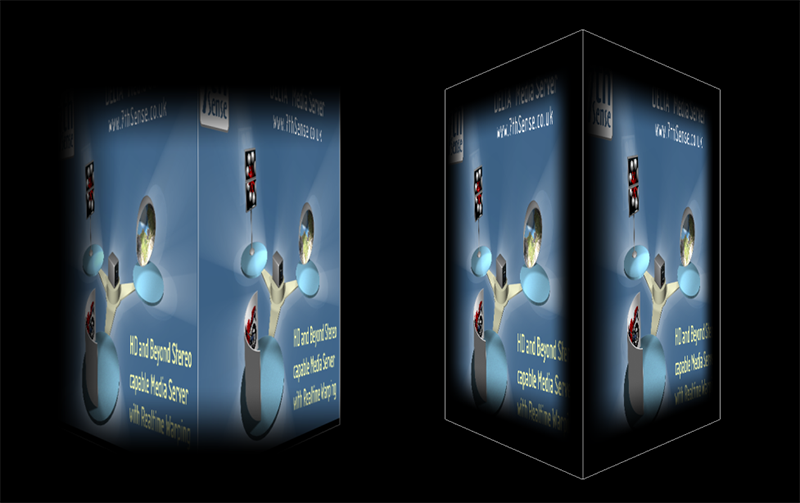
In the example below, blending has been applied to a cube mesh with 2 channels. The first image shows what happens when the blends are applied to the Channel, whilst the second image shows how blends are applied to the Source Texture 3D mesh.
For more information on Mesh Mode, including Mesh Editing functionality, see Display Configuration: Mesh Mode. |
•Blend resources can also have Fixed enabled – this will auto-reset the start frame of this geometry to frame 0. If Fixed is disabled, you can set the start frame as normal.