Open the Asset Management panel to view and organise timeline assets that have been ingested, and manually ingest new assets to required vaults.
This panel addresses the underlying database of ingested assets and metadata. Assets, singly or as groups, can be dragged from here directly onto timelines. The illustration below shows that some assets in the Root folder have been grouped (the icon showing how many assets are in the group) and some are also in three subfolders.

Movie sequences that have been sectioned and distributed, will automatically be ingested as a group with the movie name. Do not ungroup these.
The right hand panel can be dragged out and shows all the details, which are also available in the list view or by clicking on the grey buttons for more detail about distributed locations, tags or property information (as shown in the illustration above). The number in the first button here shows that the asset is currently only in one location.
To begin with, all available assets will be listed together in the Root folder. From here, assets can be filtered by type, searched by name, tagged for destination, grouped, and organised into collections in subfolders.From the top of the panel, the folders can be navigated: ‘Home’ is top level, the folders icon includes or excludes items in subfolders. The category buttons filter the list out by asset type, and the whole asset database contents can be searched.
At the bottom:
![]()
Assets removed from the Asset Management panel go to the Recycle bin. Hover this to see the option to empty it (i.e. delete the assets altogether).
You can refresh the list (and reorder it), and change the view (tabular list, or thumbnail grid) using the icons, bottom right, or the right-click context menu on any asset listed, to change the view. Use the slider control to zoom the asset details and thumbnails.
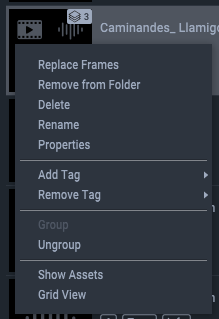
Assets have a right-click context menu that allows assets to be grouped and ungrouped, removed from folders, deleted, and tagged. An asset group – for example of sectioned media comprising a whole – can be addressed with this menu as a group or individually.
Tags
Tags are used for selective media distribution, for example sending sectioned media to respective servers (see Configure Asset Logistics for Remote Servers), or identifying associated assets for user-defined purposes.
Ingesting assets
The Asset Logistics app monitors the designated ‘Watch’ folder, ready to ingest new timeline assets placed there when called on. Select a system device on the lower left section and click the Ingest button. Once ingested, these assets become available to any device through the Asset Manager.
Viewing assets
Select the Root folder in the Asset Management panel and click the ‘Refresh’ button if freshly ingested media does not appear straight away. View the assets shown in the panel as list or grid (thumbnail) format by right clicking any asset and choosing your view.
Organising assets
Folders
There are two ‘special’ folders in Asset Management: ‘Root’ and ‘Recycle Bin’. These can be renamed if required, but retain the special roles of being respectively the sum of all ingested assets, and assets extracted ready for complete deletion.
Creating and naming folders or subfolders and populating them does not move any files. It only categorises the associated records with metadata to better organise them. The Root folder on an Actor device remains the central and secure repository for ingested assets, however grouped, or associated in other folders. Any Actor device (node in the system) locates the physical assets on other Actor devices via the common shared database.
Add subfolders
Subfolders can be added or removed at any time: right-click the parent folder and select ‘New subfolder’.
Rename folders
Folders and subfolders can be renamed at any time: right-click and select ‘Rename’.
Remove folders
Right-click a folder to remove it. This places the selected assets or folders in the Recycle folder. Content from here can be added back into the root folder, but cannot be added directly to the timeline.
Remove from folder
A subfolder can be removed from a folder without affecting its contents in any other way.
Grouping
Grouping allows assets that belong together in use to be handled as a unit. The actual files are not moved around, but are given an association in the database. When a group is dragged onto a timeline, the members are divided into layers, not least because they can be different asset types (e.g. video and multiple audio tracks). The exception is the ingested group of sectioned media, whereby each Actor recognises the asset name and plays its own version (section) of it, oblivious of the other section players.
Conditions:
•An asset can only belong in one group.
•Once in a group, only the whole group can be added to a timeline.
•To group assets, drag one onto another in the list, and a group is formed. Drag and add others in the same way onto the group header. Alternatively use Ctrl+click to make a selection, or Shift+click for a series, then right-click to ‘Group’.
•The number of assets in a group is then shown.
•Right-click a group to ‘Show assets’, i.e. expand the group. Right-click again to Hide, i.e. collapse the group.
•To ungroup, right-click the group header and select ‘Ungroup’.
•To join groups together, select both group headers and right-click to select ‘Group’.
•To split a group into two groups, select assets for one group, right-click and select ‘Split group’.
Deleting assets
Assets are deleted from the database permanently and the resource files deleted from the ingest folder, when they are deleted from the Recycle Bin.
Note: deleting very large assets can take a long time. If deleting to create disk space, check before adding new assets of similar size.