The Compere user interface is completely flexible. Panels can be resized, docked and nested however you want, or detached and floating, to work on multiple screens. They are docked in rows, columns or tabs (layered in the same space). Any item can be a docking space for others.
Any element of a workspace can be resized. When the whole space is resized, panels except for Project and Properties, resize proportionately. When more than one panel is in a row or column, they resize together.
Elements are positioned by dragging their title tabs.
•Click and drag a panel boundary to resize it.
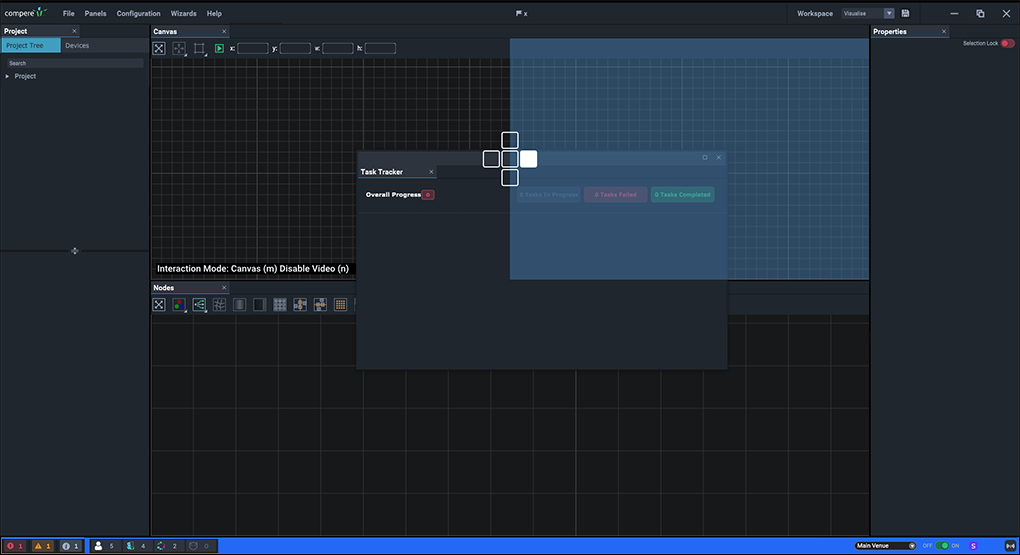
•Click and drag a panel title to rearrange it. Dragging will bring up a cross pattern of white squares showing the drop positions relative to the panel you are over.
•Panels can be arranged horizontally or vertically in these zones, or layered (centre square). As the panel title is dragged over the pattern, the squares light up, and where the panel will be docked is highlighted.
•Drag free of the squares (no highlight) to float a panel. Multiple floating panels can be docked together.
•Here the Task Tracker panel is being moved to dock to the right of the Canvas panel:
•Any panel can be closed, and redisplayed from the Panels menu item. If any panel is duplicated, these are just multiple instances, but can display different areas of the panel simultaneously. For example you may want to see different parts of a complex Project next to each other, or fill a separate display screen with a single assembly panel.
•Multiple Properties panels can be displayed but ‘locked’ to display for specific items.
•Menu Panels > Reset UI will restore the default fully-docked arrangement of panels to a default workspace relevant to either Juggler or to Visualise View.
•To save your own workspace to use again, use the top right toolbar:

•Assembly panel grids can be dragged around to reposition the view, and zoomed with the mouse wheel. The Visualise assembly panel grid operates in a 3D space and can be rotated about 3 axes.
General
•Resources can be added to assembly panels in several ways: by dragging from panel lists, selecting from context menus, using shortcut keys or selecting from dropdown lists.
•To remove items from assembly panels, right-click and select ‘Remove’. Note that ‘Remove’ is not ‘Delete’, and that removing leaves configuration of properties intact.
•To delete items from the Project altogether, select and delete them from the project tree (there is no undo).
•To edit the properties of any resource, first select it in the Project panel to list its properties in the Properties panel.
•To delete a link in the Juggler Nodes assembly panel, hover over an end point of the node and press Delete.
•Assembly panels have their own toolbars, and right-clicking between and on items will raise a context-specific menu.
