Delta can have multiple timelines, which are independent of each other within the same server. This allows you to create and present timeline 1 to the audience while editing timeline 2 in the background, then smoothly crossfade between the 2 timelines. You can also use other timelines for purely audio, or as control timelines for Serial Events.
Timelines are interleaved by opacity masks of their own. How timelines interact in terms of their opacity and layer precedence, is determined by the Timeline Mode, in the Timelines Dialog (Configure Timelines).
Reserve Timeline
This is an interactive mode such that when active, only those resources on the reserve timeline (not single-channel Delta Nano) are shown, and pressing the [R] button on the toolbar (or Ctrl+R, or through external control) fades between normal operation (current timelines shown) and Reserve Mode (Reserve timeline only shown).
This enables users with live events happening at unknown times (for example) to play a movie, then gracefully fade to a background image, move the timeline head to a new position (the audience still see the background image while this is happening), then start playing a new movie and gracefully fade up.
You can choose which active timeline is the Reserve timeline on the Timeline dialog (Ctrl+T), and set the fade time in Preferences > Misc Settings.
‘Out of the box’, there are two active timelines, 1, and 8 assigned as default [R]eserve. This is suitable for placing an image onto timeline 8 to which to fade, non-playing. Once you configure multiple timelines, your Reserve must be one of these, and can hold and play movie and audio resources. |
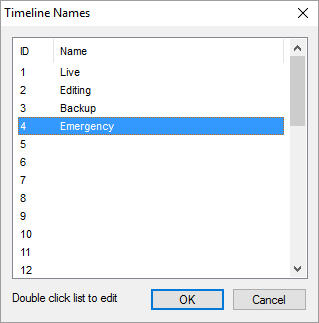
Timeline Names
Timelines are numbered 1 to 32, but you can name each timeline such that external control or sequences can use the named timeline:
Mediainsert type=image resourcename=white TL=Backup
instead of:
Mediainsert type=image resourcename=white TL=3
You can access the timeline names in DeltaGUI from the menu, View > Timeline Names.
This name will show to the left of the timeline dropdown, also above the slider for that timeline in the Timelines dialog and in the DeltaGUI title bar.

Note that timeline names are stored in the show XML, File > New will reset them to numbers only and they are not loaded with XDL files (as with other timeline parameters). |