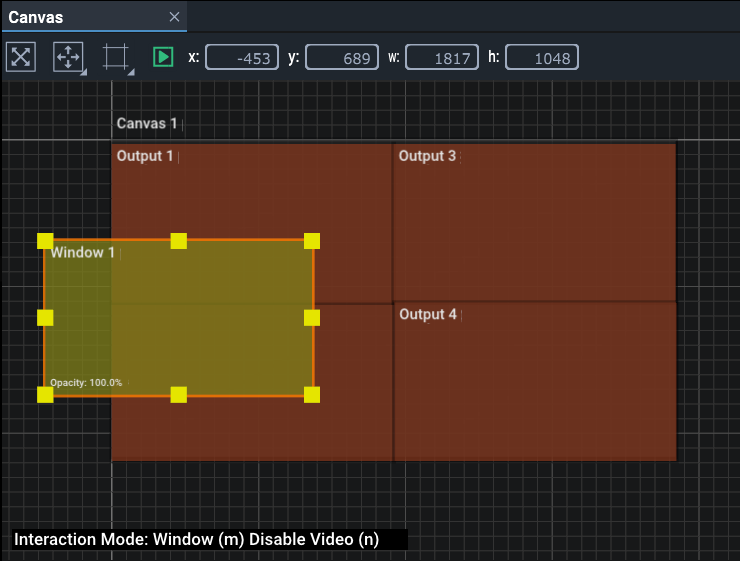
Having set up the output areas, you can now place input sources (media feeds) on them. The placed input source is called a Canvas Window and can be positioned and scaled anywhere in the Canvas area, on or off the Canvas itself.
•Drag a yellow Window from the Resources panel into the Canvas assembly panel:
As with the Canvas Output, an unassigned asset adopts a default resolution. The Canvas Window has been added as a branch to the Canvas in the Project panel. Select it there and its properties become available in the Properties panel.
Interaction Mode: Use the ‘m’ key toggle to ‘Window’, to enable dragging and also sizing of Windows. Select Windows in the Project panel as a branch to the Canvas.
If any window appears to be inaccessible for dragging and resizing, for example, obscured by other windows, select it by name in the Project panel and it comes into focus.
Position the Window anywhere in the Canvas assembly panel using Shift+left mouse. Add Alt+ to drag to snap to other edges. Its size reflects a media source sent to it, scaled as required, and is not bound by any Canvas Output dimensions.
When within the Canvas bounds, the area of a Window that overlaps an Output on the Canvas will be displayed/projected. Any part of the media feed to this Canvas Window that lies outside an Output will not be seen. In this way streaming feeds can be moved around, on or off the Canvas display dynamically, either by interacting directly in this Compere interface, or by External Control.
Resize a Canvas Window with the mouse using Shift+ the grab handles. Add Shift+Alt+ to snap to other object edges. Add Shift+Ctrl when sizing from a corner to maintain aspect ratio. Alternatively enter values in the Canvas toolbar or the Window properties.
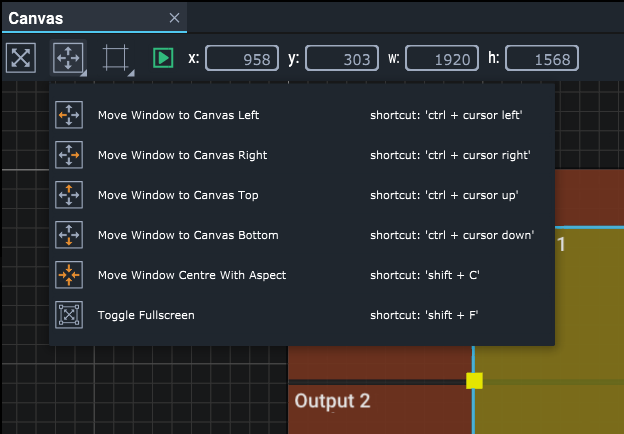
The other toolbar button is now active to move selected Canvas Windows around to common positions. Incremental ‘Move’ positions are also available in the right-click context menu for a Window. The Window can also be toggled to fill the Canvas and return to its set size. Shortcuts are listed in the toolbar menu.

Window Properties
Name
Name Canvas Windows logically and clearly for their position or purpose. Names can also be changed in the Project panel by double-clicking the name there.
Enabled
Media will only be processed through a Canvas Window when it is enabled. When this is unchecked, the Window object remains in the Canvas panel shown at 25% opacity. If you do not want a Window to display, and do not want to remove it, it can either be moved off the Canvas, or un-enabled.
Fullscreen
A toggle switch, to make this Window fit and fill the Canvas. Shift+F also has this function, which is on the Window’s Move toolbar menu.
Window > Position
X/Y, Width/Height
X and Y are the top-left co-ordinates in the Canvas. Set Height and Width. The input (media feed) will be scaled to this size. Unlike Canvas Outputs, nothing forces the size of a Canvas Window. Like position, resizing can be performed dynamically and by External Control.
Window Layering (z-order)
The Canvas property ‘Modify Layers’ allows selection of any single Canvas Window to be brought to the top (front). Use this to achieve the correct layering of Windows and then fix the layering by unchecking the Canvas ‘Modify Layers’ property.
Page edited [d/m/y]: 26/09/2022
