Fitting the Mesh
If, having positioned six calibration points, the whole projected grid is very wrong, this could be either due to poor distribution of points or a mistaken vertex between the mesh and real life (perhaps behind the one you think it is).
•Try switching off individual calibration points in case one in particular is bad.
•Try adding one further point, perhaps where the projected grid is most out of position.
•Check the Lens Modes in the 3D Projector Calibration panel. Are you using the recommended defaults? Try unchecking and checking Fixed Aspect, Zero Tangential, and K6, K5, K4 for best improvement.
•Discrepancies between the mesh and the real life surface can also be corrected for by editing points on the mesh.
Fitting the Media
Delta works out how the projectors fit the model to reality. If the media designer has worked from the same model and scale, and rendered it correctly, and you have compensated for irregularities in the real-life canvas, then the single crucial error may be setting the eyepoint position in Delta, so check this carefully first.
•If the eyepoint is correct, some warping of the canvas may be appropriate. Add a flat geometry to the background layer, assign the channel in the Resource Editor, and use channel point distortion warp (see this section under Display Configuration, in the Delta User Guide).
•If the overall correction required seems geometric, try warping the mesh as a whole (see Warping in Mesh Mode).
•If the mesh and media correspond and the required adjustment is small, then the media can also be surface warped into a better fit. Place a flat geometry on the timeline in the same layer as your media. Go to Warp and ease the media into place. Remember that Surface Warp has two different interpolation methods. Spline method moves points in smooth arcs, warping a greater area than the linear method, which moves the point(s) in straight lines, within its own area, without affecting the rest of the image. The H+, H-, V+ and V- buttons increase the grid density (click then ‘Apply’ or Enter), which affects the area of warping.

For more guidance on surface warp, see this section under Display Configuration, in the Delta User Guide.
Mesh is Clipped or not Showing on Playback
If on playback (projected, displayed or in the Playback window) you either cannot see all your mesh, or cannot see it at all, it could be out of range of the DeltaServer clipping plane settings. This could occur for very large or distant meshes, which you would not notice in DeltaGUI whose clipping planes are separate.
The DeltaServer far clipping plane is held in a Registry key and can be adjusted.
Registry Edits |
7thSense software uses the Windows Registry extensively, and on occasion we make recommendations for changes. •Before making any changes, close DeltaGUI and DeltaServer. •DeltaServer can take up to 10 seconds to fully close in the background, even if it appears that all the Windows have closed. Ensure that Delta has fully closed before opening and/or refreshing, and finally editing. The best way to ensure this, is to watch Windows Task Manager > Details list. You will see ‘DeltaServer.exe’ in this list if DeltaServer is still running. If it won’t close for any reason, you can right click on it in the list and choose ‘End Process Tree’. •Make a note of any setting before you change it, in case you want to change it back. •Only make the changes as recommended and only to those registry keys. |
Go to Windows search > regedit > Computer\HKEY_LOCAL_MACHINE\SOFTWARE\7thSense\Delta\Graphics and find FarClip. The default is 10000 and can be increased as required.
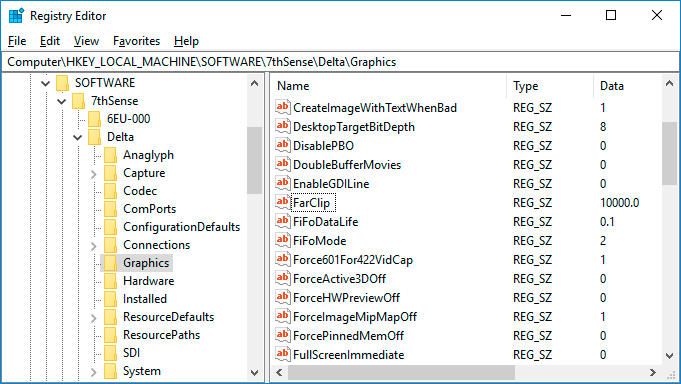
Note that the far clip should be set to just beyond the model limits to preserve rendering precision in the 0 – FarClip range.
Page edited [d/m/y]: 01/03/2023