File
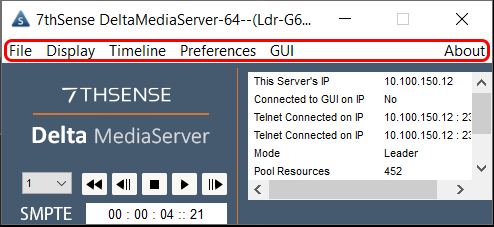
From this menu, you can Load or Save a Delta file, clear the timeline (File > New), exit the application (File > Exit).
Display
Toggle the Playback Window between full screen and windowed, using the View menu.
Timeline
Jump to a specific frame using the Timeline > Jump to Frame menu.
Preferences > System

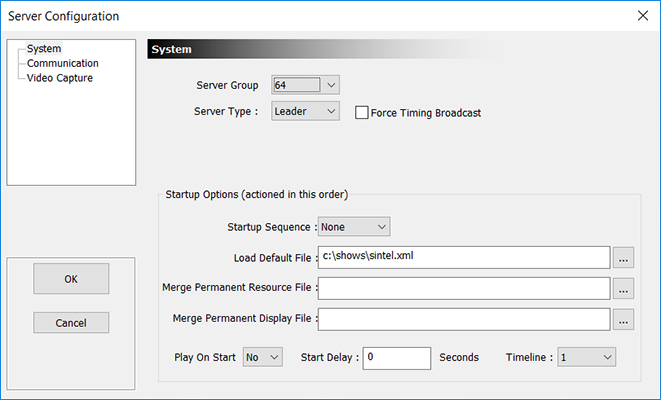
This simple dialog allows you to set basic server parameters such as:
Server Group
which group this server belongs to (1-64)
Server Type
Leader or Follower
Force Timing Broadcast
By default, timing packets are not broadcast if no Follower servers are detected in this group (in order to lower network traffic). Enable this option to always force timing packets to be broadcast in case other equipment depends on that timing.
Startup Options (actioned in this order)
Startup Sequence
This sequence will be run on boot.
Load Default File
a full path to the default Delta show
Merge Permanent Resource File
a full path to the Delta show that will be merged after loading the main show (for masks etc.)
Merge Permanent Display File
Set an XDL file to be loaded after any file load (see display configuration files -xdl files).
Play On Start
If Yes, the Default file will be played when Delta starts, after the main show is loaded, before it starts playing.
Start Delay: the seconds to wait before loading the default show
Timeline
which timeline to play on start
Note: Start Delay Since Delta can play a show immediately after the PC boots, having a delay before Delta loads and plays the default show allows the various Windows boot procedures to finish using any network, CPU or disk resources that could interfere with Delta’s playback, for example to receive a valid IP address if using DHCP from a network device. It is recommended to set Follower Delta servers to a delay of at around 20 seconds, and a Leader Delta server to 30 seconds to ensure the Follower servers are ready to play as a group. |
Preferences > Communication

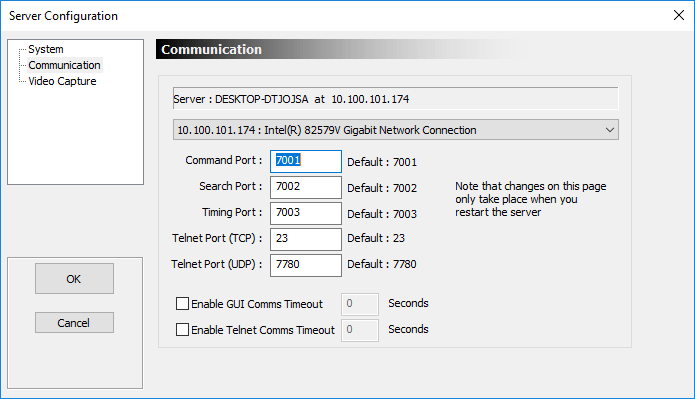
•Set the ports for DeltaGUI / Server comms. Leave as default unless there are specific network restrictions, so that a default installation of DeltaGUI will find the server. If non-default ports are used, configure any DeltaGUI applications to also use these ports.
•Choose which Ethernet adapter to use and what ports.
•Set optional DeltaGUI and Telnet timeout in seconds – use this if there is a possibility of the network being removed so that the DeltaGUI can reconnect.
Preferences > Video Capture

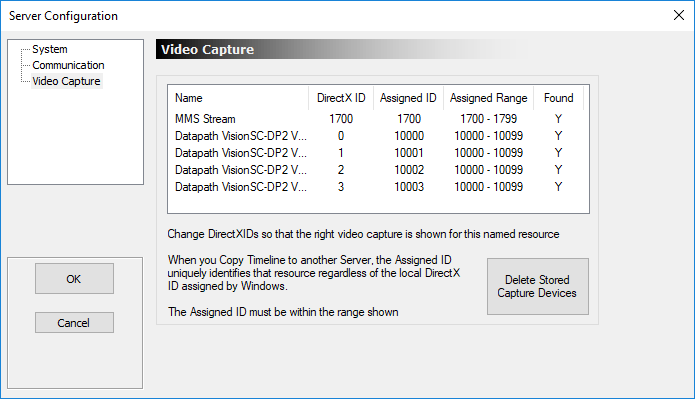
This page lists any capture devices found and their assigned IDs which map physical input connectors to the resource on the timeline.
Normally, this list is populated automatically and needs no interaction, but if, for example, you would like to swap the IDs around on a multiple input card, you can edit the Assigned ID for each card here – this will be remembered in the registry next time the server application starts.
Note: do not allow two devices to have the same Assigned ID. |
Delete Stored Capture Devices – press this button to remove all capture devices and enumerate them again. Note this loses any previously edited Assigned IDs and is usually only used if a capture device has been removed physically from the server, but the driver has not been removed properly – this process attempts to find only real hardware.
GUI
Close DeltaGUI (wherever it is open) from this server.
About
About Server
DeltaServer software and licensing details.
Shortcut Keys
See Appendix E: Shortcut Keys
Command Line Switches
See Appendix F: Command Line Switches
Update Licence
See Appendix B: Licensing the Server
Save System Log
See System Diagnostic Logs
Show External Control Traffic
See Troubleshooting External Control
Page edited [d/m/y]: 01/04/2021
