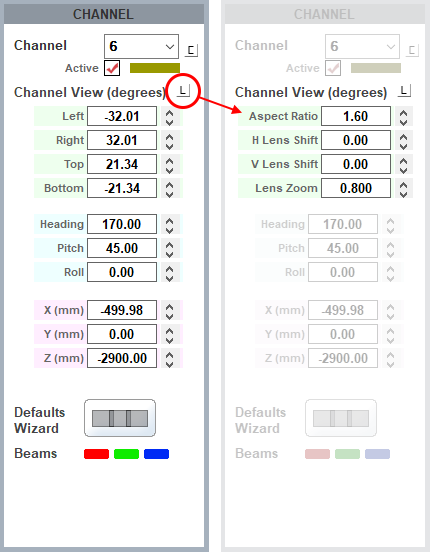
Set the number of active channels (projectors). Using either or both the default wizard and the channel dimensions settings, you will define the rectangular area of the dome covered by each channel. The centre of this area is given a (horizontal) heading, (vertical) pitch, and (rotational) roll. Its width is defined by left and right angles, and height by top and bottom angles.
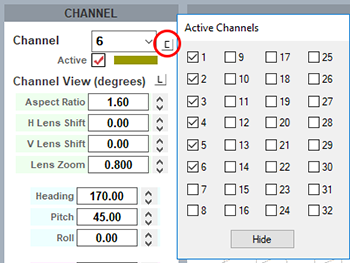
Click the C button to define active channels. This example will be for 5 surrounding channels and a cap channel.
Channel Sizing (Default Wizard)
Delta will distribute channels automatically, from where all channels can be adjusted manually. Press the Defaults Wizard button to view the configuration dialog:
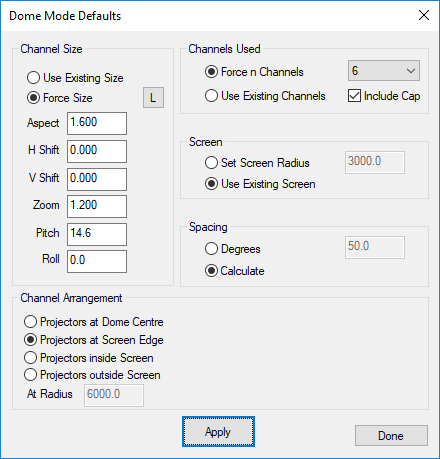
The Dome Mode Defaults dialog can place projectors around the dome interactively, so you can design the projector coverage to allow sufficient overlap for blending, or note where projectors have to be placed due to lens restrictions etc.
Force Size
choose Force Size to force the dialog’s channel values into the server, or Use Existing Size to leave them unchanged.
Aspect
Alter this to the aspect ratio of the projector’s output video format, so for example, 1920/ 1080 = 1.777, or 1920 / 1200 = 1.6
HShift / VShift
Alter these values to match the known projector lens shift, so for example if the projector has no lens shift (image is dead center in the lens), leave these at 0, but if the projector has an inherent 100% lens offset vertically, enter 100 to VShift, 0 for HShift.
Zoom
This value should match the projector’s lens zoom value (0.8 = wide angle, 1.2 - 1.6 = standard type zoom, 2-4 = long lens).
Pitch
Alter this value to pitch the projectors up to fill the dome. A typical projector arrangement is to have projectors located on the dome springline (horizon), so they need to pitch up to fill the dome.
Roll
Alter this value to match the projector roll angle if any, or for example set to 90 if the projector is in portrait mode.
Channel Arrangement
Projectors at dome centre
choose this if they are all at dome centre, facing out to the dome surface (unusual).
Projectors at screen edge
choose this if they are all at the screen edge, crossfiring to the dome surface (typical).
Projectors inside screen
choose this if they are all within the dome, crossfiring to the dome surface, you can set a separate radius from dome centre where the projectors are located.
Projectors outside screen
choose this if they are all outside the dome, firing on the outside of the dome surface, you can set a separate radius from dome centre where the projectors are located. Note in interactive mode on the server, content is only shown on the outside of the dome surface.
Channels Used
Force n channels
or leave as-is
Include Cap
will make the last channel point up at the dome pole, from near to where channel 1 is located, and also choose a wider Zoom for that one channel so it covers more of the cap.
Screen
Set Screen Radius
Force a radius in mm or leave as-is
Spacing
Set the spacing angle in degrees, or set to Calculate (default) to allow DeltaGUI to move projectors to equally spaced around the dome.
Channel Size (manual adjustment)
It may be necessary to make adjustments, or direct settings for a partial dome (see the example of a panoramic dome section, below).
Set or adjust the dimensions for each channel or use the L button to use lens characteristics instead of angular dimensions: