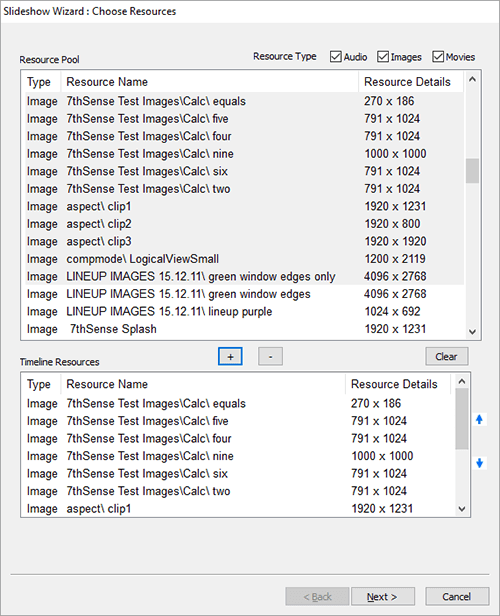
This DeltaGUI wizard can help setup a quick slideshow (chain) of audio, images or movies (Wizards > Create Slideshow).
From the initial dialog, choose one or more audio files, images or movies (optionally filter the type using the check boxes in the top right), then click the add (+) button to add them to the list. If you hold Control down while clicking, you can select multiple resources before adding, hold Shift down to select multiple from the first selected resource.
Once in the lower Timeline Resources area, you can select them and remove (again with Control or Shift) by clicking the subtract (–) button. If you want to re arrange the order, select one resource, then click the up or down arrows in the right side to move.
Once the list is complete, press the Next button to move onto the options page.
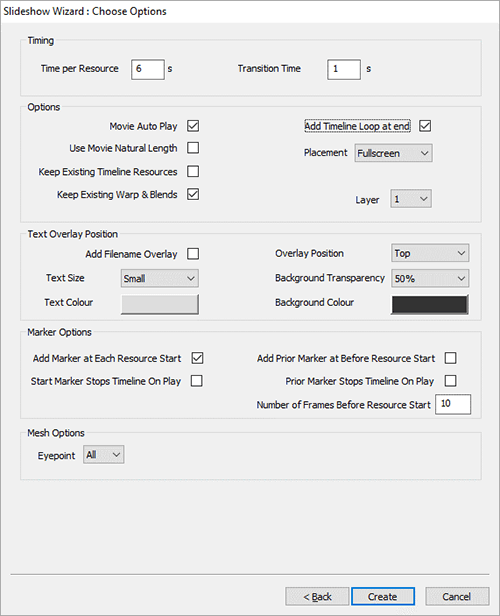
On this page, select the various options as described below and press Create. The result will be inserted into the requested layer, with each ‘slide’ being automatically faded up and down in turn. These remain separable resources, whose properties can be adjusted – or disrupted if treated casually.
Once the slideshow is created, save it as any other show to a new name.
 Timing
Time per Resource
Defaults to 6s, choose this for the amount of time a resource is visible.
Transition Time
Defaults to 1 s, choose this for the amount of time crossfading. For no cross-fading, set to 0.
|
 Options
Movie Auto Play
Turn on autoplay for all movies in the slideshow.
Add Timeline Loop at End
Add a loop at the end of the slideshow so when playing, it loops and restarts.
Use Movie Natural Length
Instead of the Time per Resource value (default 6s), use the movie’s native length.
Keep Existing Timeline resources
Disabled : Delete existing (non-background) content, then insert all slideshow resources starting at frame 0.
Enabled : Do not delete existing resource on the timeline before creating the new slideshow. The slideshow contents will be inserted from the current timecode onwards, so you can build part of a slideshow in one session, move the current timecode, and choose different resources to insert at the new position, without disturbing the previous contents.
Placement
Fullscreen makes each resource fill the whole canvas
Fit Canvas will maintain the aspect ratio of the media, fitting the height or width to the whole canvas as required.
|
 Text Overlay Position
Add Filename Overlay
When enabled, use the parameters in this area to show a text overlay of the current resource filename with a coloured bar behind it for clarity.
Text Size
V Small, Small, Medium or Large for the text overlay text size.
Text Colour
Colour of the text overlay.
Overlay position
Top or Bottom of the canvas..
Background Transparency
off (no bar), 25, 50, 75% and Opaque for the bar behind the overlay text.
Background Colour
colour of the bar behind the overlay text
|
 Marker Options
Add Marker at Each Resource Start
Places a marker at the start frame of each resource, named "Slide1", "Slide2" etc.
Start Marker Stops Timeline On Play
If enabled, each marker has the Playing Action set to Stop so that playing into each marker stops the timeline.
Add Prior Marker Before Resource Start
Add another marker before the resource start – the Number of Frames Before Resource Start box is used here. This is used if a customer wants to skip to just before the next item in the slideshow by using the Ctrl+Arrow keys in DeltaGUI.
Prior Marker Stops Timeline on Play
If enabled, Prior marker has the Playing Action set to Stop so that playing into it stops the timeline.
|
 Mesh Options
Eye-point
Choose which eye-point to place the slideshow resources on when in Mesh Mode.
Create
Press this to create the slideshow.
|

