| Name: | Medialon Script |
| Version: | 6.7.2 |
| Available for: | Manager V7 and Manager V6 (Lite & Pro), Showmaster (ST, Pro, LE, XS) |
| Limitation In: | |
| Device Brand: | |
| Positrack Compatible: | No |
| Resources type: | TCP/IP Network, UDP/IP Network, Serial, DMX, I/O |
Overview
The Medialon Script MxM allows executing JavaScript code inside a Medialon Manager project. The JavaScript code can access, modify and control devices, tasks, variables and UserScreen objects of the running project.
This MXM is also able to support different types of communication like:
- TCP/IP Client
- UDP Client-Server
- HTTP Client
Some resources available in the project can be used directly by a Script device. Below the list of supported resources:
- Serial
- DMX
- I/O
This Javascript code can be provided as a Script custom Driver in order to be used easily by everyone.
Otherwise, Medialon programmers who wish to go beyond the programming features provided by the integrated Medialon environnement can create their own Script Driver including a set of commands and device variables.
JavaScript is a very popular and widely used scripting language and it is relatively easy to learn. There are many online resources, tutorials and example source codes available for both beginners and advanced programmers.
The range of applications of this MxM is endless and is up to the imagination and skills of the programmer. The Medialon Script MxM particulary shines where there is a large quantity of objects to manage as it can avoid writing and maintening hundreds of tasks. It is also good at performing complex algorithms quickly in one cue as opposed to executing a lot of StepBased tasks cues. Here are some application examples:
- simple conversion routines
- data parsing
- array like operations
- management of lot of objects (graphic objects, devices, etc.)
- complex algorithms which would otherwise require lots of StepBased cues
- scheduling and playlists
- communication protocols
- resources manager
By default, the JavaScript code of a device is edited in the Device Setup dialog box and is saved in the Medialon project. But an interesting feature of the MxM is that it allows loading a new script at run time, that is, while the Medialon project is in Run or Debug mode. This opens the possibility to change the whole behavior or logic of a project by simply updating the script file without modifying the project itself. Even better, the JavaScript code can be modified directly in the Device Control Panel at run-time which is handy for debugging the script.
The MxM also allows creating Device System Variables. This can greatly simplify the implementation and the maintenance of projects using such devices as the devices are “self-contained” and embed both variables and code.
In addition to that, the programmer can write its own set of commands, adjust their parameters types and their definition and even be able to add wizards.
The implementation details of the JavaScript code is fully detailed in the Script Implementation Guidelines section.
To help programmers, a Debugger can be enabled to debug the script during the running mode.
MxM Installation
Execute vcredist_x86.exe, which is the Microsoft Visual C++ 2008 Redistributable Package (x86), in order to insall the runtime components of Visual C++ Libraries required by the MXM Medialon Script.
Script Driver
A Script Driver is just a .js file which contains javascript code formatted with the Medialon Script implementation.
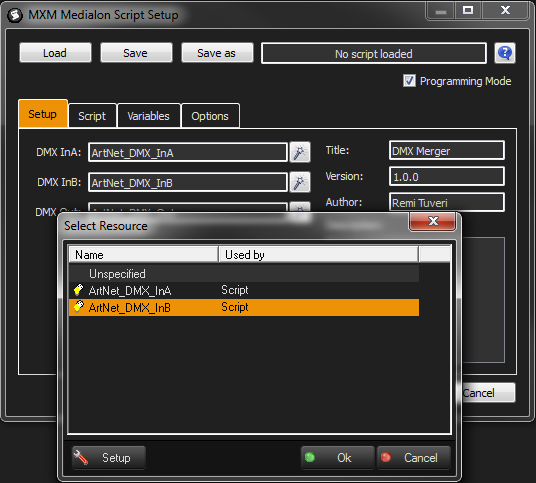
During the creation of a Scrip Device, the Setup dialog box allows the user to load a Script file. By clicking on the Load button another dialog box is displayed and provides an easy way to select a Script Driver from the Script library.
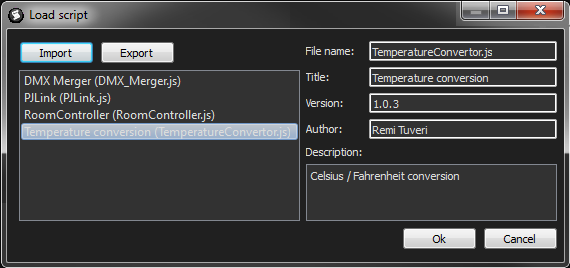
This Script library is located to the sub-folder \Medialon\Scripts\ of the Common Documents directory of the Windows, typically in C:\Documents and Settings\All Users\Documents\Medialon\Scripts.
It is possible to Import or Export script files to/from this folder.
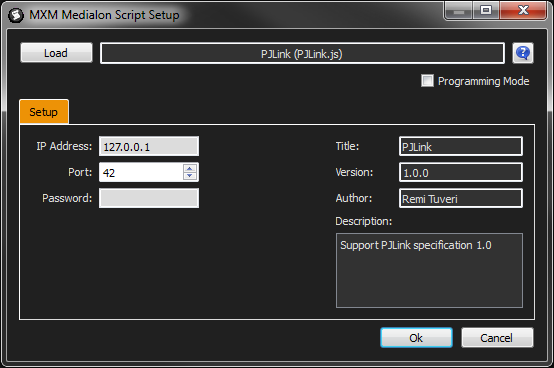
Once the Script has been selected, its name and others information such as its version, its description appear in the Setup dialog box. And if the script itself has a custom Setup, this one will be display in order to allow the user to enter Setup information like an IP address, select a resource…
Script Implementation Guidelines
Overview
Writing and understanding JavaScript code requires a minimal knowledge of the Javacript syntax. There are numerous JavaScript resources available on the Internet. The following sections are not intended to teach JavaScript but rather to help a moderately skilled JavaScript programmer setting up a script for use in the context of the Medialon Script MxM.
Basically, the script code in a Medialon Script device can:
- expose functions which can be called via the “Execute Function” device command. See Functions.
- expose device variables which can be accessed by the Medialon project cues. see Device Variables.
- access Medialon project variables for reading or writing. See The QMedialon Object.
- execute commands on the Medialon project objects via the QMedialon object. See The QMedialon Object.
- and, internally, execute any JavaScript compliant code
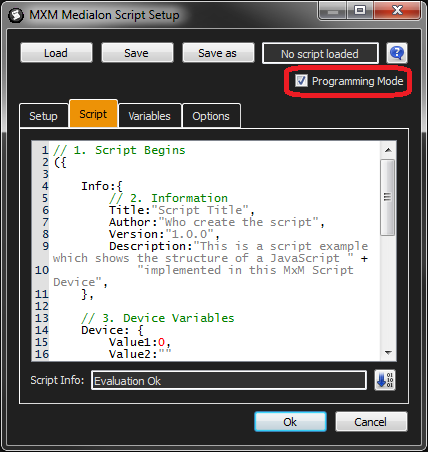
To access to the Script area, the checkbox named ‘Programming Mode’ in the Setup should be checked.
This section starts by exploring few script examples then goes into a more formal description of Medialon Script codes. Those who prefer formal descriptions can skip the following section an go straight to Script Structure.
Examples
Hello World Example
The following (over simplified) example is a script which sets the device “Greeter” variable to “Hello World!”. Not very useful but is shows the basics of the Medialon Script scripting.
({
    Device: { Message:"" },
    SayHello: function() { this.Device.Message="Hello World!"; }
})
The
({specifies the beginning of the script.The
var Device { Message:"" };line declares a device variable namedMessage. This variable can be accessed by a Medialon cue withGreeter.Message.The
SayHello: function() { this.Device.Message="Hello World!"; };line declares a function which puts “Hello World” in the deviceMessagevariable. Note the usage of thethiskeyword which tells the JavaScript interpreter that we’re talking about the object defined in the script.The
)}specifies the end of the script.
A Medialon project can use the above script as in the following task:
Line    Device      Command
----    ------      -------
1       Greeter     Execute Function("SayHello")
2       Manager     Expression("TextDisplay.Text=Greeter.Message")
Value Smoother Example
The next example is a little bit more elaborate: the purpose of this script is to compute the average value of the last 10 samples of a rapidly changing slider in order to “smooth” the value sent to a physical device (in our case: another slider). Note that lines beginning with “//” are JavaScript comments.
// script begins
({
    // Here are the device variables which can be automatically extracted
    // in the Device Setup Dialog
    Device: {
        Raw:0,
        Smooth:0
    },

    // Below is a local JavaScript "samples" array
    samples: [],

    // The "Init" script function clears the "samples" array
    Init: function() {
        this.samples=[];
    },

    // The main "Process" script function queues the new device input "Raw" value
    // in the samples array (making sure there are no more than 10 samples),
    // computes the average value of the samples and updates the
    // "Smooth" device variable.
    Process: function() {
        if(this.samples.length>=10){
            this.samples.shift();
        }
        this.samples.push(this.Device.Raw);
        var avg=0;
        var i=0;
        while(i<this.samples.length){
            avg=avg+this.samples[i];
            i=i+1;
        }
        avg=avg/this.samples.length;
        this.Device.Smooth=avg;
    },

// script ends
})
Let’s say the Medialon Script device is called “Smoothie”. A Medialon project would first initialise the script in a startup task:
Line    Device      Command
----    ------      -------
1       Smoothie    Execute Function("Init")
A continuously looping task would then call the “Process” script function regularly
Line    Device      Command
----    ------      -------
1       Manager     Expresssion(Smoothie.Raw=SliderRaw.Status)
2       Smoothie    Execute Function("Process")
3       Manager     Expression(SliderSmooth.Status=Smoothie.Smooth)
4       Manager     Wait(00:00:00/25)
5       Manager     GoToLine(,1)
Example 3: processing a large number of sensors
The previous example if nice but it could also be implemented with a regular Medialon programming using enums and expressions. So what is the advantage of using a script? It quickly shows when there are multiple values to process. Let’s say there are 20 sliders to “smooth”…
The following script takes care of updating 20 sliders. Note that this example uses the powerful “QMedialon” object which is described in the QMedialon Object section.
// script begins
({
    // Below is a local JavaScript "samples" array
    // Each entry of this array is an array of samples
    sliderCount: 10,
    sampleCount: 25,
    sampleArrays: [],

    // The "Init" script function clears the "samples" array
    Init: function() {
        for(var i=0;i<this.sliderCount;i++){
            this.sampleArrays[i] = [];
        }
    },

    // The "Process" function processes all of the sliders
    Process: function() {
        // for each slider
        for(var slider=0;slider<this.sliderCount;slider++){

            // Make sure that this slider sample queue is not full
            var samples=this.sampleArrays[slider];
            if(samples.length>=this.sampleCount){
                samples.shift();
            }

            // Push the "raw" value for this slider
            var value=QMedialon.GetValueAsInteger("SliderRaw"+(slider+1)+".Status");
            samples.push(value);

            // Compute the average value for this slider
            var avg=0;
            for( var i=0;i<samples.length;i++){
                avg=avg+samples[i];
            }
            avg=avg/samples.length;

            // Update the "smooth" slider
            QMedialon.SetValue("SliderSmooth"+(slider+1)+".Status", avg);
        }
    },
// script ends
})
Here’s the “Startup” task:
Line    Device      Command
----    ------      -------
1       Smoothie    Execute Function("Init")
And here’s the “Looping” task:
Line    Device      Command
----    ------      -------
1       Smoothie    Execute Function("Process")
2       Manager     Wait(00:00:00/05)
3       Manager     GoToLine(,1)
Advantages of using this script compared to writing pure Medialon programming tasks and cues:
- There are only 2 Medialon tasks to write (not several hundreds).
- The Medialon programming is really simplified and much more maintenable.
- The graphic updates are fast.
- The whole script can be imported in another project with similar requirements and tweaked in a matter of minutes.
Script Execution Flow
A function of a script is called when the Medialon Script device “Execute Function” command is executed (either from a task, the Command Lister):
- The script engine of the Medialon Script device is started.
- The “Status” variable of the Medialon Script device goes to “Executing”.
- The “Execute Function” command returns control to the caling task.
- The script engines executes the JavaScript statements of the script function. Note that all of the device JavaScript variable and object values are kept.
- The script function ends and the “Status” variable of the device goes to “Ready”.
If an “Execute Function” command is triggered while the script engine is busy (device variable “Status” is “busy”) executing a script function. The “Execute Function” request is queued and will be executed when the current script function is done.
Script Structure
The script code should follow the JavaScript syntax. All of the code must be wrapped in a JavaScript object.
The script structure is:
- script beginning
- Information (optional)
- device variable declaration (optional)
- local script variables (optional)
- script functions (at least one function)
- script end
Example:
// 1. Script Begins
({

    Info:{
        // 2. Information
        Title:"Script Title",
        Author:"Who create the script",
        Version:"1.0.0",
        Description:"This is a script example which shows the structure of a JavaScript " +
            "implemented in this MxM Script Device",
    },

    // 3. Device Variables
    Device: {
        Value1:0,
        Value2:""
    },

    // 4. Local Script Variables
    localCount: 0,

    // 5. Script Functions
    _mStart: function() {
        //initializing
        this.localCount=4;
    },

    _mStop: function() {
        //de-initializing
    },

    Test: function() {
        this.Device.Value2 = this.Device.Value1 + this.localCount;
    }

// 6. Script Ends
})
Note that all script Device variables and local variables must be referenced by the this keyword as shown in the “Test” function.
Information
The Info section is the place to describe metadata concerning the script like its Title, the Author, its Version and a Description. These fields are optional. Even if they are not set, their Setup area is still displayed.
Info:{
    Title:"Script Title",
    Author:"Who create the script",
    Version:"1.0.0",
    Description:"This is a script example which shows the structure of a JavaScript " +
        "implemented in this MxM Script Device",
}

Device variables
Base
A special “Device” object must be declared in order to define Device variables. This object can be ommitted if there’s no device variable. This object is parsed when the Device Setup Dialog is validated. The Medialon Script MxM variable extractor automatically populates the Medialon Script device variables according to the JavaScript variables declared in this section. The name of a Device Variable should be unique, otherwise the last defined Variable will be the one considered.
Device: {
    aDeviceVariable: ""
},
The Medialon Script MxM variable extractor uses the variable declaration as a hint for the type of the variable. For example, if the variable is initialized with a string, the variable will be a String variable once extracted from the script.
It is also possible to define a variable as a Real or as a Integer in this section.
Device: {
    myIntegerVariable: 182,
    myStringVariable: "hello world",
    myRealVariable: 10.05
}
Once declared, Device Variables can be accessed by the JavaScript code using the this.Device prefix.
// declaration:
Device: {
    myDeviceVariable: ""
},

// usage:
Test: function() { this.Device.aDeviceVariable="Hello!"; }
Advanced
A Device variable can be casted in another type of variable as an Enum, a Time or a Date just by adding an ‘Info’ object containing a ‘Variables’ object and few information. The extractor will automatically try to associate the sub-objects from this ‘Variables’ object to the Device variables defined into the ‘Device’ object.
Info: {
    Variables: {
        myEnumVariable: {
            Type:"Enum",
            Items:[ "Item 1", "Item 2", "Item 3", "Item 4" ]
        },
        myTimeVariable: {
            Type:"Time"
        },
        myDateVariable: {
            Type:"Date"
        }
    }
},

Device: {
    myEnumVariable:"",
    myTimeVariable:"",
    myDateVariable:""
}
Depending of the Type, specific properties can be added to Device Variables via the ‘Variables’ object.
String:
- MaxLength: [integer] Max length of the string. By default this value is set to –1 which means that there is no limit.
Integer:
- MinValue: [integer] Min value
- MaxValue: [integer] Max value
Real:
- MinValue: [integer / real] Min value
- MaxValue: [integer / real] Max value
- Precision: [integer] The number of digit after decimal point
Time:
- TimeCodeType: [integer] Timecode type. Without this property, the timecode type is by default set to 4 (Time base is 1/100s).
- 0: 24 frames per second
- 1: 25 frames per second
- 2: 30 frames per second (No dop frame)
- 3: 30 frames per second (dop frame, ie 29.97 fps)
- 4: Time base is 1/100s
- 5: Time base is 1/1000s
Enum:
- Items: [array] list of items
Info: {
    Variables: {
        myStringVariable: {
            MaxLength:10
        },
        myIntegerVariable: {
            MinValue:0,
            MaxValue:100
        },
        myRealVariable: {
            MinValue:-1.5,
            MaxValue:1.5,
            Precision:2
        },
        myEnumVariable: {
            Type:"Enum",
            Items:[ "Item 1", "Item 2", "Item 3", "Item 4" ]
        },
        myTimeVariable: {
            Type:"Time",
            TimeCodeType:1
        }
    }
},

Device: {
    myStringVariable: "hello world",
    myIntegerVariable:50,
    myRealVariable:-0.25,
    myEnumVariable:"Item 2",
    myTimeVariable:100
}
Default Value vs Script Default Value
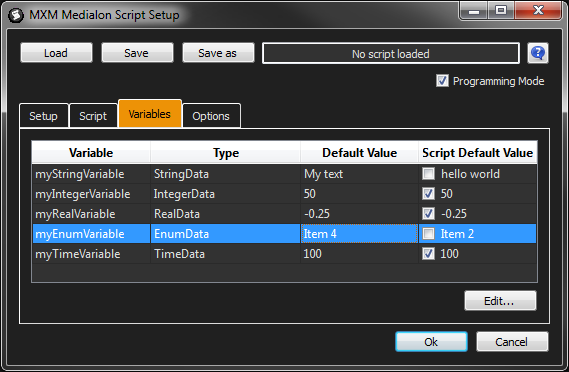
From the Setup dialog box, in the ‘Variables tab’, it is possible to choose if the default value of a Device variable is the one which is defined into the script or another one.
This can be useful when the script is loaded in different Devices.
The default value or the script default value will applied to the Device variable when the project is loaded.
Local Script Variables
Local variables are simple JavaScript variables which are not accessible from the Medialon project side. Once declared, the local variables can be accessed by the JavaScript code with the this keyword prefix.
// declaration
aLocalVariable: 2,

// usage
Test function() { this.aLocalVariable=2; }
Setup
The Setup Tab is fully customisable with different widgets in order to provide a Setup box easy to use for the end user.
Base
A special “Setup” object must be declared to start to fill the Setup Tab with widgets. It is not mandatory to define this object if the Setup Tab must stay empty. This object is parsed each time that the Setup Tab is displayed.
The “Setup” object contains the declaration of local variables. Depending of their types, these variable will be automatically associated to an adapted widget:
Setup: {
    myStringSetupVar: "hello world",
    myIntegerSetupVar: 50,
    myRealSetupVar: 1.5
}
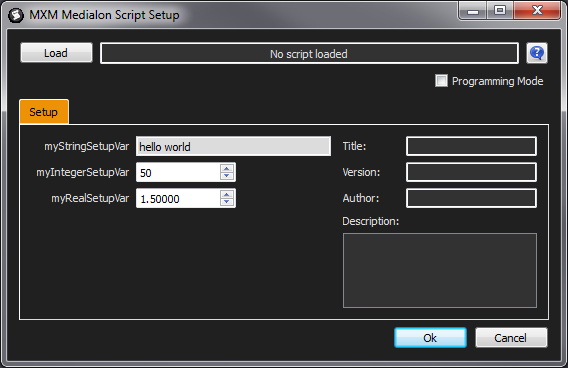
By default, the association between type of local variable and widget type is:
- String: LineEdit
- Integer: SpinBox
- Real: RealSpinBox
- Enum: ComboBox
- Time: TimeEdit
- Date: DateEdit
Advanced
Based on the same concept than the “Device” object, it is possible to cast a Setup local variable in another type of variable as an Enum, a Time or a Date just by adding an ‘Info’ object containing a ‘Setup’ object and few information.
Info:{
    Setup:{
        myDateSetupVar:{
            Type:"Date",
            //Widget:"DateEdit", //already set as default for a Date
            Name:"My Date"
        },
        myTimeSetupVar:{
            Type:"Time",
            //Widget:"TimeEdit", //already set as default for a Time
            TimeCodeType:2,
            Name:"My Time"
        },
        myComboBox:{
            Type:"Enum",
            Items:[ "Item1", "Item2", "Item3", "Item4", "Item5", "Item6", "Item7", "Item8" ],
            //Widget:"ComboBox", //already set as default for an Enum
            Name:"My ComboBox"
        },
        myStringSetupVar:{
            //Widget:"LineEdit", //already set as default for a String
            MaxLength:10,
            Width:100,
            Name:"My LineEdit"
        },
        myIntegerSetupVar:{
            //Widget:"SpinBox", //already set as default for an Integer
            MinValue:-100,
            MaxValue:100,
            Prefix:"$",
            Name:"My SpinBox"
        },
        myRealSetupVar:{
            //Widget:"RealSpinBox", //already set as default for a Real
            MinValue:-1.5,
            MaxValue:1.5,
            Precision:1,
            Suffix:"°C",
            Name:"My Real SpinBox"
        },
        myCheckBox:{
            Widget:"CheckBox",
            Name:"My CheckBox"
        },
        myLabel:{
            Widget:"Label"
        },
        myDivider:{
            Widget:"Divider"
        }
    }
},

Setup:{
    myLabel:"This is a Label",
    myStringSetupVar: "hello world",
    myIntegerSetupVar: 50,
    myRealSetupVar: 1.5,
    myComboBox:1,
    myCheckBox:1,
    myDivider:0,
    myDateSetupVar:"06/08/1984",
    myTimeSetupVar:0
}
Available Widget list and their properties:
- LineEdit:
- Name: [string] label of the widget
- MaxLength: [integer] Max length of the string. By default this value is set to –1 which means that there is no limit.
- Width: [integer] Width in pixel of the Widget. By default this value is set to –1 which means that the widget is automatically resized.
- SpinBox:
- Name: [string] label of the widget
- MinValue: [integer] Minimum value
- MaxValue: [integer] Maximum value
- Prefix: [string] The prefix is prepended to the start of the displayed value
- Suffix: [string] The suffix is appended to the end of the displayed value
- RealSpinBox:
- Name: [string] label of the widget
- MinValue: [integer] Minimum value
- MaxValue: [integer] Maximum value
- Prefix: [string] The prefix is prepended to the start of the displayed value
- Suffix: [string] The suffix is appended to the end of the displayed value
- Precision: [integer] Precision of the value. By default it is set to 5.
- ComboBox:
- Name: [string] label of the widget
- Items: [array] Items must be an array of string.
- DateEdit:
- Name: [string] label of the widget
- TimeEdit:
- Name: [string] label of the widget
- TimeCodeType: [integer] Timecode type. Without this property, the timecode type is by default set to 4 (Time base is 1/100s).
- CheckBox:
- Name: [string] label of the widget
Label
Divider
- Serial:
- Name: [string] label of the widget
- DMXIn:
- Name: [string] label of the widget
- DMXOut:
- Name: [string] label of the widget
- DigitalIn:
- Name: [string] label of the widget
- DigitalOut:
- Name: [string] label of the widget
- AnalogIn:
- Name: [string] label of the widget
- AnalogOut:
- Name: [string] label of the widget
When the Widget property is set to Serial, DMXIn, DMXOut, DigitalIn, DigitalOut, AnalogIn, AnalogOut, the appropriated Resource selector will be displayed in the Setup tab.
Script Functions
Function declarations follow the regular JavaScript syntax. Each function is listed in the Device function list and a can be called via a device “Execute Function” cue. The name of a script function should be unique, otherwise the last defined function will be the one considered.
mySuperCoolFunction: function( name ) {
    return "Hi " + name + "!";
},
Private functions
If the function name begins by a ‘_’ character, the script function is not added to the function list exposed by the device for the “Execute Function” command. And thus this makes it available for internal script usage. Callback functions use generally this formatting.
Example of a private function:
_myPrivateFunction: function( a, b ) {
    return a + b;
}
Once declared, functions can be called internally by the JavaScript code using the this keyword.
// calling a private function
var result = this._myPrivateFunction(1,2);
On Start / Stop functions
There are two defined functions which will be executed when the project is started/stopped, when the device activity is enabled/disabled, or when a script is loaded or unloaded:
_mStart( Loading ) {//Function's Instructions}

_mStop( Loading ) {//Function's Instructions}
These functions are privates, it means that they are not exposed in the available list of function in Manager.
Loading is a Boolean parameter set by the Script Device which provides additional informations:
The parameter Loading will be true if the function is called by a Load From File or Load From Text command.
The parameter Loading will be false if the function is called by a change of the project running status (Stop, Debug, User, Run), or when the Device is enabled/disabled.
Dynamic Commands
Each javascript functions defined in the script (except the private ones which begin by a _ character) will generate a dynamic command. The dynamic commands are just commands provided by the MXM, they depend of the script itself. So two Script Devices can have a different set of commands.
It is also possible to customise the dynamic commands by completing the Commands section which is placed in the Info node.
Info:{
    Commands: {
        MyJavascriptFunction: {
            Name: "My Command",
            GroupName: "Test",
            GroupOrder: "0",
            GroupCmdOrder: "0"
            Params: {
                integerParam: {
                    Name: "my integer parameter",
                    Type: "Integer",
                    MaxValue:1000,
                    MinValue:0
                },
                realParam: {
                    Name: "my real parameter",
                    Type: "Real",
                    Precision:3,
                    MinValue:-100.0,
                    MaxValue:100.0
                }
            }
        }
    }
},

MyJavascriptFunction : function( integerParam, realParam ){
    // ...
},
Below the list of optional properties which can be defined to customise a Command:
- Name: [string] The name that you want to display for this command. The Command name will be ignored if it is set to: ‘Load From File’, ‘Load From Text’, ‘Execute Function’ or ‘Execute Function With Params’. These name are reserved.
- GroupName: [integer] It indicates a name of a group to which the command belongs.
- GroupOrder: [integer] It indicates the ordering value for the group, the lowest value is displayed first. Note that this value must have the same value in each command belonging to the same group.
- GroupCmdOrder: [integer] It indicates the ordering value for the command within the group, the lowest value is displayed first.
Group management rules:
- A GroupName which has the value "" is considered as no group.
- A command without GroupName declaration is placed by default in a User Command group.
- Groups are listed according the GroupOrder or in alphabetical order if no GroupOrder is defined.
- Commands within a group are listed according the GroupCmdOrder or in alphabetical order if no GroupCmdOrder is defined.
Example of a typical command grouping and ordering:
({
    Info:{
        Commands: {
            StopCommand: {
                Name: "Stop",
                GroupName: "Transport",
                GroupOrder: "0",
                GroupCmdOrder: "0"
            },
            PlayCommand: {
                Name: "Play",
                GroupName: "Transport",
                GroupOrder: "0",
                GroupCmdOrder: "1"
            },
            MuteCommand: {
                Name: "Mute",
                GroupName: "Audio",
                GroupOrder: "1",
                GroupCmdOrder: "0"
            },
            PowerCommand: {
                Name: "Power",
                GroupName: "",
                GroupOrder:"2",
                GroupCmdOrder: "3"
            },
        }
    },

    StopCommand : function(){},
    PlayCommand : function(){},
    MuteCommand : function(){},
    PowerCommand : function(){}
})

In addition to that, each parameter of the command can also be customised in order to provide the most adapted commands to the end user. This customisation is optional. Below the list of optional properties which can be defined to customise a command parameter:
Name: [string] The name that you want to display for this parameter.
- Type: [string] It indicates a type of the paramter. By default it is a String but it can be set to:
- String
- Integer
- Real
- Enum
- Time
- Date
MinValue: [integer / real] Min value. This property is used only in the case of the Type property is set to ‘Integer’ or ‘Real’.
MaxValue: [integer / real] Max value. This property is used only in the case of the Type property is set to ‘Integer’ or ‘Real’.
Precision: [integer] The number of digit after decimal point. This property is used only in the case of the Type property is set to ‘Real’.
MaxLength: [integer] Max length of the string. This property is not used if the Type property is set to something else than ‘String’. By default this value is set to –1 which means that there is no limit.
TimeCodeType: [integer] Timecode type. This property is used only in the case of the Type property is set to ‘Time’. Without this property, the timecode type is by default set to 4 (Time base is 1/100s).
- 0: 24 frames per second
- 1: 25 frames per second
- 2: 30 frames per second (No dop frame)
- 3: 30 frames per second (dop frame, ie 29.97 fps)
- 4: Time base is 1/100s
- 5: Time base is 1/1000s
Wizards: In some circumstance, command parameter values are not very easy to select, mostly due to the complexity of the semantic of that value. A wizard is a feature which helps selecting such value, displaying a selection dialog box.
This wizard is represented by a wand in the manager:

In order to add a Wizard to a parameter, just add Wizard:“NameOfTheWizard” as parameter.
For example:
Info: {
    Commands: {
        myCommand: {
            Params: {
                myVariable: {
                    Wizard: "UserScreenNameSelector"
                }
            }
        }
    }
},

myCommand: function( myVariable ) {
}
There is several types of wizards:
UserScreenNameSelector: This wizard is used to display a selector for available UserScreen’s names.
ListNameSelector: This wizard is used to display a selector for available UserScreen’s List object’s names.
ContainerNameSelector: This wizard is used to display a selector for available UserScreen’s Container object’s names.
StepTaskNameSelector: This wizard is used to display a selector for available Step based task’s names.
TimeTaskNameSelector: This wizard is used to display a selector for available Time based task’s names.
AllTaskNameSelector: This wizard is used to display a selector for available task’s names, weither they’re Step or Time based.
TaskLabelNameSelector: This wizard is used to display a selector for available Label’s names of Step based task’s.
DeviceNameSelector: This wizard is used to display a selector for available Device’s names.
ObjectNameWithTextSelector: This wizard is used to display a selector for available UserScreen’s object’s names which have a Text property.
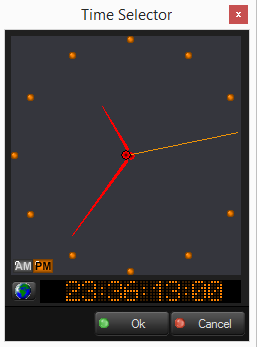
TimeClockSelector: This wizard is used to display a selector for a time value. The selector looks like the following:
- ScreenCoordinatesSelector: This wizard is used to display a selector for a X or a Y coordinate of the screen.
By default, the X/Y coordinate refers to the entire screen, however, if one of the parameter has the name “UserScreen Name” and the content of this parameter is an actual UserScreen name, then the X/Y coordinate refers to this UserScreen.
If the parameter’s name contains the string “X Pos”, the returned coordinate will be the X position when the mouse is clicked, otherwize the Y position.

- Relative Position: To set position relative to an user screen, you must create one of the parameter with the name “UserScreen Name” and the content of this parameter with an actual UserScreen name.
For example:
stringVar5: {
    Name:"UserScreen Name",
    Wizard: "ScreenCoordinatesSelector"
},
stringVar6: {
    Name:"Xpos",
    Wizard: "ScreenCoordinatesSelector"
},
stringVar7: {
    Name:"Ypos",
    Wizard: "ScreenCoordinatesSelector"
},
- ObjectNameSelector: This wizard is used to display a selector for available object’s names. Types of concerned objects are:
- User Group
- Step Based Task
- Time Based Task
- Device
- UserScreen
- Button
- Slider
- Digital Slider
- Display
- List
- Edit
- Led
- Gauge
The QMedialon object
The QMedialon object allows controlling many of the current Medialon project objects like Tasks, Devices, Variables and UseScreen objects. The “QMedialon” object is a global JavaScript object automatically created by the Medialon Script MxM and is made available for use by the scripting code.
For example, the following code starts the task named “NightMode”:
QMedialon.StartTask("NightMode");
This other example sends a “Power Off” command to a projector device named “Projector1”:
QMedialon.Perform("Projector1", "Power", "Default", "Value=Off");
The next example turns 80 projectors off (from “Projector1” to “Projector80”):
for( var i = 1; i <=80; i++ ) {
    QMedialon.Perform("Projector"+i, "Power", "Default", "Value=Off");
}
Shared Group
Most of the QMedialon functions require to be registered against a Medialon “Shared Group” in the current project. The only exceptions are the ‘Variable Access’ functions (SetValue, SetValueAsInteger, GetValueAsString, GetValueAsInteger and GetValueAsReal) of QMedialon which don’t require shared group registration. All others functions use a shared group and the RegisterGroup() function must be called at least once before invoking any of these functions. Note that in the Setup, one option allows to automatically register all User Groups.
A typical “shared group” scenario is:
- let’s say that “MySharedGroup” is a shared user group which contains all of the Medialon Project objects that must be accessible from the script.
- the script calls QMedialon.RegisterGroup(“MySharedGroup”)
- …
- the script calls any of the QMedialon functions
- …
- when done, the script can (optionaly) call QMedialon.UnregisterGroup()
The following sections list all of the functions exposed by the QMedialon object, grouped by categories.
Variable Access
SetValue
Set the value of a variable defined in the Medialon project.
SetValue( variableName, value )
- variableName: [string] Name of the existing variable in the Medialon project.
- value: [string] New value to define for this variable (empty string "" by default).
Return: MERR_SUCCESS if the operation succeeded, an MERR_XXX code otherwise. See MERR Values.
Example:
// Set the Status of the DigitalSlider_1 graphic object to 50
QMedialon.SetValue("DigitalSlider_1.Status",50);
SetValueAsInteger
Set the value of a variable defined in the Medialon project as an Integer.
SetValueAsInteger( variableName, value )
- variableName: [string] Name of the existing variable in the Medialon project.
- value: [string] New value to define for this variable (empty string "" by default).
Return: MERR_SUCCESS if the operation succeeded, an MERR_XXX code otherwise. See MERR Values.
Example:
// Set the Status of the MyEnum which is defined as an Enum variable to 4
QMedialon.SetValueAsInteger("MyEnum",4);
GetValueAsString
Get the value, as a string, of a variable defined in the Medialon project.
GetValueAsString( variableName )
- variableName: [string] Name of the existing variable in the Medialon project.
Return: Return the variable value as a string if the operation succeeded otherwise an empty string "".
Example:
// Get the text of the TextEdit_1 object
var text = QMedialon.GetValueAsString("TextEdit_1.Text");
GetValueAsInteger
Get the value, as an integer, of a variable defined in the Medialon project.
GetValueAsInteger( variableName )
- variableName: [string] Name of the existing variable in the Medialon project.
Return: Return the variable value as an integer if the operation succeed otherwise 0.
Example:
// Get the status (position) of the Slider_1 object as an integer number
var sliderPosition = QMedialon.GetValueAsInteger("Slider_1.Status");
GetValueAsReal
Get the value, as a real, of a variable defined in the Medialon project.
GetValueAsReal( variableName )
- variableName: [string] Name of the existing variable in the Medialon project.
Return: Return the variable value as a real if the operation succeed otherwise 0.0.
Example:
// Get the status (position) of the Slider_1 object as a real number
var sliderPosition = QMedialon.GetValueAsReal("Slider_1.Status");
OnVariableChange
Be notified when a variable changes. All the variables which are in a shared group already registered by the device is concerned. Important note: this function is available only with Overture and Manager version >= 6.7.0.
OnVariableChange( callback )
- callback: [function] function which must be called each time that a change happens on a shared variable. The callback function should have at least two params ( variableName, variableValue ). These parameters are strings.
Return: MERR_SUCCESS if the operation succeeded, an MERR_XXX code otherwise. See MERR Values.
Example:
_callback: function( variableName, variableValue ){
    //..
},

Init: function() {
    QMedialon.RegisterGroup( "SharedGroup", true );
    QMedialon.OnVariableChange( this._callback );
}
Script functions for Enum device variable
An Enum device variable has 2 functions which allow to set its list of items while the project is running.
The first one allows you to clear all the items of an Enum device variable:
this.Device.EnumClear( "NameOfTheEnumVariable" );
The second provides a way to Add an Item in the Enum device variable:
this.Device.EnumAdd( "NameofTheEnumVariable", newItemValue );
Variable Conversion
Enum, Date and Time are complexes variables composed of several informations. The functions below can help to interact with them.
EnumStringToIndex
Get the index, as an integer, of a item in a list.
EnumStringToIndex( itemList, itemString )
- itemList: [array] list of items.
- itemString: [string] string wich matches with one item in the list.
Return: Return the index of the item in the list. This function returns –1 if the item is not found.
Example:
// Get the index in the list
var itemIndex = QMedialon.EnumStringToIndex( this.Info.Variables.enumVar.Items, "Item4" );
Note: “enumVar” is an Enum device variable, and Items is an array of string providing the Enum list.
DateStringToDay
Extract the day as an integer from a date.
DateStringToDay( date )
- date: [string] formatted date.
Return: Return the day of this date as an integer.
Example:
// Get day (25)
var day = QMedialon.DateStringToDay("12/25/2014");
Note: the date format which been set in windows should be respected.
DateStringToMonth
Extract the month as an integer from a date.
DateStringToMonth( date )
- date: [string] formatted date.
Return: Return the month of this date as an integer.
DateStringToYear
Extract the year as an integer from a date.
DateStringToYear( date )
- date: [string] formatted date.
Return: Return the year of this date as an integer.
DateStringToDayOfWeekAsNumber
Get the day of week as an integer from a date.
DateStringToDayOfWeekAsNumber( date );
- date: [string] formatted date.
Return: Return the day of the week of this date as an integer.
TimeStringToHours
Extract the hours as an integer from a time.
TimeStringToHours( time, timeCodeType )
- time: [string] formatted time.
- TimeCodeType: [integer] Timecode type. Without this property, the timecode type is by default set to 4 (Time base is 1/100s).
Return: Return the hours of this time as an integer.
Example:
// Get hour (1)
var hour = QMedialon.TimeStringToHours( "01:02:03/04", 4 );
TimeStringToMinutes
Extract the minutes as an integer from a time.
TimeStringToMinutes( time, timeCodeType )
- time: [string] formatted time.
- TimeCodeType: [integer] Timecode type. Without this property, the timecode type is by default set to 4 (Time base is 1/100s).
Return: Return the minutes of this time as an integer.
TimeStringToSeconds
Extract the seconds as an integer from a time.
TimeStringToSeconds( time, timeCodeType )
- time: [string] formatted time.
- TimeCodeType: [integer] Timecode type. Without this property, the timecode type is by default set to 4 (Time base is 1/100s).
Return: Return the seconds of this time as an integer.
TimeStringToFrames
Extract the frames as an integer from a time.
TimeStringToFrames( time, timeCodeType )
- time: [string] formatted time.
- TimeCodeType: [integer] Timecode type. Without this property, the timecode type is by default set to 4 (Time base is 1/100s).
- 0: 24 frames per second
- 1: 25 frames per second
- 2: 30 frames per second (No dop frame)
- 3: 30 frames per second (dop frame, ie 29.97 fps)
- 4: Time base is 1/100s
- 5: Time base is 1/1000s
Return: Return the frames of this time as an integer.
User Group access
Most of the functions exposed by the QMedialon object require the script to be registered to a “Shared Group”. A “Shared Group” is a User Group in the Medialon project which has its “Shared” property set.
The Medialon objects accessed via QMedialon must be part of this shared group. Otherwise the QMedialon functions return the MERR_OBJECTNOTSHARED (49) error.
All User Groups can be register automatically via the option in the Setup dialog, in this case QMedialon.RegisterGroup and QMedialon.UnregisterGroup calls will be ignored.
RegisterGroup
Register to a shared group in order to allow accessing objects which are part of the group from the script.
RegisterGroup( groupName, acceptEvent )
- groupName: [string] The name of the parent shared group which owns the objects to access from the script.
- acceptEvent: [boolean] The acceptEvent is an optional parameter which is available only for Overture and Manager version >= 6.7.0. By default is is set to false.
- false: the RegisterGroup is done synchronously.
- true: the RegisterGroup will be done asynchronously.
Return: MERR_SUCCESS if the operation succeeded, an MERR_XXX code otherwise. See MERR Values.
Example:
// Allow the script to access objects which are part of the "MySharedGroup"
QMedialon.RegisterGroup("MySharedGroup");
UnregisterGroup
Unregister from the currently registered group.
UnregisterGroup()
Return: MERR_SUCCESS if the operation succeeded, an MERR_XXX code otherwise. See MERR Values.
UserScreen Access
OpenUserScreen
Open a UserScreen.
OpenUserScreen( userScreenName, positionType, left, top )
- userScreenName: [string] The UserScreen name.
- positionType: [integer] Position type of the UserScreen, MWP_DEFAULT:0 / MWP_ABSOLUTE:1 (0 by default).
- left: [integer] Left position of the UserScreen (0 by default).
- top: [integer] Top position of the UserScreen (0 by default).
Return: MERR_SUCCESS if the operation succeeded, an MERR_XXX code otherwise. See MERR Values.
Example:
// 0pen the the UserScreen_1 UserScreen at position 10,10
QMedialon.OpenUserScreen( "UserScreen_1", 1, 10, 10 );
CloseUserScreen
Close a UserScreen.
CloseUserScreen( userScreenName )
- userScreenName: [string] The UserScreen name.
Return: MERR_SUCCESS if the operation succeeded, an MERR_XXX code otherwise. See MERR Values.
Example:
// Close the UserScreen_1 UserScreen
QMedialon.CloseUserScreen( "UserScreen_1" );
GotoPage
Go to a page of a UserScreen.
GotoPage( userScreenName, pageNumber )
- userScreenName: [string] The UserScreen name.
- pageNumber: [integer] Page number to goto (0 by default).
Return: MERR_SUCCESS if the operation succeeded, an MERR_XXX code otherwise. See MERR Values.
Example:
// Goto page 2 of the UserScreen_1 UserScreen
QMedialon.GotoPage( "UserScreen_1", 2 );
Task Control
StartTask
Start a task.
StartTask( taskName )
- taskName: [string] The task name.
Return: MERR_SUCCESS if the operation succeeded, an MERR_XXX code otherwise. See MERR Values.
Example:
// Start task "Task_1"
QMedialon.StartTask( "Task_1" );
PauseTask:
Pause a task.
PauseTask( taskName )
- taskName: [string] The task name.
Return: MERR_SUCCESS if the operation succeeded, an MERR_XXX code otherwise. See MERR Values.
Example:
// Pause task "Task_1"
QMedialon.PauseTask( "Task_1" );
StopTask
Stop a task.
StopTask( taskName, mode )
- taskName: [string] The task name.
- mode: [integer] The mode is an optional parameter which is available only with Overture and Manager version >= 6.7.0. By default is is set to 0.
- 0: Stop specified task
- 1: Stop all task
- 2: Stop all task except the specified one
Return: MERR_SUCCESS if the operation succeeded, an MERR_XXX code otherwise. See MERR Values.
Example:
// Stop task "Task_1"
QMedialon.StopTask( "Task_1" );
GotoLabel
Go to the specified label of a task.
GotoLabel( taskName, label )
- taskName: [string] The task name.
- label: [string] The task label name (empty string "" by default).
Return: MERR_SUCCESS if the operation succeeded, an MERR_XXX code otherwise. See MERR Values.
Example:
// Go to the label "Loop" of task "Task_1"
QMedialon.GotoLabel( "Task_1", "Loop" );
GotoLine
Goto the specified line of a task.
GotoLine( taskName, lineNumber )
- taskName: [string] The task name.
- lineNumber: [integer] The task line number (0 by default).
Return: MERR_SUCCESS if the operation succeeded, an MERR_XXX code otherwise. See MERR Values.
Example:
// Go to line 12 of task "Task_1"
QMedialon.GotoLine( "Task_1", 12 );
GotoTime
Goto the specified time of a task.
eMResult GotoTime( taskName, time )
- taskName: [string] The task name.
- time: [integer] The task’s time in 1/100s (0 by default).
Return: MERR_SUCCESS if the operation succeeded, an MERR_XXX code otherwise. See MERR Values.
Example:
// Go to the 10 second position of task "Task_1"
QMedialon.GotoLine( "Task_1", 1000 );
Device Command Control
Perform
Perform an action on a object. This command can be used to execute a
Perform( objectName, action, parameterType, param1, ..., param10 )
- objectName: [string] The name of the object.
- action: [string] The name of the action.
- parameterType: [string] Type of parameter. Can be either “Default” or “XML”. See notes bellow about the parameter type.
- param1: [string] The parameter 1 of the action (empty string "" by default). If the parameter type is XML, this is the only required parameter.
- …: [string] The parameter X of the action (empty string "" by default).
- param10: [string] The parameter 10 of the action (empty string "" by default).
Return: an empty string "".
Parameter Type:
If the parameter type is “Default”, the syntax of the parameters is: parameterName=parameterValue. There must be a parameter for each parameter of the command. In the following example, the “Locate” command of a MIP device requires one parameter of name “TimeCode”:
// Locate the video of the device "MIP_1" to 20 seconds
QMedialon.Perform( "MIP1_1", "Locate", "Default", "TimeCode=00:00:20/00" );
If the parameter type is “XML”, the “param1” parameter of the perfom commands contains a full XML description of the parameters of the action to perform. In the following example, the “Locate” command of a MIP device requires one parameter of name “TimeCode”:
// Locate the video of the device "MIP_1" to 20 seconds
QMedialon.Perform( "MIP1_1", "Locate", "XML",
"<parameters><parameter name='TimeCode' value='00:00:20/00'/></parameters>");
When a parameter of the command is supposed to be a time (like the Timecode parameter in the example above), his value will be interpreted as a String. Here few examples of syntaxes which can be used:
| value=‘00:00:20/00’ | -> | 00:00:20/00 |
| value=‘20’ | -> | 00:00:20/00 |
| value=‘720.5’ | -> | 00:07:20/05 |
The Perform function does not support an action which has output parameters (return variables). In that case, the contents of the output parameters are undefined after the function returns.
Important Note: Using Manager 6.1.0 or less, the ‘Perform’ function doesn’t work when the command includes parameters which have a decoration as parameter range, for example: ‘Volume (–100dB to 0dB)’. Manager 6.2.0 or greater is required for a proper handling of such commands.
Insert Perform action:
It is easy to complete a QMedialon.Perform without error in the Setup dialog by right clicking in the Script edition area and ‘Insert QMedialon.Perform’ or by just pressing Alt+P.
 This dialog box allows to select a Device, one of its commands and set the parameters. When the script line is validate by clicking on the Ok button, this line is added in the script itself.
It is also possible to select a Perform Async in order to generate the script line for a QMedialon.PerformAsync.
This dialog box allows to select a Device, one of its commands and set the parameters. When the script line is validate by clicking on the Ok button, this line is added in the script itself.
It is also possible to select a Perform Async in order to generate the script line for a QMedialon.PerformAsync.
PerformAsync
Perform asynchroniously an action on a object. This command can be used to execute a
PerformAsync( callback, objectName, action, parameterType, param1, ..., param10 )
- callback: [function] script callback function which is called when the PerformAsync action is completed. This callback should have at least one parameter which will contain the result of the PerformAsync command as a XML node. Note that XML node will have the definition of each parameters and values of the executed action.
- objectName: [string] The name of the object.
- action: [string] The name of the action.
- parameterType: [string] Type of parameter. Can be either “Default” or “XML”. See notes bellow about the parameter type.
- param1: [string] The parameter 1 of the action (empty string "" by default). If the parameter type is XML, this is the only required parameter.
- …: [string] The parameter X of the action (empty string "" by default).
- param10: [string] The parameter 10 of the action (empty string "" by default).
Return: MERR_SUCCESS if the operation succeeded, an MERR_XXX code otherwise. See MERR Values.
Important note: this function is available only with Overture and Manager version >= 6.7.0.
PostponeResult
PostponeResult allows to postpone the end of the command. The cue won’t be terminated while “SetResult” has not be called.
PostponeResult()
Return: Returns an ID (integer) which identify the postponed object. This ID must be specified when the “SetResult” is called.
Notes: - A good pratice consists to use “SetTimeout” to execute a callback after a timeout to be sure that the “SetResult” function is called. - If “PostponeResult” is called multiple times by the same command, it’ll always returns the same ID.
SetResult
SetResult function must be called when “PostponeResult” has been used in a command in order to terminate it.
SetResult( Id, result )
- Id: [integer] Id returned by the “PostponeResult” function.
- result: [string] result of the command
Example:
_onResponse:function(response, error) {
    // do what ever you want here with the response/error

    // release the context
    this._setResult();
},

_setResult: function() {
    QMedialon.ClearTimeout( this.timeoutId );
    this.timeoutId = 0;
    QMedialon.SetResult(this.contextId, "timeout");
    this.contextId = 0;
},

_postponeResult: function() {
    // just in case, a timeout is added to terminate the command
    this.timeoutId = QMedialon.SetTimeout( this._setResult, 30000 );
    this.contextId = QMedialon.PostponeResult();
},

myBlockingCommand: function() {
    this._postponeResult();
    // below, it's possible to execute an async function and wait for its results
    // let's imagine that the callback of this async function is _onResponse
}
Object Management
GetObjectList
Return a list of manager object in XML format.
GetObjectList( objectName, objectType )
- objectName: [string] The name of parent object from which shared objects belong.
- objectType: [integer] Type of object to list (0 motObjectAll by default, see eMngObjectType in the Notes below).
Return: Returns a list of manager objects in XML format as a string otherwise an empty string "".
GetObject
Get an object info XML structure.
GetObject( objectName, objectType )
- objectName: [string] The name of parent object from which shared objects belong.
- objectType: [integer] Requested depth of the structure (0 by default).
Return: Returns a manager object in XML format as a string otherwise an empty string "".
Timing Events
SetInterval
Executes a script function, over and over again, at specified time intervals.
SetInterval( function, interval )
- function: [function] Function to execute.
- interval: [integer] The length of the time-intervals between each execution (in milliseconds).
Return: Returns the ID of the Interval. This ID can be used by the QMedialon.ClearInterval function.
Example:
// Recall _refreshTime script function every 100ms
QMedialon.SetInterval(this._refreshTime, 100);
SetTimeout
Executes a script function, once, after waiting a specified number of milliseconds.
SetTimeout( function, timeout )
- function: [function] Function to execute.
- timeout: [integer] The time (in milliseconds), from now, you want to wait before to execute the script function.
Return: Returns the ID of the Timeout. This ID can be used by the QMedialon.ClearTimeout function.
ClearInterval
Stop further executions of the script function specified in the QMedialon.SetInterval() method.
ClearInterval( intervalID )
- intervalID: [integer] ID of the Interval to stop.
ClearTimeout
Stop the execution of the script function specified in the QMedialon.SetTimeout() method.
ClearTimeout( timeoutID )
- timeout: [integer] ID of the Timeout to stop.
Traces
TraceMessage
Log a message in the Manager Traces system. The mxmMedialonScript Log option must be enabled in the ‘Preferences’ menu of Manager (Log Traces sub-menu).
TraceMessage( message, messageType )
- message: [string] The message to log.
- messageType: [integer]or[string] Type of message (0 / NORMAL by default).
| 0 | NORMAL | Message Type is normal (color is lightgray in console). |
| 1 | NORMALPLUS | Message Type is information (color is green in console). |
| 2 | INFO | Message Type is information (color is green in console). |
| 3 | COMMENT | Message Type is comment (color is blue in console). |
| 4 | ALARM | Message Type is alarm (color is yellow in console). |
| 5 | ERROR | Message Type is error (color is red in console). |
| 6 | FATAL | Message Type is fatal error (color is black on background red in console). |
| 7 | DEBUG | Message Type is debug (color is fushia red in console). |
MERR_XXX values
- MERR_SUCCESS (0): Object Control operation succeed.
- MERR_INVALIDARGUMENT (1): An invalid argument passed to the ControlObject.
- MERR_BUFFERTOOSMALL (2): An insuffisant buffer size passed to the ControlObject.
- MERR_MISSINGDATA (3): Missing data for the ControlObject.
- MERR_INVALIDID (4): An invalid ID passed to the ControlObject.
- MERR_OPERATIONNOTSUPPORTED (16): The requested operation is not supported by ControlObject.
- MERR_OPERATIONNOTKNOWN (17): The requested operation is not known by ControlObject.
- MERR_OPERATIONTIMEDOUT (18): The requested operation has timed out.
- MERR_OPERATIONFAILED (19): The requested operation has failed.
- MERR_OPERATIONABORTED (20): The requested operation has been aborted .
- MERR_WRONGSTATE (32): The object is in wrong state and cannot perform the requested operation.
- MERR_ACCESSDENIED (33): Object access is denied.
- MERR_GRANTEDLIMITEXCEDED (34): The requested operation cannot be performed, limit reached.
- MERR_NOTCONNECTED (35): The connection is not extablished.
- MERR_CONNECTIONFAILED (36): The connection attempt has failed.
- MERR_NOTIDENTIFIED (37): The connection is not yet identified (need identification).
- MERR_NETWORKERROR (38): A network error occured.
- MERR_NOTREGISTERED (39): The connection is not yet registered.
- MERR_ALREADYREGISTERED (40): The connection is already registered.
- MERR_REGISTRATIONFAILED (41): The connection registration failed.
- MERR_OBJECTDOESNOTEXIST (48): The requested object doesn’t exist.
- MERR_OBJECTNOTSHARED (49): The requested object is not shared.
- MERR_OBJECTUNKNOWNPROPERTY (50): The requested property is not part of this object.
- MERR_OBJECTCANNOTSETGETPROPERTY (51): The requested property cannot be set/get on this object
- MERR_REDIRECTION (52): The connection has been redirected.
- MERR_NOREDIRECTIONDEFINED (53): The connection redirection has not been defined.
- MERR_BADPROTOCOLVERSION (54): The requested protocol version is not supported.
In the script code below, a function has been implemented in order to convert a MERR_XXX value to an error text:
// Script Begins
({

    // Script Functions
    _merr_xxx_toText : function( merr_xxx ) {

    var s= "";
    switch( merr_xxx ) {

    // MERR_SUCCESS
    case 0: {s="Object Control operation succeed.";}break;
    // MERR_INVALIDARGUMENT
    case 1: {s="An invalid argument passed to the ControlObject.";}break;
    // MERR_BUFFERTOOSMALL
    case 2: {s="An insuffisant buffer size passed to the ControlObject.";}break;
    // MERR_MISSINGDATA
    case 3: {s="Missing data for the ControlObject.";}break;
    // MERR_INVALIDID
    case 4: {s="An invalid ID passed to the ControlObject.";}break;
    // MERR_OPERATIONNOTSUPPORTED
    case 16: {s="The requested operation is not supported by ControlObject.";}break;
    // MERR_OPERATIONNOTKNOWN
    case 17: {s="The requested operation is not known by ControlObject.";}break;
    // MERR_OPERATIONTIMEDOUT
    case 18: {s="The requested operation has timed out.";}break;
    // MERR_OPERATIONFAILED
    case 19: {s="The requested operation has failed.";}break;
    // MERR_OPERATIONABORTED
    case 20: {s="The requested operation has been aborted.";}break;
    // MERR_WRONGSTATE
    case 32: {s="The object is in wrong state and cannot perform the requested operation.";}
        break;
    // MERR_ACCESSDENIED
    case 33: {s="Object access is denied.";}break;
    // MERR_GRANTEDLIMITEXCEDED
    case 34: {s="The requested operation cannot be performed, limit reached.";}break;
    // MERR_NOTCONNECTED
    case 35: {s="The connection is not extablished.";}break;
    // MERR_CONNECTIONFAILED
    case 36: {s="The connection attempt has failed.";}break;
    // MERR_NOTIDENTIFIED
    case 37: {s="The connection is not yet identified (need identification).";}break;
    // MERR_NETWORKERROR
    case 38: {s="A network error occured.";}break;
    // MERR_NOTREGISTERED
    case 39: {s="The connection is not yet registered.";}break;
    // MERR_ALREADYREGISTERED
    case 40: {s="The connection is already registered.";}break;
    // MERR_REGISTRATIONFAILED
    case 41: {s="The connection registration failed.";}break;
    // MERR_OBJECTDOESNOTEXIST
    case 48: {s="The requested object doesn't exist.";}break;
    // MERR_OBJECTNOTSHARED
    case 49: {s="The requested object is not shared.";}break;
    // MERR_OBJECTUNKNOWNPROPERTY
    case 50: {s="The requested property is not part of this object.";}break;
    // MERR_OBJECTCANNOTSETGETPROPERTY
    case 51: {s="The requested property cannot be set/get on this object";}break;
    // MERR_REDIRECTION
    case 52: {s="The connection has been redirected.";}break;
    // MERR_NOREDIRECTIONDEFINED
    case 53: {s="The connection redirection has not been defined.";}break;
    / MERR_BADPROTOCOLVERSION
    case 54: {s="The requested protocol version is not supported.";}break;
    default: {s="Unknown error." } break;

    }
    return s;

    }

// Script Ends
})
eMngObjectType values
- motObjectAll (0):
- motDevice (1):
- motTask (2):
- motTimelineTask (3):
- motStepbasedTask (4):
- motVariable (5):
- motUserVariable (6):
- motUserScreen (7):
- motButton (8):
- motSlider (9):
- motDigitalSlider (10):
- motDisplay (11):
- motLed (12):
- motGauge (13):
- motSquare (14):
- motCircle (15):
- motLine (16):
- motImage (17):
- motPage (18):
- motReserved (19):
- motText (20):
- motContainer (21):
- motList (22):
- motEdit (23):
- motDeviceMap (24):
- motAnyGraphicObject (25):
- motUserGroup (26):
- motCue (27):
- motCommand (28):
- motResource (29):
- motHLValue (100):
- motObjectUndefined (1000):
TCP Client or UDP creation
A TCP Client or UDP object can be created from the QMedialon object to manage a TCP connection.
CreateSocket
Create a TCP Client or UDP object. This function belongs to the QMedialon object.
CreateSocket( type )
- type: [string] This parameter is optional and by default a TCP Client object is generated. If ‘type’ is set to ‘udp4’, a UDP object will be created instead of a TCP Client object.
Return: an empty object is returned if it is not possible to create the appropriate object. Otherwise, a TCP Client or an UDP object is returned.
Example:
// create a TCP Client object
this.myTCPClient = QMedialon.CreateSocket();
TCP Client

The TCP Client object provides the methods below:
- connect
- setNoDelay
- write
- end
- address
- on (CallBack)
connect
Opens the connection for a given socket. If port and host are given, then the socket will be opened as a TCP socket, if host is omitted, localhost will be assumed.
This function is asynchronous. When the ‘connect’ event is emitted the socket is established. If there is a problem connecting, the ‘connect’ event will not be emitted, the ‘error’ event will be emitted with the exception.
The connectListener parameter will be added as an listener for the ‘connect’ event.
connect(port, [host], [connectListener])
- port: (integer) port number
- host: (string) host address
- connectListener: (function) callback called when the connection is done
Example:
// ask to the TCP Client object to establish a connection with a server
// and to prevent via the _OnSocketConnect callback when the connection will be done
this.myTCPClient.connect(4422, '127.0.0.1', this._OnSocketConnect);
setNoDelay
Disables the Nagle algorithm. By default TCP connections use the Nagle algorithm, they buffer data before sending it off. Setting true for noDelay will immediately fire off data each time socket.write() is called. noDelay defaults to true.
setNoDelay([noDelay])
- noDelay: (boolean) by default this parameter is set to true
Example:
this.myTCPClient.setNoDelay(false);
write
Sends data on the socket.
write(data)
- data: (Buffer or string) Message to be sent.
Example:
this.myTCPClient.write( "my message" );
end
Close the socket.
end()
Example:
this.myTCPClient.end();
address
Get address information concerning the socket.
address()
Returns the bound address, the address family name and port of the socket as reported by the operating system. Returns an object with three properties, e.g. { port: 12346, family: ‘IPv4’, address: ‘127.0.0.1’ }
on
Associate an event to a callback function.
on( event, callback )
- event: (string) here the list of available events for an TCP Client
- ‘connect’: Emitted when a socket connection is successfully established.
- ‘error’: Emitted when an error occurs. The ‘close’ event will be called directly following this event.
- ‘close’: Emitted once the socket is fully closed. The argument had_error is a boolean which says if the socket was closed due to a transmission error.
Example:
this.myTCPClient.on('close', this._OnSocketDisconnect );- ‘data’: Emitted when data is received. Note that the data will be lost if there is no listener when a Socket emits a ‘data’ event.
Example:
this.myTCPClient.on('data', this._OnSocketRead );
UDP
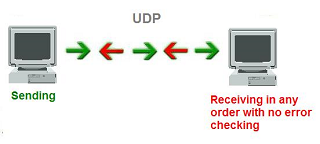
UDP uses a simple connectionless transmission model with a minimum of protocol mechanism. It has no handshaking dialogues, and thus exposes any unreliability of the underlying network protocol to the user’s program. There is no guarantee of delivery, ordering, or duplicate protection.
The UDP object provides the methods below:
- bind
- setExclusivePort
- send
- close
- address
- on (CallBack)
bind
For UDP sockets, listen for datagrams on a named port and optional address. If address is not specified, it will try to listen on all addresses.
A bound datagram socket keeps the process running to receive datagrams.
bind(port, [address])
- port: (integer) port to bind
- address (string) address to bind. This parameter is optional.
Example:
//listening all IP at 44444 port.
this.myUDP.bind(44444);
setExclusivePort
Set exclusive port at false will give the possibility at other sockets to listen to the socket port too, at the same time.
setExclusivePort( exclusivePort )
- exclusivePort: (boolean) by default this parameter is true.
send
For UDP sockets, the destination port and address must be specified. A string may be supplied for the address parameter, and it will be resolved with DNS.
If the address is omitted or is an empty string, ‘0.0.0.0’ is used instead. Depending on the network configuration, those defaults may or may not work; it’s best to be explicit about the destination address.
If the socket has not been previously bound with a call to bind, it gets assigned a random port number and is bound to the “all interfaces” address (‘0.0.0.0’ for udp4 sockets)
The maximum size of an IPv4 datagram depends on the MTU (Maximum Transmission Unit) and on the Payload Length field size.
The Payload Length field is 16 bits wide, which means that a normal payload cannot be larger than 64K octets including internet header and data (65,507 bytes = 65,535 − 8 bytes UDP header − 20 bytes IP header); this is generally true for loopback interfaces, but such long datagrams are impractical for most hosts and networks.
The MTU is the largest size a given link layer technology can support for datagrams. For any link, IPv4 mandates a minimum MTU of 68 octets, while the recommended MTU for IPv4 is 576 (typically recommended as the MTU for dial-up type applications), whether they arrive whole or in fragments.
Note that it’s impossible to know in advance the MTU of each link through which a packet might travel, and that generally sending a datagram greater than the (receiver) MTU won’t work (the packet gets silently dropped, without informing the source that the data did not reach its intended recipient).
send(data, offset, length, port, address)
- data: (Buffer or string) Message to be sent.
- offset: (integer) Offset in the buffer where the message starts.
- length: (integer) Number of bytes in the message.
- port: (integer) Destination port.
- address: (string) Destination hostname or IP address.
Close
Close the underlying socket and stop listening for data on it.
close()
address
address()
Returns an object containing the address information for a socket. For UDP sockets, this object will contain address , family and port.
Example:
var adressObject = this.myUDP.address();
var adress = adressObject.address;
var family = adressObject.family;
var port = adressObject.port;
on
Associate an event to a callback function.
on( event, callback )
- event: (string) here the list of available events for an UDP object
- ‘error’: Emitted when an error occurs.
Example:
this.myUDP.on('error', this._OnSocketError );- ‘message’: Emitted when a new datagram is available on a socket. msg is a Buffer and rinfo is an object with the sender’s address information and the sender’s adress.
- msg Buffer object. The message
- rinfo Object. Remote address information
Example:
this.myUDP.on('message', this._OnSocketMessage );

_OnSocketMessage : function(msg, rinfo){
    this.Device.lastFrame = msg;
    this.Device.lastPort = rinfo.port;
    this.Device.lastAddress = rinfo.address;
},
HTTP Client creation
A HTTP Client object can be created from the QMedialon object to be able to send HTTP requests.
CreateHTTPClient
Create a HTTP Client . This function belongs to the QMedialon object.
CreateHTTPClient()
Return: A HTTP Client object is returned.
Example:
// create a HTTP Client object
this.myHTTPClient = QMedialon.CreateHTTPClient();
HTTP Client
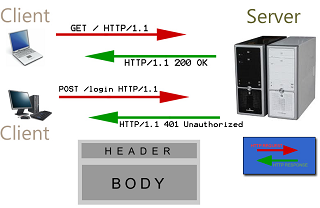
HTTP Client allows sending HTTP/HTTPS requests to a HTTP Server. These requests are GET, POST, PUT and DELETE.
The selection between HTTP and HTTPS is merely done via the URL value indicated in the ‘URL’ parameter of commands.
It also supports the following authentication methods:
- Basic
- Digest-MD5
The HTTPClient object provides the methods below:
- on (CallBack)
- get
- post
- put
- downloadFile
- deleteResource
- getHeaderValue
- getHeaderNameByIndex
- getHeaderValueByIndex
- getHeaderCount
- addHeader
on
Associate an event to a callback function.
on( event, callback )
- event: (string) here the list of available events for an HTTPClient object
- ‘response’: Emitted when a response is received or when an error occurs. The response contains is a Buffer and rinfo is an object with the sender’s address information and the sender’s adress.
- response object. The response object contains the following properties:
- ‘data’: (buffer) Object filled with the data.
- ‘statusCode’: (integer) Http status code.
- ‘headers’: (string) Response header list. Headers are separated by ‘\r\n’ characters. Each Header contains a name and a value which are separated by a ‘:’ character (ex: Connection:Keep-Alive).
- error Object. The error object has two properties:
- ‘errorCode’: (integer) Error code.
- ‘errorText’ : (string) Error text.
- response object. The response object contains the following properties:
Example:
this.myHTTPClient.on('response', this._OnHTTPResponse ); _OnHTTPResponse : function(response, error){ this.Device.Data = response.data; this.Device.StatusCode = response.statusCode; this.Device.ResponseHeaders = response.headers; this.Device.HTTPError = error.errorText; },- ‘download_progress’: Emitted when download progress. It indicates the download progress status (from 0 to 100) of a ‘Download File’ request.
Example:
this.myHTTPClient.on('download_progress', this._OnHTTPDownloadProgress); _OnHTTPDownloadProgress : function(downloadProgress){ this.Device.DownloadProgress = downloadProgress; },- ‘upload_progress’: Emitted when upload progress. It indicates the upload progress status (from 0 to 100) of a ‘Put’ request.
- ‘response’: Emitted when a response is received or when an error occurs. The response contains is a Buffer and rinfo is an object with the sender’s address information and the sender’s adress.
get
Requests data to the specified server
get(url, requestHeaders, items, itemsEncoding, userName, password)
- url: (string) The URL to be requested.
- requestHeaders: (string) (optional) The headers to apply to the request. ‘addHeader’ function can be used to manipulate this parameter.
- items: (string) (optional) It allows to specify the parameters for a URL (it supports special characters like #)
- itemsEncoding: (integer) (optional) Specify the way to encode Items.
- 0: Encode specific parameter like # in percent encoded form.
- 1: specific parameters must be manually encoded (for example : -> %3A)
- userName: (string) (optional) It allows to specify the User Name for authentication.
- password: (string) (optional) It allows to specify the Password for authentication.
post
Submits data to be processed by the specified server.
post(url, requestHeaders, data, items, itemsEncoding, userName, password)
- url: (string) The URL to be requested.
- requestHeaders: (string) (optional) The headers to apply to the request. ‘addHeader’ function can be used to manipulate this parameter.
- data: (Buffer or string) (optional) The Data to send with the request.
- items: (string) (optional) It allows to specify the parameters for a URL (it supports special characters like #)
- itemsEncoding: (integer) (optional) Specify the way to encode Items.
- 0: Encode specific parameter like # in percent encoded form.
- 1: specific parameters must be manually encoded (for example : -> %3A)
- userName: (string) (optional) It allows to specify the User Name for authentication.
- password: (string) (optional) It allows to specify the Password for authentication.
put
Uploads data into the specified server.
put(url, requestHeaders, data, items, itemsEncoding, userName, password)
- url: (string) The URL to be requested.
- requestHeaders: (string) (optional) The headers to apply to the request. ‘addHeader’ function can be used to manipulate this parameter.
- data: (Buffer or string) (optional) The Data to send with the request.
- items: (string) (optional) It allows to specify the parameters for a URL (it supports special characters like #)
- itemsEncoding: (integer) (optional) Specify the way to encode Items.
- 0: Encode specific parameter like # in percent encoded form.
- 1: specific parameters must be manually encoded (for example : -> %3A)
- userName: (string) (optional) It allows to specify the User Name for authentication.
- password: (string) (optional) It allows to specify the Password for authentication.
downloadFile
Download a file from the server and save it in a specific directory.
downloadFile(url, requestHeaders, path, items, itemsEncoding, userName, password)
- url: (string) The URL to be requested.
- requestHeaders: (string) (optional) The headers to apply to the request. ‘addHeader’ function can be used to manipulate this parameter.
- path: (string) (optional) The Path where the file must be saved.
- items: (string) (optional) It allows to specify the parameters for a URL (it supports special characters like #)
- itemsEncoding: (integer) (optional) Specify the way to encode Items.
- 0: Encode specific parameter like # in percent encoded form.
- 1: specific parameters must be manually encoded (for example : -> %3A)
- userName: (string) (optional) It allows to specify the User Name for authentication.
- password: (string) (optional) It allows to specify the Password for authentication.
deleteResource
Sends a request to delete the data/document into the specified server..
deleteResource(url, requestHeaders, items, itemsEncoding, userName, password)
- url: (string) The URL to be requested.
- requestHeaders: (string) (optional) The headers to apply to the request. ‘addHeader’ function can be used to manipulate this parameter.
- items: (string) (optional) It allows to specify the parameters for a URL (it supports special characters like #)
- itemsEncoding: (integer) (optional) Specify the way to encode Items.
- 0: Encode specific parameter like # in percent encoded form.
- 1: specific parameters must be manually encoded (for example : -> %3A)
- userName: (string) (optional) It allows to specify the User Name for authentication.
- password: (string) (optional) It allows to specify the Password for authentication.
getHeaderValue
Get the Header value, from a list of Headers, matching to a specific Header name.
getHeaderValue(headerList, headerName)
- headerList: (string) The Header list where the search must be realized.
- headerName: (string) The header name to find.
Return: Returns the value of the header. If the header name is not found, an empty string is returned.
getHeaderNameByIndex
Get the name of a Header by specifying its index in the list of Headers.
getHeaderNameByIndex(headerList, headerIndex)
- headerList: (string) The Header list.
- headerIndex: (integer) The header index in the list.
Return: Returns the name of the header. If the header index is not correct, an empty string is returned.
getHeaderValueByIndex
Get the value of a Header by specifying its index in the list of Headers.
getHeaderValueByIndex(headerList, headerIndex)
- headerList: (string) The Header list.
- headerIndex: (integer) The header index in the list.
Return: Returns the value of the header. If the header index is not correct, an empty string is returned.
getHeaderCount
Get the count of Header in the list.
getHeaderCount(headerList)
- headerList: (string) The Header list.
Return: Count of Header.
addHeader
Add a Header in the list.
addHeader(headerList, headerName, headerValue)
- headerList: (string) The Header list.
- headerIndex: (integer) The header index in the list.
Return: Returns a new Header list based on the provided list and containing the new Header.
Note: Each Headers are separted by ‘\r\n’ characters. This variable can be used in a Medialon List. Each Header contains a name and a value which are separated by a ‘:’ character (ex: Connection:Keep-Alive).
Resources
A Serial, a DMX or an IO Channel resource can be accessible from the Script.
GetResource
Gets a resource from its reference. This function belongs to the QMedialon object.
GetResource( reference )
- reference: [json object] The reference is generally created during the Setup when a Resource has been selected.
Returns A Serial, a DMX or an IO Channel object if the resource exists and if this resource is not already used. Otherwise, an empty object is returned.
Example:
//Setup definition for a Serial resource
Info:{
    Setup:{
        iSerialID:{
          Widget:"Serial",
          Name:"COM Port:"
        }
    }
},

Setup:{
    iSerialID:-1
},

//local script variable
SerialRes:null,

Init: function()
{
    //get the Serial resource
    this.SerialRes = QMedialon.GetResource( "Serial", this.Setup.iSerialID );
}
Serial

The Serial object provides the methods below:
- Open
- SetBaudRate
- SetStopBits
- SetDataSize
- SetParity
- SetBreak
- SetDTR
- SetRTS
- SetDTRControl
- SetRTSControl
- SetDTRHandshake
- SetDSROutFlow
- SetRTSHandshake
- SetCTSOutFlow
- SetBreakCharacter
- SetBreakTime
- Write
- Close
- On (CallBack)
Open
Open the Serial resource
Open( openListener )
- openListener: (function) callback called when the resource is opened. This callback is optional.
Close
Close the Serial resource
Close( closeListener )
- closeListener: (function) callback called when the resource is closed. This callback is optional.
SetBaudRate
Set the BaudRate
SetBaudRate( baudRate )
- baudRate: (integer) this is the number of bits per seconds. Its default value is 19200. Below the list of supported baudrate:
- 300
- 600
- 1200
- 2400
- 4800
- 9600
- 19200
- 38400
- 57600
- 115200
SetStopBits
Set the BaudRate
SetStopBits( stopBits )
- stopBits: (integer) Number of Stop bits per seconds. Its default value is 1. It can be set to 1 or 2.
SetDataSize
Set the data size
SetDataSize( dataSize )
- dataSize: (integer) Number of Stop bits per seconds. Its default value is 8 bits. It can be set to 8 or 7 bits.
SetParity
Set the parity
SetParity( parity )
- parity: (string) the parity is set to ‘None’ by default. Below the list of supported baudrate:
- ‘None’
- ‘Even’
- ‘Odd’
SetBreak
enable or no the sent of a break
SetBreak( break )
- break: (boolean) true to enable the sent of a break
SetDTR
Set the DTR
SetDTR( DTR )
- DTR: (boolean) true to enable the DTR
SetRTS
Set the RTS
SetRTS( RTS )
- RTS: (boolean) true to enable the RTS
SetDTRControl
Set the DTR Control
SetDTRControl( DTRControl )
- DTRControl: (boolean) true to enable the DTR Control
SetRTSControl
Set the RTS Control
SetRTSControl( RTSControl )
- RTSControl: (boolean) true to enable the RTS Control
SetDTRHandshake
Set the DTR Handshake
SetDTRHandshake( DTRHandshake )
- DTRHandshake: (boolean) true to enable the DTR Handshake
SetDSROutFlow
Set the DSR Out Flow
SetDSROutFlow( DSROutFlow )
- DSROutFlow: (boolean) true to enable the DSR Out Flow
SetRTSHandshake
Set the RTS Handshake
SetRTSHandshake( RTSHandshake )
- RTSHandshake: (boolean) true to enable the RTS Handshake
SetCTSOutFlow
Set the CTS Out Flow
SetCTSOutFlow( CTSOutFlow )
- CTSOutFlow: (boolean) true to enable the CTS Out Flow
SetBreakCharacter
Define the break character which is the character that will be set in the frame for sending a break (low status) on the serial line.
SetBreakCharacter( breakCharacter )
- breakCharacter: (integer) its value should be between 0 to 255.
SetBreakTime
Define the break time which is the time that this break will last.
SetBreakTime( breakTime )
- breakTime: (integer) break time in milliseconds. By default it is set to 2ms.
Write
Send a data.
Write( data )
- data: (string or Buffer) data to send
On
Associate an event to a callback function.
On( event, callback )
- event: (string) here the list of available events for an Serial object
- ‘open’: Emitted when the resource is opened
- ‘close’: Emitted when the resource is closed
- ‘data’: Emitted when a data is received
- ‘tx_empty’: Emitted when
- the Tx Buffer is empty
- a break has been received
- a CTS event has been received
- a DSR event has been received
- an error has occcured
Example:
({
    Info:{
        Setup:{
            iSerialID:{
              Widget:"Serial",
              Name:"COM Port:"
            }
        }
    },

    Setup:{
        iSerialID:-1
    },

    SerialRes:null,

    _OnReceivedData: function(data) {
        //data.toString();
    },

    Init: function()
    {
        this.SerialRes = QMedialon.GetResource( "Serial", this.Setup.iSerialID );
        this.SerialRes.On('data', this._OnReceivedData );
        this.SerialRes.Open();
    },

    Send: function()
    {
        this.SerialRes.Write("hello");
    }
})
DMX

The DMX is splitted in two different resources DMXIn and DMXOut object which provide the methods below:
- Open
- WriteBlock
- ReadBlock
- Close
- On (CallBack)
Open
Open the DMXIn / DMXOut resource
Open( openListener )
- openListener: (function) callback called when the resource is opened. This callback is optional.
Close
Close the DMXIn / DMXOut resource
Close( closeListener )
- closeListener: (function) callback called when the resource is closed. This callback is optional.
WriteBlock
Sends a block of data.
WriteBlock( data, startChannel, channelCount )
- data: (string or Buffer) the block of data to send (first byte is data for the specified startChannel)
- startChannel: (integer) index of First channel to write to. By default it is set to 0.
- channelCount: (integer) Count of channels to write (one byte per channel) which is equivalent to the length of the block. By default it is set to 512.
ReadBlock
Reads a block of received data.
ReadBlock( startChannel, channelCount )
- startChannel: (integer) index of First channel to read from. By default it is set to 0.
- channelCount: (integer) Count of channels to read (one byte per channel) which is equivalent to the length of the block. By default it is set to 512.
Returns a new Buffer containing the block asked.
On
Associate an event to a callback function.
On( event, callback )
- event: (string) here the list of available events for an Serial object
- ‘open’: Emitted when the resource is opened
- ‘close’: Emitted when the resource is closed
- ‘data’: Emitted when a data is received
Example:
({
    Info:{
        Setup:{
            DMXInRef:{
              Widget:"DMXIn",
              Name:"DMX In:"
            },
            DMXOutRef:{
              Widget:"DMXOut",
              Name:"DMX Out:"
            }
        }
    },

    Setup:{
        DMXInRef:"",
        DMXOutRef:""
    },

    Device:{
        DMXInRed:0,
        DMXInGreen:0,
        DMXInBlue:0
    },

    DMXInRes:null,
    DMXOutRes:null,
    RGBBuff:null,

    //this function is called when the DMXIn receives something
    _OnReceivedData: function(data) {
        //the bits 5, 6 and 7 values are put in the device variables
        this.Device.DMXInRed = data[5];
        this.Device.DMXInGreen = data[6];
        this.Device.DMXInBlue = data[7];
    },

    _InitDeviceVariables: function() {
        //initialize the device variables
        this._OnReceivedData( this.DMXInRes.ReadBlock() );
    },

    _mStart: function()
    {
        //create a buffer which can contains 3 bits
        this.RGBBuff = new Buffer(3);
        this.RGBBuff.fill(0);

        //get the DMX output resource and open it
        this.DMXOutRes = QMedialon.GetResource( this.Setup.DMXOutRef );
        this.DMXOutRes.Open();

        //get the DMX input resource, associate a callback and open it
        this.DMXInRes = QMedialon.GetResource( this.Setup.DMXInRef );
        this.DMXInRes.On('data', this._OnReceivedData );
        this.DMXInRes.Open( this._InitDeviceVariables );
    },

    WriteRGB: function()
    {
        //send the slider values via the RGBBuff Buffer at the position 5, 6 and 7
        this.RGBBuff[0] = QMedialon.GetValueAsInteger( "SliderRed.Status" );
        this.RGBBuff[1] = QMedialon.GetValueAsInteger( "SliderGreen.Status" );
        this.RGBBuff[2] = QMedialon.GetValueAsInteger( "SliderBlue.Status" );
        this.DMXOutRes.WriteBlock( this.RGBBuff, 5, 3 );
    }
})
IO Channel

The IO Channel is splitted in four different resources DigitalIn, DigitalOut, AnalogIn and AnalogOut object which provide the methods below:
- Open
- SetValue
- GetValue
- Close
- On (CallBack)
Open
Open the DigitalIn / DigitalOut / AnalogIn / AnalogOut resource
Open( openListener )
- openListener: (function) callback called when the resource is opened. This callback is optional.
Close
Close the DigitalIn / DigitalOut / AnalogIn / AnalogOut resource
Close( closeListener )
- closeListener: (function) callback called when the resource is closed. This callback is optional.
SetValue
Set the value of an IO.
SetValue( value, flush )
- value: (integer) Value to set (x1000 for analog values i.e. 1Volt = 1000)
- flush: (boolean) Flush allows to synchronize all the Digital and Analog Outputs and so to set their values at the same moment. By default this parameter is set to true. If it is set to false, the output will be not validated until another SetValue( X, true ) is called on a IO Channel resource.
GetValue
Get the value of an IO.
GetValue()
Returns the value as an integer.
On
Associate an event to a callback function.
On( event, callback )
- event: (string) here the list of available events for an Serial object
- ‘open’: Emitted when the resource is opened
- ‘close’: Emitted when the resource is closed
- ‘data’: Emitted when a Digital or Analog Input value changes
Example:
({
    //define IOChannel1Ref and IOChannel2Ref as Digital Output
    Info: {
        Setup: {
            IOChannel1Ref: {
                Widget:"DigitalOut"
            },
            IOChannel2Ref: {
                Widget:"DigitalOut"
            }
        }
    },

    Device:{
        IOChannel1Val:0,
        IOChannel2Val:0
    },

    Setup: {
        IOChannel1Ref:"",
        IOChannel2Ref:""
    },

    //local script variables which are associated to the IO Channel resources
    IOChannel1Res:null,
    IOChannel2Res:null,

    //private script function which is called each time that the IO Channels change
    _OnReceivedData: function( val, obj ) {
        if( obj == this.IOChannel1Res ) {
            this.Device.IOChannel1Val = val;
        }
        else if( obj == this.IOChannel2Res ) {
            this.Device.IOChannel2Val = val;
        }
    },

    //private script function which must be called when a resource is opened
    //in order to initialize the Device Variable
    _InitValue: function( obj ) {
        if( obj == this.IOChannel1Res ) {
            this.Device.IOChannel1Val = this.IOChannel1Res.GetValue();
        }
        else if( obj == this.IOChannel2Res ) {
            this.Device.IOChannel2Val = this.IOChannel2Res.GetValue();
        }
    },

    //private script function which is called when the program starts
    _mStart: function(){
        //get the resources, link the callbacks and open the resources
        this.IOChannel1Res = QMedialon.GetResource( this.Setup.IOChannel1Ref );
        this.IOChannel1Res.On('data', this._OnReceivedData );
        this.IOChannel1Res.Open( this._InitValue );

        this.IOChannel2Res = QMedialon.GetResource( this.Setup.IOChannel2Ref );
        this.IOChannel2Res.On('data', this._OnReceivedData );
        this.IOChannel2Res.Open( this._InitValue );
    },

    SetAllOutputsToOn: function() {
        //the value of each resources will be modified at the same moment
        // because only the last SetValue as a its 'flush' parameter set to true
        this.IOChannel1Res.SetValue( 1, false );
        this.IOChannel2Res.SetValue( 1 );
    },

    SetAllOutputsToOff: function() {
        //the value of each resources will be modified at the same moment
        // because only the last SetValue as a its 'flush' parameter set to true
        this.IOChannel1Res.SetValue( 0, false );
        this.IOChannel2Res.SetValue( 0 );
    }

})
Buffer

A Buffer is similar to an array of integers but corresponds to a raw memory allocation outside the V8 heap. A Buffer cannot be resized.
new Buffer
The Buffer class is a global type for dealing with binary data directly. It can be constructed in a variety of ways.
new Buffer(size)
- size: (integer) size of the buffer
Allocates a new buffer of size octets.
new Buffer(array)
- array: (array) array of letter.
Allocates a new buffer using an array of octets.
new Buffer(str, [encoding])
- str: (string) string to encode.
- encoding: (string) encoding to use. By default this optional parameter is set to ‘utf8’.
- ascii: for 7 bit ASCII data only. This encoding method is very fast, and will strip the high bit if set.
- utf8: Multibyte encoded Unicode characters. Many web pages and other document formats use UTF–8.
- base64: Base64 string encoding.
- hex: Encode each byte as two hexadecimal characters.
Allocates a new buffer containing the given str. Encoding defaults to ‘utf8’.
toString
toString([encoding], [start], [end])
- encoding: (string) encoding to use. By default this optional parameter is set to ‘utf8’.
- start: (integer) start position. By default this optional parameter is set to 0.
- end: (integer) end position. By default this optional parameter is set to the buffer length value.
Decodes and returns a string from buffer data encoded with encoding (defaults to ‘utf8’) beginning at start (defaults to 0) and ending at end (defaults to buffer.length)
Converting between Buffers and JavaScript string objects requires an explicit encoding method. Here are the different string encodings:
- ascii: for 7 bit ASCII data only. This encoding method is very fast, and will strip the high bit if set.
- utf8: Multibyte encoded Unicode characters. Many web pages and other document formats use UTF–8.
- base64: Base64 string encoding.
- hex: Encode each byte as two hexadecimal characters.
copy
copy(targetBuffer, [targetStart], [sourceStart], [sourceEnd])
- targetBuffer: (Buffer) Buffer to copy into
- targetStart: (integer) target start position. By default this optional parameter is set to 0.
- sourceStart: (integer) source start position. By default this optional parameter is set to 0.
- sourceEnd: (integer) source end position. By default this optional parameter is set to the source buffer length value.
Do copy between buffers. The source and target regions can be overlapped.
All values passed that are undefined/NaN or are out of bounds are set equal to their respective defaults.
Example:
//build two Buffers, then copy buf1 from byte 16 through byte 19 into buf2,
// starting at the 8th byte in buf2
buf1 = new Buffer(26);
buf2 = new Buffer(26);

for (var i = 0 ; i < 26 ; i++) {
  buf1[i] = i + 97; // 97 is ASCII a
  buf2[i] = 33; // ASCII !
}

buf1.copy(buf2, 8, 16, 20);
return buf2.toString('ascii');

// !!!!!!!!qrst!!!!!!!!!!!!!
concat
concat a list of buffers in a new buffer.
concat(list, [totalLength])
- list: (array) List of Buffer objects to concat
- totalLength: (integer) Total length of the buffers when concatenated
Returns a buffer which is the result of concatenating all the buffers in the list together. If totalLength is not provided, it is read from the buffers in the list. However, this adds an additional loop to the function, so it is faster to provide the length explicitly.
Example:
var buffer1 = new Buffer("Controller");
var buffer2 = new Buffer("Stage");
//var buff = buffer2.concat([buffer1]);
var buff = buffer2.concat([buffer1, buffer2]);
return buff.toString();
//ControllerStage
write
Writes string to the buffer at offset using the given encoding. Length is the number of bytes to write.
write(string, [offset], [length], [encoding])
- string: (string) data to be written to buffer.
- offset: (integer) offset where to start to write in the buffer. By default this optional parameter is set to 0.
- length: (integer) number of bytes to write.
- encoding: (string) encoding to use. By default this optional parameter is set to ‘utf8’.
Returns number of octets written. This buffer did not contain enough space to fit the entire string, it will write a partial amount of the string. The method will not write partial characters.
Example:
var buf = new Buffer(256);
var len = buf.write('\u00bd + \u00bc = \u00be', 0);
return (len + " bytes: " + buf.toString('utf8', 0, len));
//12 bytes: ½ + ¼ = ¾
left
left(length)
- length: (integer) number of bytes from the left.
Returns a buffer that contains the leftmost length bytes of this buffer.
The entire buffer is returned if length is greater than size().
Example:
var buf = new Buffer(26);
for (var i = 0 ; i < 26 ; i++) {
    buf[i] = i + 97; //"97" is the ASCII code for "a"
}
var result = buf.left(10));
// result = "abcdefghij"
middle
middle(position, length)
- length: (integer) starting position.
- length: (integer) number of bytes from the position.
Returns a buffer containing length bytes from this buffer, starting at position position. If length is –1 (the default), or position + length >= buffer size, returns a buffer containing all bytes starting at position until the end of the buffer.
Example:
var buf = new Buffer(26);
for (var i = 0 ; i < 26 ; i++) {
    buf[i] = i + 97; //"97" is the ASCII code for "a"
}
var result = buf.middle(10, 5));
// result = "klmno"
right
right(length)
- length: (integer) number of bytes from the right.
Returns a buffer that contains the rightmost length bytes of this buffer.
The entire buffer is returned if length is greater than size().
var buf = new Buffer(26);
for (var i = 0 ; i < 26 ; i++) {
    buf[i] = i + 97; //"97" is the ASCII code for "a"
}
var result = buf.right(10));
// result = "qrstuvwxyz"
fill
Fills the buffer with the specified value.
buf.fill(value, [offset], [end])
- value: (integer / string) value to use to fill the buffer. it can be a number between 0 and 256 or a string containing one letter.
- offset: (integer) offset where to start to fill the buffer. By default this optional parameter is set to 0.
- end: (integer) end where to stop to fill the buffer. By default this optional parameter is set to buffer length value.
Example:
var buf = new Buffer(10);
buf.fill("a");
var temp = buf.toString();
//temp= "aaaaaaaaaa")
Checksum

A checksum is a count of the number of bits in a transmission unit that is included with the unit so that the receiver can check to see whether the same number of bits arrived. If the counts match, it’s assumed that the complete transmission was received.
new Checksum
A Checksum object can be constructed easily.
new Checksum()
Allocates a new Checksum object.
Example:
var ck = new Checksum();
Init
Set multiple parameters of the checksum in order to initialize it.
Init( checksumType, countOfBytes, twosComp, ASCIIcoded )
Default values:
- checksumType: (string) By default this parameter is set to “Sum”. The list of available value are
- “Sum”: This checksum is the sum of all the bytes between the byte indicated by ‘Start from byte’ parameter and the byte before the checksum character or indicated by ‘Stop at byte’ parameter.Note: ‘Checksum pos’ parameter is not used.
- “Xor”: This checksum is the result of a XOR operation of all the bytes between the byte indicated by ‘Start from byte’ parameter and the byte before the checksum character or indicated by ‘Stop at byte’ parameter.Note: ‘Checksum pos’ parameter is not used. Note: ‘Count of Bytes’ parameter is always 1 with this type.
- “Or”: This checksum is the result of a OR operation of all the bytes between the byte indicated by ‘Start from byte’ parameter and the byte before the checksum character or indicated by ‘Stop at byte’ parameter.Note: ‘Checksum pos’ parameter is not used. Note: ‘Count of Bytes’ parameter is always 1 with this type.Note: This is a very inefficient checksum but it is present in some protocols.
- “Crc16”: This checksum is the two bytes result of a polynomial calculation between the byte indicated by ‘Start from byte’ parameter and the byte before the checksum character or indicated by ‘Stop at byte’ parameter. Note: CRC stands for Cyclic Redundency Check). Note: ‘Checksum pos’ parameter is not used.
- “Crc8”: This checksum is the one byte result of a polynomial calculation between the byte indicated by ‘Start from byte’ parameter and the byte before the checksum character or indicated by ‘Stop at byte’ parameter. Note: CRC stands for Cyclic Redundency Check). Note: ‘Checksum pos’ parameter is not used.
- countOfBytes: (integer) count of bytes in the result. This parameter is by default set to 2 for the Sum, Xor, Or, Crc8 types and it is set to 2 for a Crc16 type.
- twosComp: (boolean) a two’s complement (NOT+1) operation is performed on the checksum byte if this parameter is set to true. Its default alue is false.
- ASCIIcoded: (boolean) The result of the operation is changed into ASCII characters if this parameter is set to true. Its default alue is false. Important note: if the size of the checksum is set to 1, the “ASCII coded” operation will create two bytes, if the size of the checksum is set to 2, the “ASCII coded” operation will create four bytes. For example, with a size of 1 and a checksum result of 110 (in decimal) the two bytes will be the ASCII character “6” and “E”.
SetChecksumType
Initialize the checksum Type.
SetChecksumType( checksumType )
- checksumType: (string) By default this parameter is set to “Sum”. The list of available value are
- “Sum”
- “Xor”
- “Or”
- “Crc16”
- “Crc8”
SetCountOfBytes
Initialize the count of bytes in the checksum result. This function is mainly usefull when the checksum type is Sum and if this sum must be done on more than 1 byte.
SetChecksumType( checksumType )
- countOfBytes: (integer) number of bytes in the result.
SetTwoComplement
Invert all the bits of the checksum value, and add 1. If the checksum as 2 bytes, the addition will be done on the second byte.
SetTwoComplement( twosComp )
- twosComp: (boolean) a two’s complement (NOT+1) operation is performed on the checksum byte if this parameter is set to true. Its default alue is false.
Example:
0010 0111 0100 1111 (0x274f) become: 1101 1000 1011 0001 (0xd8b1)
1010 1100 (0xAC) become: 0101 0100  (0x54)
SetAsciiCoded
Allows to code the result in ASCII format.
SetAsciiCoded( ASCIIcoded )
- ASCIIcoded: (boolean) The result of the operation is changed into ASCII characters if this parameter is set to true. Its default alue is false. Important note: if the size of the checksum is set to 1, the “ASCII coded” operation will create two bytes, if the size of the checksum is set to 2, the “ASCII coded” operation will create four bytes. For example, with a size of 1 and a checksum result of 110 (in decimal) the two bytes will be the ASCII character “6” and “E”.
SetHighByteFirst
Invert the the 2 bytes of the Crc16 checksum result.
SetHighByteFirst( highByte )
highByte: (boolean) When true the order of the two bytes resulting of the Crc16 is high-low, when false it is low-high.
This parameter will change the order of the checksum bits like this:
Here we have a 2 bytes checksum:
0010 0111 0100 1111 (0x274f)
if SetHighByteFirst is true, the checksum bytes, will become:
1111 0100 0111 0010 (0xf472)
SetCRC16Mask
Set the Mask/Polynom of the CRC16 checksum.
SetCRC16Mask( crc16Mask )
- crc16Mask: By default its value is 0xA001. CRC uses a polynome definition for the computation, this parameter indicates which members of that polynome are used to compute the CRC.
Each bit corresponds to a member of the polynome (bit is 1 if the member is present otherwize bit is 0) and is given low bits first.
Generally a CRC16 polynome is expressed with x^16 member which is hidden for the CRC16 mask value.
Typical polynom (also known as CRC16-ANSI) is expressed as x^16 + x^15 + x^2 + x^0.
To compute the CRC16 mask value, the polynome must be expressed low bits first (as mention above) with the x^16 member hidden such as x^0 + x^2 + x^15, which in terms of mask means 1010 0000 0000 0001 or !A0!01.
Examples of polynome/mask:
- CRC16-ANSI: Polynom: (x^16 +) x^15 + x^13 + x^0, Mask: !A0!01. This value is the default value and is commonly used in the industry.
- CRC16-CCITT (Kermit): Polynom: (x^16 +) x^12 + x^5 + x^0, Mask: !84!08.
- CRC16-DNP: Polynom:(x^16 +) x^13 + x^12 + x^11 + x^10 + x^8 + x^6 + x^5 + x^2 + x^0, Mask: !A6!BC.
- Any other value can be used accordingly to the device protocol definition. Please refer to the device protocol documentation.
SetCRC16InitialValue
Set the initial value of the CRC16 checksum.
SetCRC16InitialValue( crc16Initial )
- crc16Initial: By default its value is 0. The Crc16 initial value indicates a constant value used to initialize the computation registers:
- !00!00 (default value) is commonly used in the industry.
- The CCITT defines the value !FF!FF.
- Any other value can be used accordingly to the device protocol definition. Please refer to the device protocol documentation.
SetCRC8Mask
Set the Mask/Polynom of the CRC8 checksum.
SetCRC8Mask( crc8Mask )
- crc8Mask: By default its value is 0x8C. CRC uses a polynome definition for the computation, this parameter indicates which members of that polynome are used to compute the CRC.
Each bit corresponds to a member of the polynome (bit is 1 if the member is present otherwize bit is 0) and is given low bits first.
Generally a CRC8 polynome is expressed with x^8 member which is hidden for the CRC8 mask value.
Typical polynom (also known as CRC8-CITT) is expressed as x^8 + x^2 + x^1 + x^0.
To compute the CRC8 mask value, the polynome must be expressed low bits first (as mention above) with the x^8 member hidden such as x^0 + x^1 + x^2, which in terms of mask means 1110 0000 or !E0.
Examples of polynome/mask:
- CRC8-CCITT: Polynom: (x^8 +) x^2 + x^1 + x^0, Mask: !E0.
- CRC8-DALLAS: Polynom: (x^8 +) x^5 + x^4 + x^0, Mask: 8Ch. This value is the default value.
- CRC8-W-CDMA: Polynom: (x^8 +) x^7 + x^4 + x^3 + x^1 + x^0, Mask: !D9.
- Any other value can be used accordingly to the device protocol definition. Please refer to the device protocol documentation.
SetCRC8InitialValue
Set the initial value of the CRC8 checksum.
SetCRC8InitialValue( crc8Initial )
- crc16Initial: By default its value is 0xFF. Crc8 initial value indicates a constant value used to initialize the computation registers:
- !FF (default value) is defined by the CCITT and DALLAS.
- Any other value can be used accordingly to the device protocol definition. Please refer to the device protocol documentation.
ComputeChecksum
Computes the checksum matching with the data provided as parameter and insert the checksum result at a specific position, and return the new buffer (or string) with the checksum inserted.
ComputeChecksum( data, checksumPosition )
- data: (Buffer or string) data which must be computed.
- checksumPosition: (integer) position where the checksum result must be inserted. This parameter is optional and by default, the checksum result is added at the and of the Buffer which is returned.
Returns a new Buffer containing the initial data and the checksum result inserted to the appropriated position.
Example:
var ck = new Checksum();
ck.SetChecksumType( "Crc16" );
var buff = new Buffer("Hello World!!" );
var result = ck.ComputeChecksum( buff, buff.length - 2 );
return result.toString("hex");

//the returned value is 48656c6c6f20576f726c6468172121
//0x6817 is the checksum result
//it has been inserted 2 bytes before the end of the buff data
//note that 0x21 -> !
UpdateChecksumToCompute
Update the checksum result. This allows to compute a checksum with multiple datas.
UpdateChecksumToCompute( data )
- data: (Buffer or string) data which must be computed.
GetComputedChecksum
Get the computed checksum result.
GetComputedChecksum()
Returns a new Buffer which contains the checksum result.
Example:
var ck = new Checksum();
ck.SetChecksumType( "Crc16" );
var buff = new Buffer("Hello World!!" );
ck.UpdateChecksumToCompute( buff ); //or ck.UpdateChecksumToCompute( "Hello World!!" );
var result = ck.GetComputedChecksum();
return result.toString("hex");

//0x6817 is the checksum result
ResetChecksumToCompute
Reset the checksum parameters with the initializing values. For example, the CRC16 initial value is resetted to the one provided by the user. The previous changes done by a call of the UpdateChecksumToCompute function are ignored.
ResetChecksumToCompute()
XML

A simple, small and minimal XML parser has been integrated into the JavaScript engine. It reads XML and creates objects representing the XML document. The objects can be manipulated, changed, and saved again as XML.
Examples:
Write to XML
var xmlDoc = new XMLDocument();
var xmlEltPlaylist = xmlDoc.CreateElement("playlist");
xmlDoc.AppendChild( xmlEltPlaylist );

var xmlEltItem1 = xmlDoc.CreateElement("item");
xmlEltPlaylist.AppendChild( xmlEltItem1 );
xmlEltItem1.SetAttribute( "id", 1 );

var xmlEltFilename1 = xmlDoc.CreateElement("filename");
xmlEltItem1.AppendChild( xmlEltFilename1 );
xmlEltItem1.SetText( "example_A.mp3" );

var xmlEltTitle1 = xmlDoc.CreateElement("title");
xmlEltItem1.AppendChild( xmlEltTitle1 );
xmlEltItem1.SetText( "Song A" );
Read from XML
var xmlDataToRead =
    '<playlist>' +
    '   <item id="1">' +
    '       <filename>example_A.mp3</filename>' +
    '       <title>Song A</title>' +
    '   </item>' +
    '   <item id="2">' +
    '       <filename>example_B.mp3</filename>' +
    '       <title>Song B</title>' +
    '   </item>' +
    '</playlist>';
var xmlDoc = new XMLDocument();
xmlDoc.Parse( xmlDataToRead );
var rootElt = xmlDoc.DocumentElement();

var itemChild = rootElt.FirstChildElement();
while( !itemChild.IsNull() ) {
    var id = itemChild.Attribute("id");

    var titleChild = itemChild.FirstChildElement("title");
    if( !titleChild.IsNull() ) {
        var titleText = titleChild.GetText();
    }

    itemChild = itemChild.NextSiblingElement();
}
XMLDocument Object
Parse
Parse the given block of xml data.
Parse( XMLData )
- XMLData: [string] XML data.
DocumentElement
Get the root element, the only top level element, of the document.
DocumentElement()
Return: Returns the root XMLElement Object.
CreateElement
Create a new XMLElement Object
CreateElement( tagName )
- tagName: [string] XML tag name.
Return: Returns the a new XMLElement Object.
AppendChild
Add a new XMLElement child. The new XMLElement is added at the end of the list.
AppendChild( newChild )
- newChild: [XMLElement] XMLElement to append.
Error
If an error occurs, Error will be set to true.
Error()
Return: Returns true if an error has been detected in this XMLDocument Object.
XMLElement Object
ToString
Convert the XML data from the XMLElement to a string.
ToString()
Return: Returns the XML data from the XMLElement as a string.
SetTagName
Set the tag name of this XMLElement.
SetTagName ( tagName )
- tagName: [string] XML tag name.
GetTagName
Get the tag name of this XMLElement.
GetTagName ()
Return: Returns the XML tag name of this XMLElement.
SetText
Set the text of this XMLElement.
SetText ( text )
- text: [string] text of this XMLElement.
GetText
Get the text of this XMLElement.
GetText ()
Return: Returns the text of this XMLElement.
SetAttribute
Define a new attribute.
SetAttribute ( name, value )
- name: [string] Name of the attribute to add or to update.
- value: [string] Value of the attribute.
RemoveAttribute
Remove an attribute.
RemoveAttribute ( name )
- name: [string] Name of the attribute to remove.
Attribute
Get the value of a specific attribute of this XMLElement.
Attribute ( name )
Return: Returns the value of the attribute as a string.
IsNull
Check if the XMLElement is empty.
IsNull()
Return: Returns true if the XMLElement has no tag name, none attribute, no XMLElement child…
FirstChildElement
Get the first XMLElement child of this object.
FirstChildElement()
Return: Returns the first XMLElement of this Object.
FirstChildElement
Get the first XMLElement child of this object which has the tag name defined as argument.
FirstChildElement( tagName )
- tagName: [string] XML tag name.
Return: Returns the first XMLElement of this Object.
NextSiblingElement
Get the next sibling XMLElement.
NextSiblingElement()
Return: Returns the next sibling XMLElement.
NextSiblingElement
Get the next sibling XMLElement which has the tag name defined as argument.
NextSiblingElement( tagName )
- tagName: [string] XML tag name.
Return: Returns the next sibling XMLElement.
AppendChild
Append a XMLElement to another one.
AppendChild( newChild )
- newChild: [XMLElement] XMLElement to append.
Sample Projects and Scripts
Several Manager sample projects and scripts can be found here.
Find window
In order to facilitate the search in the script area from the Setup or in the Control Panel the access the a Find window is available by pressing Ctrl+F or clicking on ‘Find…’ in the contextual menu.
 This Find window is pretty basic and allows to search in up or down direction and it can be set as case sensitive.
Debugger
One Debugger by device is automatically created when the mxmMedialonScript.cfg contains the lines below:
[DEBUGGER]
enable=1
The ‘enable’ option is 0 by default.
The Debugger allows to debug the script in Debug/User Mode/Run Project modes, not in Stop mode. BreakPoints and differentes actions like Continue/Interrupt/Step Into/Step Over/Step Out are available. The value of each variables defined into the script can be read. The Debugger provides also Runtime Error.
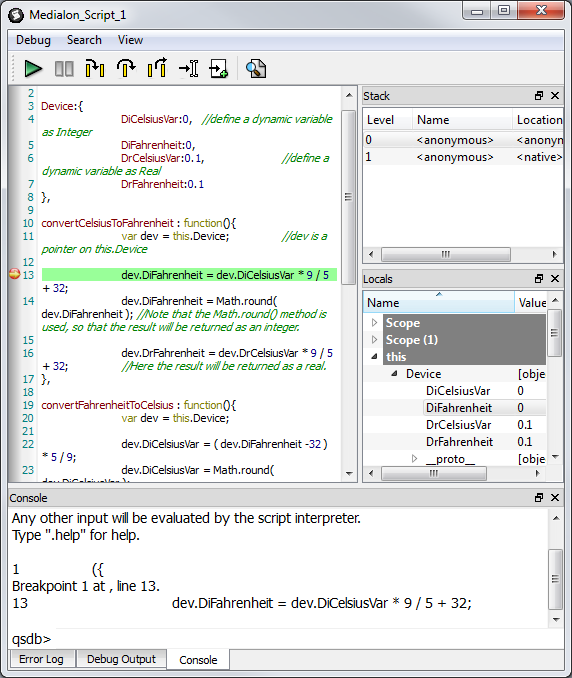
Note: All the calls to a Qmedialon.Perform which have an effect on the GUI should be commented when the debugger is enabled, otherwise Manager can be frozen.
Device Setup
The Device setup Dialog is used to:
- Load a Script Driver and set its parameters (like any others MxM devices)
- Edit the JavaScript code of the device
- Manage the device variables
- Set various options

Default Script Edition
The “Default Script” of a mxmMedialonScript device is the script which is loaded and executed by default when the device is started (when the project goes into run mode). This script is also saved in the project file and automatically reloaded when the project is loaded. Most of the time this is the only script used by the device (unless the advanced dynamic script loading feature is used: see the Load From File and Load From Text command description).
The Script area is used to edit the Default Script code of the device.
- Type (or copy and paste) the code in the code area
- Search words
- Click the “Evaluate” button to perform a syntax checking of the code.
- If there’s a syntax error, the error is displayed in the “Script Info” area and the offended line is selected.
The JavaScript code is saved in the project when the Setup Dialog is closed by clicking the “OK” button.
To easily edit script, this area provides a syntax highlighting system and a contextual menu which allows to quickly insert Medialon Variable, Task, Cue, UserGroup, UserScreen or Device name.

Device Variables Management
The Variables tab of the setup dialog can be used to adapt the default value of the device variables.
The type of these variables can be:
- String
- Integer
- Real
- Enum
- Data
- Time
These variables are automatically extracted from the script during the Setup. See Device Variables in the JavaScript Guidelines section for the JavaScript device variable declaration syntax.
Edit…
Select a variable a click “Edit…” button to display the Edit dialog which allows changing the type of variable and its value.
Options
The Options tab of the setup dialog provides is a section where specific configuration can be done concerning the Programming and the Control Panel.
Programming
Remove Default Commands and Variables
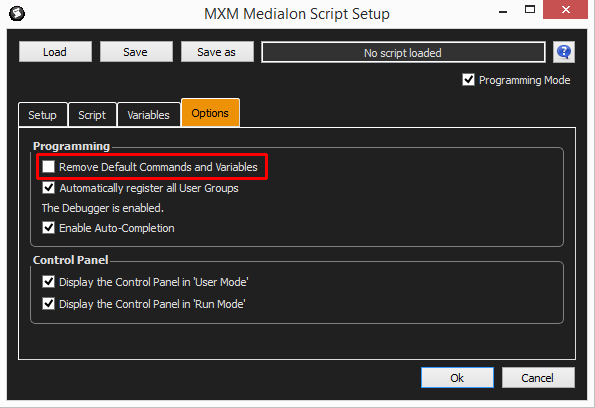
In the option tab, there is an option which permits to disable the default commands and value if you don’t need it, in order to clarify the utilization of the script by a final user (in the commands menus for example)
Default Commands are:
- Execute Function
- Execute Function With Params
- Load From File
- Load From Text
Default Variables are:
- [deviceName].Activity –>Cannot be removed
- [deviceName].Positrack –>Cannot be removed
- [deviceName].Status
- [deviceName].Error
It is possible to force the value of this option directly in the script:
Info:{
    Options:{
       RemoveDefaultCommandsAndVariables:[false/true]
    },
In this case and because this script line has the priority, the checkbox will be disabled.
User Groups
One checkbox allows to automatically register all User Groups.
If this option is checked, QMedialon.RegisterGroup and QMedialon.UnregisterGroup calls will be ignored.
Debugger
A line informs the end user if the Debugger is enabled or not.
Auto-Completion
The Auto-Completion system allows to automatically complete some words (QMedialon functions, Medialon variables, tasks, user groups…) into the javascript Edit box of the Setup dialog. But for huge project with many Variables and Devices the loading time of the Setup can be long. In this case, it might be useful to disable the Auto-Completion.
Control Panel
Two check boxes allows specifying the Control Panel visibility:
“Visible In User Mode”: if checked, the Device Control Panel is visible in User Mode. Otherwise the Device Control Panel is hidden.
“Visible In Run Mode”: if checked, the Device Control Panel is visible in Run Mode. Otherwise the Device Control Panel is hidden.
These options are useful if the control panel is put in a container in order to display it during the execution.
Graphical User Interface
Control Panel
The purpose of the Control Panel is to allow “live editing” of the JavaScript code for minor modification or debugging while the Medialon project is running. Thus, the Device Control Panel should not be displayed in a normal production environment as it is geared toward people who have some skills in JavaScript and in Medialon programming.

The Device Control Panel has one main area for the script edition:
Script Edition area
The Script Edition area is very similar to the one in the Setup Dialog box and supports the same interactions. For example, a script evaluation button allows to verify the script syntax and it is also possible to load or save the script in files.
In addition, a ‘Script Status’ panel indicates whether script displayed in the edition area is the same as the script currently running in the device:
- ‘Loaded’: the displayed script is the same as the currently running device script.
- ‘Modified’: the script in the editing area has been modified.
If the script has been modified, it is possible to update the currently running device script by clicking on the ‘Update Device’ button.
The ‘Set as Default Script’ check box allows defining the currently edited script as the Device Default Script when the ‘Update Device’ button is clicked. Note that the current project must be saved in order to store the new Device Default Script in the project.
The ‘Refresh from Device’ button replaces the content of the editing area with the script which is currently running in the device. In that case the Script Status switches back from ‘Modified’ to ‘Loaded’.
Note that a Debugger button is displayed when the Debugger is enabled. Clicking on this button, the Debugger window will open.
Device Commands
Execute Function
Executes a script function.
- Script Function Name: [String] the name of the script function to execute.
Script example:
({
    Device: { Counter:0},
    Increment: function(){
        this.Device.Counter++;
    }
})
Task Programming Example:
Line    Device      Command
----    ------      -------
1       Script      Execute Function("Increment")
The “Counter” device variable is incremented each time the task is executed.
Execute Function With Params
Executes a script function which accepts parameters and returns a result value.
- Script Function Name: [String] the name of the script function to execute.
- Result: [String] A project return variable which holds the result of the function when the script function is executed (optional).
- Param1: [String] first parameter (optional)
- Param2: [String] second parameter (optional)
- Param3: [String] third parameter (optional)
- Param4: [String] fourth parameter (optional)
- Param5: [String] fifth parameter (optional)
- Param6: [String] sixth parameter (optional)
- Param7: [String] seventh parameter (optional)
- Param8: [String] eighth parameter (optional)
Script example: String concatenation
({
    FormatName: function( firstname, lastname ){
        return "Hi! My Name is " + firstname + " " + lastname;
    }
})
Task Programming Example:
Line    Device      Command
----    ------      -------
1       Script      Execute Function With Params("FormatName",ResultString,"John","")
All parameters except “Script Function Name” are optional. If no value is specified for a parameter, an empty string is passed to the script function.
Parameters are passed as “String” values to the script functions. This means that parameter values must be converted to numbers if the script functions expects numbers instead of strings. A typical way of converting a string to a number in JavaScript is to use the parseInt() or parseFloat() JavaScript functions as shown in the following example:
Script example: Computing an average value
({
    Average: function( a, b, c ){
        a = parseInt(a,10);
        b = parseInt(b,10);
        c = parseInt(c,10);
        return (a + b + c)/3;
    }
})
Load From File
Dynamically loads a script from a file.
- Script File Name: [String] the full path of the script file to load.
The current script of the device is replaced by the file content. The script is parsed and the device “Error” variable is set to an empty string is the script syntax is correct. Otherwise, the “Error” variable indicates the syntax error and the line where the error occured.
Note that the device script is reset to the default script when the project is switched from “Stop” mode to “Debug”,“User Mode” or “Run” mode.
Load From Text
Dynamically loads a script from a text string.
- Script Text: [String] script text to load.
The current script of the device is replaced by the string content. The script is parsed and the device “Error” variable is set to an empty string is the script syntax is correct. Otherwise, the “Error” variable indicates the syntax error and the line where the error occured.
Note that the device script is reset to the default script when the project is switched from “Stop” mode to “Debug”,“User Mode” or “Run” mode.
Device Variables
Status
[Enum] Current status of the device.
- “Ready”: Device is ready to work
- “Loading”: Device is loading a script
- “Executing”: Device is executing a script function
Error
[String] Current error of the device.
CurrentScriptFileName
[String] Current loaded script file name.
CurrentScriptText
[String] Current loaded script text.
ScriptFunctions
[String] List of the available script functions.
Revisions
V6.0.0
- Initial
- Fixed: ‘Perform’ function doesn’t work when the command includes parameters which have a decoration as parameter range, for example: ‘Volume (–100dB to 0dB)’. This fix requires Manager 6.2.0+.
V6.0.1
- Modified: Internal changes.
V6.0.2
- Fixed: A crash can happen when the MXM is unloaded.
V6.0.3
- Fixed: The ‘Script Function Selector’ should only display the available functions of the selected device. This fix requires Manager 6.2.1+.
V6.0.4
- Fixed: MXM Commands may sometimes hang Manager while the command being executed.
- Fixed: ‘QMedialon.GotoTime’ script function does not work.
V6.1.0
- Added: A Debugger can be enabled via the mxmMedialonScript.cfg file to debug the script in Debug/User Mode/Run Project modes.
- Added: ‘SetInterval’, ‘SetTimeout’, ‘ClearInterval’, ‘ClearTimeout’ QMedialon functions provide a timing events management into the script.
- Added: ‘TraceMessage’ function has been added in QMedialon in order to allow to log messages into the Manager Traces system.
- Fixed: There is a memory leak when device variables are declared into the script.
- Added: ‘SetValueAsInteger’ function has been added in QMedialon to have an easy way to set Enum and Time variables.
- Modified: Internal changes.
- Fixed: The ‘Execute Function With Params’ is not blocking.
- Added: XML Read/Write functions accessible from script.
- Added: The Help file can be opened during the Setup.
- Added: An Auto-Completion system allows to automatically complete some words (QMedialon functions, Medialon variables, tasks, user groups…) into the javascript Edit box of the Setup dialog.
- Added: A syntax highlighting system allows displaying the script in different colors and fonts.
- Added: In the Setup dialog, one check box allows to automatically register all User Groups.
V6.2.0
- Fixed: When ‘Execute Function With Params’ is called by a MON Client, the return value is empty except if a variable has been given as parameters.
- Fixed: There is a memory leak when DocumentElement() function is called on a XMLDocument object in the script.
- Fixed: Double click on the a Script Function in the wizard window does not validate the selection.
- Added: Insert Medialon Variable, Task, Cue, UserGroup, UserScreen or Device name into the script can be done easily via the contextual menu.
- Fixed: Too many virtual memory are reserved when a device is created.
- Fixed: ‘QMedialon.TraceMessage’ does not work if the message type is DEBUG.
- Added: Compatibility for Overture CS.
V6.2.1
- Fixed: A script using the PerformAsync function can generate an access violation when the project is stopped.
V6.2.2
- Modified: Internal changes.
V6.2.3
- Modified: The MXM Script is also supported by Showmaster.
- Added: HTTP Clients can be directly created and used in the script.
- Added: “PostponeResult” and “SetResult” functions have been added to QMedialon.
- Improved: Uncaught Exceptions are now traced.
- Fixed: A crash can happen when a dynamic command is executed in Manager.
- Fixed: Callback associated to the ‘open’ event was not called.
- Modified: If a script function, called as a command by Manager, does not have a ‘return’ or returns an undefined javascript object, the ‘Result’ of the command is not set anymore.
V6.7.0
- Improved: Supports High DPI displays.
- Improved: Some functionalities like “PerformAsync”, “OnVariableChange” are now supported by Manager version >= 6.7.0.
- Improved: Using Manager version >= 6.7.0, scripts presents in the library are directly displayed in the “Create Device” dialog box of the software.
- Changed: Compatibility for Manager 6.7.0 and Showmaster Editor 2.7.0
V6.7.1
- Improved: HTTPClient Post and Put functions support now a data parameter as a string or a Buffer. (Previously only the “Buffer” type was supported).
- Fixed: It was not possible to unload dynamically the MXM.