| Name: | Digigram Audio Server |
| Version: | 6.7.2 |
| Available for: | Manager V7 and Manager V6 (Lite & Pro) and Showmaster (Mini) |
| Limitation In: | |
| Device Brand: | Digigram |
| Positrack Compatible: | Yes |
| Resources type: | None - Network Digigram Protocol Driver |
Overview

The Digigram Audio Server MxM allows control of multichannel Audio Servers from Digigram. This MxM is compatible with a wide range of Digigram products. These include:
- NCX Ethernet products
- PCX Cards
- miXart8
- Cards Any Windows Wave Compatible PC Board via the Virtual PCX Wave Driver
NCX Products
The Digigram NCX200 takes audio processing power out of the computer and is connected to a server via Ethernet, the NCX200 decodes and plays mono or stereo audio streams. The NCX support a wide variety of audio digital formats: Mpeg Layer I, II, III, Wave. 7 GPIO are available on each NCX box: these can be configured either in output or input.
The Medialon Manager Digigram Audio Server MxM allows full control of a network of Digigram NCX. Each device can be a stereo OR a Mono stream.
PCX cards
The Digigram Audio Server MxM can also control Digigram PCX cards: these are PC cards that have the same features as the NCX’s.
Up to 4 PCX440 cards can be installed and controlled in the same PC with Medialon Manager and Digigram Audio Server MxM in order to control 32 in/out audio streams.
miXart8 cards
8 output/8 input card which can be controlled the same way PCX Cards are. Note that MPEG playback and recording are provided by Digigram as options on the miXart8 cards.
Windows Wave Compatible PC cards
The Digigram Audio Server MxM can also control wave compatible PC cards (like Creative Soundblaster, Mark of the Unicorn, M-Audio Delta) for applications that do not need a lot of audio streams. Note that the Digigram Wave Driver (See Digigram Installation Manual) must be installed in order to control these cards.
MxM Installation
Driver Installation
Each type of Digigram products may have a different installation process. You should check http://www.digigram.com for the latest drivers.
Below is a driver installation example for the NCX boxes.
In order to control NCX boxes with Medialon Manager and the Digigram Audio Server MxM, you must first install the sound driver for Digigram hardware. It can be installed on the audio server machine by double clicking on the “setup.exe” program. Please follow very precisely the instruction in order to install properly the different hardware drivers and piece of softwares for Digigram audio materials.
In case of NCX driver installation, the “NCX Config” software is automatically launched to configure the NCX devices.
.jpg)
If the NCX device is working properly, it should appear
“ .jpg) ”
”
, the green light on the front panel of the device should be on. If not check your network connection between the NCX and the remote PC controler.
You can modify the NCX’s name and logical number by double-clicking on a device in the “NCX Config” software. The following dialog box appears:
.jpg)
Windows 2000 system might automatically detect and start the installation of the Digigram audio hardware when present in the system.
Once the installation is finished you must restart the server.
Playrec software
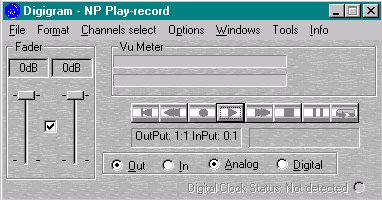
The “PlayRec.exe” software is very usefull to check if the driver was installed successfully on the server. The software should detect all the cards connected to the server, either NCX boxes or PCX/VX PCI cards.
Try to load an audio file on an output and play it, you can also test to record a file if your NCX or PCX hardware allow to do so.
If the “PlayRec.exe” software does not detect any audio NCX hardware, please check the following points:
- Check that the NCX driver is started: in the Control Panel, double click on the “Device” icon, “NCXNT_1” should be started
- Ethernet cards in the NCX box is 10 Mbits, thus you can not plug it directly in a 100 Mbits switcher, you must connect it to a 10 Mbits hub.
- If a NCX box if directly connected to a PC with a network cross-cable, the network card of the PC should be configured in “Auto-Negotiation” to work at 10Mbit with the NCX.
If the NCX boxes are detected by the Digigram driver, the green led on the front panel of the NCX should be on.
If you experience any troubleshootings during the Digigram driver installation, please contact Digigram for technical support: http://www.digigram.com
Device Setup
.jpg)
Hardware device name: choose the NCX (or PCX/VX/Wave) audio terminal to be controlled by this device. You can create a device and leave the “NCX Name” to “None” if you want to start programming without any physical devices connected to Medialon Manager.
Stream Mode: choose between “Input” or “Output” for the device type, input means that the device will record audio signal, and output means that the device will play audio files.
Stream Type: choose between “Stereo” or “Mono” for the device type. Note that Windows Wave compatible boards only support stereo mode.
Output Configuration: choose a hardware output connection for the created device. Some outputs can not be accessed depending on the audio hardware capabilities. For example a NCX device will not access outputs 5 to 8 because NCX400 only have 4 mono outputs available.
Sound Path: choose an initial sound path where the audio files are picked or stored. This path can be changed by browsing for a new folder.
GPIO Config: the small levers allow to configure the GPIO of an NCX box to work independantly as inputs or outputs.
Mixart Options: Check “Use PC CODEC” if the currently hardware device is a Mixart board and you want to use the software PC CODEC module which runs on the host PC instead of using the onboard Mixart DSP. Note that PC Codec module must be purchased as an option from Digigram.
Device Commands
SetSoundPath
Choose the directory where sound files are picked or stored - SoundPath: [String] New path name
Usage: the SoundPath variable contains the new sound path after this command completion
GetSoundList
To retrieve the sound file list of the chosen directory
Usage: the SoundList variable contains the sound file list after this command completion
Load
To prepare a sound file to be played
- FileName: [String] sound file name to load
- Scrub: [Enum] “On” or “Off”, to enable or not the scrub mode while playing the file
Usage: the StreamStatus variable of the device turns to “Loaded” and the CurrentSound variable is filled with the file name if the file is correctly loaded. The scrub mode allows to play a file backward or forward at various speed values (note that scrub mode is not available for MPEG1 Layer3 or MP3 files). Scrub mode set to “Off” do not allow to play backward. File format must be either WAV or MPEG. Note that the StreamStatus variable turns to “Paused” instead of “Loaded” if a file is open in scrub mode.
LoadNext
To load a file while another file is still being played, this file will start palying as soon as the first one will reach the end.
- FileName: [String] file name of the next audio that will be played
Usage: the files loaded with the LoadNext command are stored in the NextSound variable as a list. Thus you can prepare a playlist by calling several times the function LoadNext with different files. Once started, all the files listed in the NextSound variable will be played successively.
File format must be either WAV or MPEG.
Play
To play the current sound file loaded
Usage: the StreamStatus variable of the device turns to “Playing” and the timecode variable StreamTime starts to grow
Pause
To pause the current playing sound file
Usage: the StreamStatus variable of the device turns to “Paused” and the timecode variable StreamTime freezes
Stop
To stop the current playing sound file
Usage: the StreamStatus variable of the device turns to “Ready” and the timecode variable StreamTime is set to 0
SetSpeed
Define the playback speed of a playing sound file Speed: [Integer] speed value, from –500 to +500
Usage: negative values of speed plays backwards. +100 is nominal forward speed. Negative values (backward play) are only available if the file was loaded with the “Scrub” option turned to “On”
SetLevel
Define the input or output level, depending of the type of the device created (playback or record) - Level: [Integer] level value, from 0 to 100
Usage: create an analog slider in a Manager user screen that calls this function to change dynamically the input or output sound level
Record
Record audio signal in wave or mpeg files (Mpeg1 layer I or II)
- File Name: [String] output file where audio data will be stored, the extension (.wav or .mpa) is automatically added
- File Type: [Enum] record format chosen “Wave 8 bits”, “Wave 16 bits”, “Mpeg1 layer1”, “Mpeg1 layer2”. The size of the recorded file depends on the file type chosen (wave is uncompressed, mpeg is compressed)
- Sampl. Freq: [Enum] sampling frequency “32 khz”, “44.1 khz”, “48 khz”. High values of the sampling frequency provides a better sound quality
- Bit rate: [Enum] in Kbits/sec, “64”, “96”, “128”. “192”, “256 MpegL2 only”, “384 MpegL2 only”. This parameter is use only when recording in Mpeg. It defines the general sound quality of the file. 64 is very compressed, the quality might be poor, allthough 384 is very close to standart 16 bits wave uncompressed record.
- Overwrite: [Enum] “On” or “Off” this option enables or not to overwrite an existing sound file with the new one
Usage: the file type and bitrate chosen will depend on the desired audio quality and the available disk space on the audio server. Allthough you can play different file types (wave or mpeg) on different outputs of an NCX terminal (or PCX card) at the same time, you will not be able to play files with different sampling frequency at the same time (due to audio hardware restrictions). Trying to do so will cause the StreamStatus variable to turn to “Frequency error”.
It is recommended to play and/or record files with a fixed value of sampling frequency (“44.1 khz” is used for CD’s and is very common).
Locate
Seek to a given timecode in the playing file
- Timecode: [Time] timecode to seek to
Usage: the StreamStatus variable of the device turns to “Paused” and the timecode variable StreamTime freezes to the chosen value
SetOutput
Set a GPIO output to 0 or 5 volts
- PIO Index: [Integer] index value from 1 to 7, 0 means all outputs
- Value: [Integer] value to set (0 or 1) on the given output(s)
Usage: call this function to set the given output(s) to 0 or 5 volts
Reset
Reset the input or output stream of the device
Usage: This command releases the current stream and open it again.
Loop
Set the device into loop mode - Loop: [Enum] “On” or “Off” to enable or disable the loop mode of a device
Usage: this command must be executed before the command Load or LoadNext is used. It has no effect if a file is loaded in scrub mode.
PanAdjust
Set the left and right pan values of the output
- Left: [Integer] values from –50 to +50
- Right: [Integer] values from –50 to +50
Usage: this function does work with Left/Right only in stereo mode. You can adjust the left recorded audio signal more or less to the left and right peakers. You can adjust the right recorded audio signal more or less to the left and right peakers.
SetupSync
Set Master or Slave sync mode
- Sync type: [Enum] “None”, “Master” or “Slave” depending on the synchro mode to apply to the device
- Master device name: [String] master device to whom the current device will be synchronized
- External clock ref: [Enum] “Off” of “On” if an external AES-EBU external clock reference is to be used for the nal ce
Usage: to synchronize 2 output streams (Dev1 and Dev2), please refer to the following example:
- call Dev1-SetupSync(Master, "", Off) to configure the first device as a master
- call Dev2-SetupSync(Slave, “Dev1”, Off) to configure the second device as a slave device of “Dev1”
- call Dev1-Load(“test1.wav”, Off) to load a file onthe master device
- call Dev2-Load(“test2.wav”, Off) to load another file on the slave device
- call Dev1-Play() to play both Dev1 and Dev2 audio streams they are synchronized…
A call to the SetupSync command modifies the “SyncType”, “MasterDeviceName” and “ExternalClockRef” variables of the device.
Notes:
- Synchronization between streams belonging to different NCX boxes is not guaranteed
- Synchronization between between 2 Digigram PCI cards (PCX440, PCX820, miXart8, …) is guaranteed if using the Digigram “Inter-card cable”
Device Variables
SoundPath
[String] current sound path where audio files are picked and recorded
Usage: this value can be modified dynamically by calling the function SetSoundPath
SoundList
[String] contains the sound file list of the current selected server sound directory
Usage: GetSoundList command must be used to retrieve the sound file list from the audio server
CurrentSound
[String] contains the current playing audio file
NextSound
[String] contains the file list of the sounds that will be played in sequence
Usage: use the LoadNext command to add a new audio file into this list
StreamStatus
[Enum] Return the stream status (Ready, Playing, Paused, Loaded, Error, Recording, Frequency error, Not Online, Setup Failed).
- “Ready”: the in or out device is ready to play or record
- “Playing”: the device is currently playing a file
- “Paused”: the device is currently paused (after a Locate or a Pause command)
- “Loaded”: the device is loaded with a file, ready to play (waiting for a Play command)
- “Error”: an error which is not “Frequency Error” has occured during the execution of the last command. This is usually due to a bad filename parameter
- “Recording”: the device is recording a file (the StreamTime variable grows)
- “Frequency error”: the user tried to load and play files with different sampling frequency at the same time
- “Not Online”: the Digigram device is not online
- “Setup Failed”: the setup of the device has failed because the Digigram resource is not present or not online.
StreamTime
[Time] contains the stream timecode or the currently playing or recording file
CurrentSoundDuration
[Time] contains the duration of the currently playing file (100 fps)
Usage: this variable is automatically updated after a load command
PIO1_30:
[Integer] GPIO 30 in or out status (0 or 1)
Usage: this variable is automatically updated when an external switch closes or open the input GPIO
PIO1_17
[Integer] GPIO 17 in or out status (0 or 1)
Usage: this variable is automatically updated when an external switch closes or open the input GPIO
PIO1_31
[Integer] GPIO 31in or out status (0 or 1)
Usage this variable is automatically updated when an external switch closes or open the input GPIO
PIO1_4
[Integer] GPIO 4 in or out status (0 or 1)
Usage: this variable is automatically updated when an external switch closes or open the input GPIO
PIO1_5:
[Integer] GPIO 5 in or out status (0 or 1)
Usage: this variable is automatically updated when an external switch closes or open the input GPIO
PIO1_2
[Integer] GPIO 2 in or out status (0 or 1)
Usage: this variable is automatically updated when an external switch closes or open the input GPIO
PIO1_25
[Integer] GPIO 25 in or out status (0 or 1)
Usage: this variable is automatically updated when an external switch closes or open the input GPIO
LeftVuMeter
[Integer] current input or output left audio level, depending on the device type
RightVuMeter
[Integer] current input or output right audio level, depending on the device type
SyncType
Current synchronization mode of the device
[Enum] : “None”, “Master”, “Slave”
To modify the current sync mode of the device, call the “SetupSync” command
MasterDeviceName
[String] : name of the master device
To modify the current master device name, call the “SetupSync” command
ExternalClockRef
Current external synchro mode
[Enum] : “Off” or “On”
To modify the current external synchro mode, call the “SetupSync” command.
Revisions
V 1.0.1
- Internal Changes.
V 6.0.0
- Modified: Support of Manager V6/Showmaster V2.
V 6.0.1
- Fixed: Setup dialog doesn’t open on the correct screen on a multi-screen configuration.
V 6.0.2
- Fixed: Device variables are not reset after a project load (Requires Manager 6.0.3+).
V 6.0.3
- Fixed: The Setup dialog box is not always fully visible at the device creation time.
V 6.7.0
- Improved: Support for High DPI displays (require Manager 6.7.0+ or Showmaster Editor 2.7.0+)
- Changed: Compatibility for Manager 6.7.0 and Showmaster Editor 2.7.0