| Name: | Analog Way iX-Series |
| Version: | 6.7.2 |
| Available for: | Manager V7 and Manager V6 (Lite & Pro), Showmaster (Mini, ST, Pro, LE, XS & iPro) |
| Limitation In: | |
| Device Brand: | Analog Way |
| Positrack Compatible: | No |
| Resources type: | TCP/IP Network, UDP/IP Network, Serial |
Overview


A Seamless Switcher is a device designed to switch video or computer sources without any scratch or loss of synchronization on the output.
A Seamless Switcher will convert all signals connected to the input to the same common High-Resolution Data Output. In this way, the output is easily compatible with a unique display device (Projector or Plasma), so you will have only one display setting for all sources.
Some devices feature transitional visual effects when switching, such as Fading, Title Insertion on your video Image, Fade to Black, PIP (Picture in Picture), Wipes or a clean cut, Edge Blending, Panoramic. All these effects give more impact to your presentation (Large Events, Staging, Shows, Exhibitions, etc.).
Today, thanks to Analog Way large experience in the Seamless Switching Technology, our products have evolved to the Hi-Resolution Mixer and Seamless Switcher and offer a new high quality scaling process with a MATRIX and MIXER mode.
This MxM allows to program, control and synchronize the following devices:
- Analog Way EventiX
- Analog Way CentriX
- Analog Way DiventiX (*)
- Analog Way NatiX (**)
(*): see limitations below
(**): matrix mode only
System Scope and Terminology
The MxM is used to create device instances inside Manager. A device represents a processing system as a whole, and is able to “talk” to the underlying hardware. Any number of devices can be created inside a Manager project.
Each device can control between 1 and 16 processors. Each processor represents a single hardware mixer or matrix.
There are two device operating modes: single processor or stacked. The first mode is used to control a single matrix or mixer system, like for instance a single-screen projection system.
The other mode is used for large-screen projections where video mixers are stacked (horizontally or vertically) to form an unique wide screen, with soft-edge blending between the individual processors images.
On top of that, all processors controlled by a single device can be set in Mixer or Matrix mode. Note that while in Matrix mode, the device control panel is not available. It is possible to control an array of Matrix in stacked mode, but this particular use case is rarely encountered.
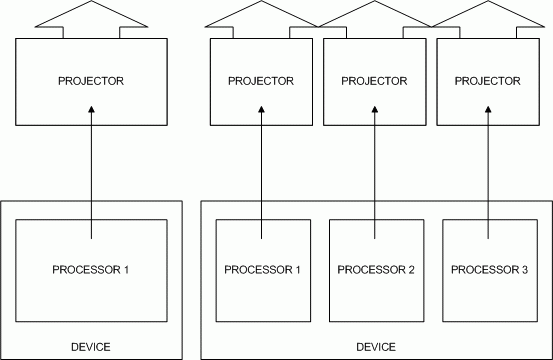
Known limitations: The current MxM version has some known limitations. The special operating mode of the DiventiX (dual-screen integrated soft-edge) is not supported. The NatiX processors can only be used in Matrix mode. The auto-take mode is not compatible with the MxM, and is automatically disabled when the device connects to its processors. The double PIP effect targets always all processors in the stack.
MxM Installation
Please refer to the device manual for wiring and setup instructions. All inputs that you plan to use as background sources must be set to extended and equally distributed amongst all processors.
In order to control the processors via Serial/COM mode, you must connect each individual processor to the show control machine with a standard RS cable.
For stacked processors, we recommend that the TCP/IP mode be used together with an Ethernet Switch or Hub. All processors must be connected to the central network equipment. The show control machine must in turn be connected to this same central equipment.
We noticed severe performance degradation when using bad quality hubs, especially with the UDP/IP mode, where packets were lost. For optimal performance, always use good quality network equipments and prefer the TCP/IP connection mode.
Important read carefully: Always upgrade your processor(s) firmware to the latest available version. Please refer to the device manual for firmware updating instructions.
Device Setup
Open the device inspector and create a new Analog Way iX-Series device instance. This will open the following setup dialog:
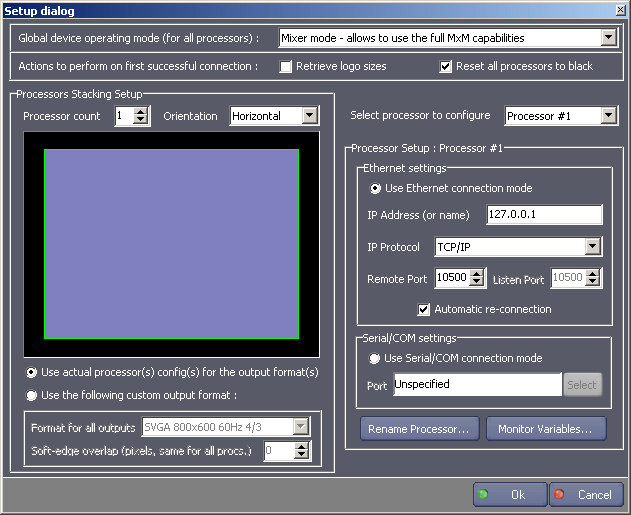
This device instance will be able to control a whole processor system, i.e. one or more processor(s) to form a single projection or matrix system. You must decide whether it will control matrix processors or mixer processors. This is the purpose of the global device operating mode combo-box, as shown in the following picture.
Please note that it is not possible to combine matrix and mixers into a single system. You have to create two separate device instances, one for the full mixer system and the other for the matrix system.

Then you have to define how many processors will take part in the current system. Just specify the processor count in the edit box below:
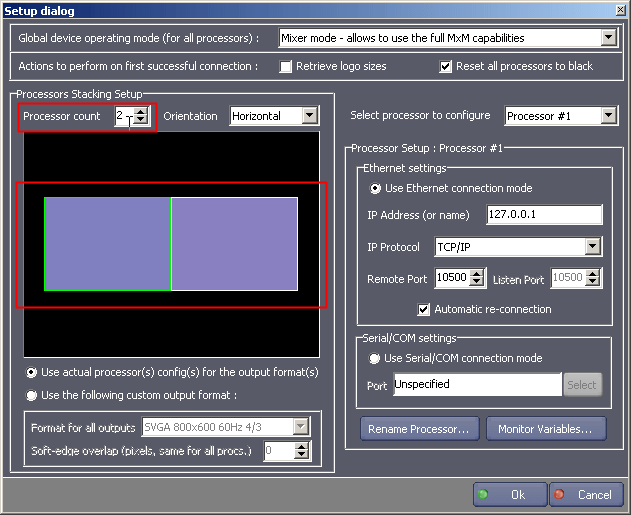
You can also select the stacking orientation as vertical or horizontal (default) Note that the integrated preview display is automatically updated to match your settings.
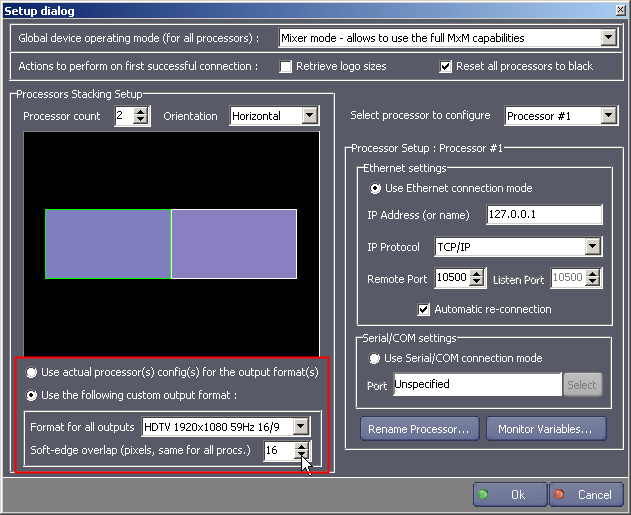
If you are preparing a mixer projection system, you can optionally force a particular output resolution on all outputs (both M and P) of all processors, as long as setting a custom soft-edge covering size. The default behaviour is to retrieve the output format and covering size from the processors during the connection process, this way the device automatically adapts to the existing hardware configuration as found “on site”.
But in order to prepare the show off-line or just to force a particular setting, you can check the corresponding radio button and set these two parameters to custom values. If later on you want to use the current processor values instead, just revert the radio button to its default position, and reconnect to the processors.
Then you must configure the control link of each individual processor by using the right pane of the setup dialog. The information displayed on the right is relative to the processor currently selected. You can change the selected processor by using the combo-box, as shown on the next picture. Please note that you can also select a particular processor by clicking on its corresponding screen in the preview/miniature area on the left.
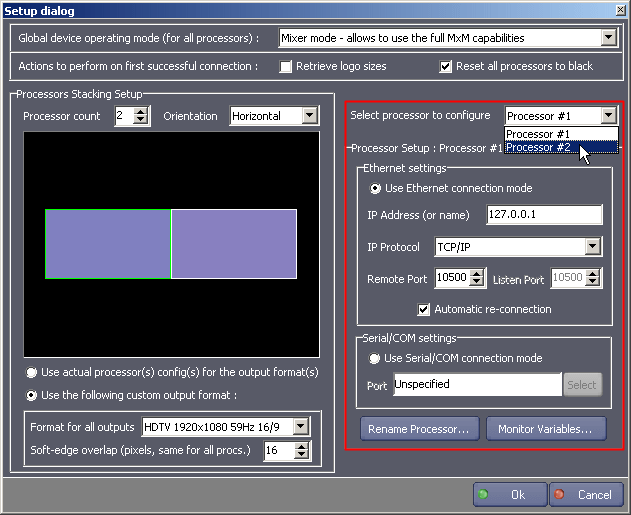
Now you must define how the device will communicate with each single processor. A valid communication path must be established between the show control machine and every processor in the system. It is possible to mix Ethernet and COM communication link types, but this is not recommended for obvious synchronization issues.
Three different link types are available: Serial/COM, TCP/IP and UDP/IP. If possible, always prefer the TCP/IP connection type, as it yields better results. If your system only has a single processor, then a serial link could be used.
For UDP and TCP modes, make sure the “Use Ethernet connection mode” radio-button is checked, then select the correct protocol in the “IP protocol” combo-box. TCP requires one communication port and UDP two ports (send and receive) You can leave these parameters by default as long as the port numbers match the ones currently set inside your processor(s).

If you want to use a serial link, then check the “Use Serial/COM connection mode” radio-button, and just select a free COM port in the drop-down list. Note that COM ports are exclusive resources in Windows and can’t be shared, i.e. you can’t control several processors with an unique port, you must have one free port per processor.
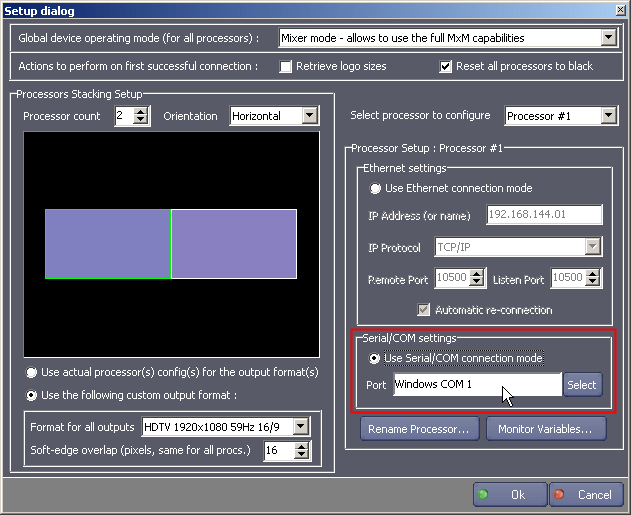
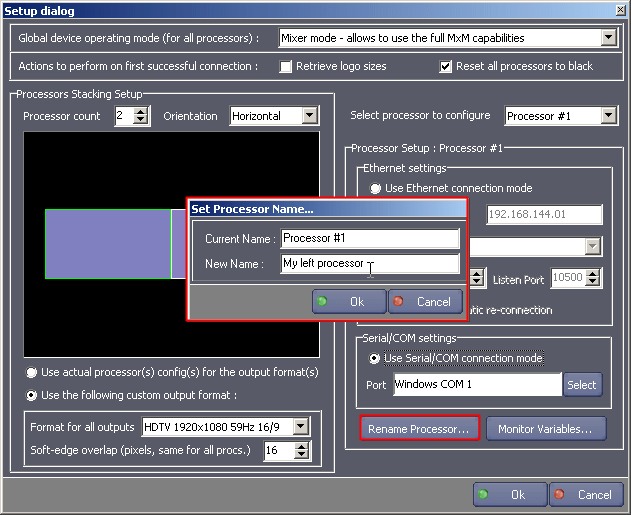
You can rename each processor by clicking on the appropriate button, at the bottom of the dialog, and by entering the new processor name in the popup dialog that appears. Changing a processor name also changes the name of all its associated variables.
It is also possible to select on a per processor basis, which state variables of the hardware device will be monitored. When a processor variable is monitored, like for instance the “currently selected effect”, a corresponding Manager variable is created and automatically updated when a new value is received from the processor.
These variables can be used to trigger tasks or special actions based on their current value. The variables names are built by contracting the state variable name and the processor name, so the full variable name is “devicename.processorname_variablename”.
To select which state variables will be monitored, click on the “Monitor Variables…” button and a dialog with a check-list will appear. You can select as many variables as you want.
By default, some important state variables are selected for monitoring, like the take status and the selected inputs. Note that “P” denotes the preview output and “M” the main output. See also the “Variables” section below.

When all individual processors have been configured, the only step remaining is to choose which “one-shot” actions will be performed the first time the device successfully connects to all its processors.
There are currently two possible actions which can be selected via the check-boxes at the top of the setup dialog. Once these actions have been executed, the check-boxes are cleared and you have to check them again if you want to retrigger the action upon next connection (that’s why they are called one-shot actions) “Retrieve logo sizes” has to be performed every time the logo sizes are changed on the processors (i.e. when new logos are recorded) If you don’t retrieve the logo sizes, the logos will still be usable but won’t be shown in the control panel visualization area.
“Reset all processors to black” is useful if you want to reset the whole system to a safe start state. It un-takes any pending effect and selects the black source on both outputs of all processors.
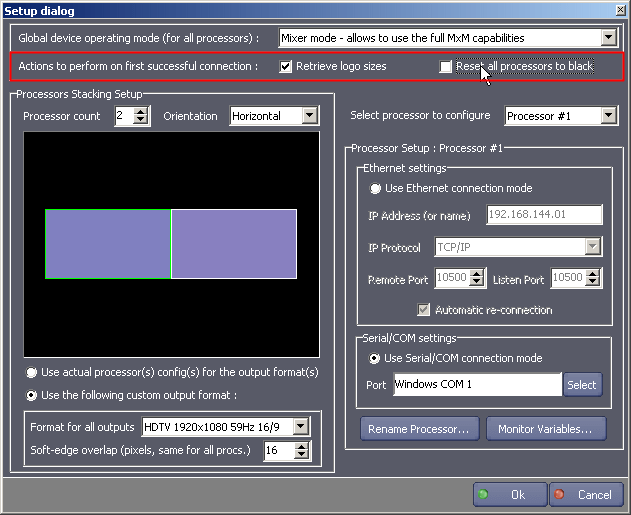 Now that you are done, you can click the “Ok” button, and the device will be created. You can return to the setup dialog at any time if you want to change these settings, reset start-up actions or select new variables to monitor.
Going Online: Now you are ready to connect to your iX processor(s). When Manager is in “stop mode”, the device is offline (unconnected) and doesn’t send any command to the processor(s). While in offline mode it is possible to prepare a full show from scratch without the need for the machines. You just have to know their count in advance and you can start working.
For instance, if you are told to prepare a show for a 4-mixers large-screen projection at a distant location but won’t be able to be on site before the last day, just create a 4-processors device in mixer mode, specify some temporary soft-edge setting to ease visual programming with the control panel, and you are ready to go.
Prepare the full show offline, then when you arrive at the event site, connect to the 4 mixers to grab their actual screen and soft-edge configuration, and you will be able to test and check your pre-programmed show in no time! When the device is offline, the processor states are being entirely simulated, but there are some limits to how far this simulation goes: not all state variables are simulated, only the ones relevant to the processor operation. Do not explicitly rely on the state variables values unless you are really connected to the processors (online) When Manager enters “debug” or “run” mode, the device starts the connection process. The connection links are first established (ports are opened) then the device asks each processor its current configuration and wait until all configurations are fully received. Devices stay in this wait mode as long as the connection is not successful, and periodically resend configuration requests.
When the last processor configuration is finally received, the eventual start-up actions are performed, then the device is ready for online operation.
In order to disconnect and go back offline, you have to leave the “debug” or “run” mode to enter “stop” mode again.
When the device is online, it periodically sends probes to the processors. These probes allow detecting connection problems or processor failures. If a processor link fails for some reason, the device tries to re-establish the connection as soon as it detects the problem. There may still be a slight delay between the moment the probe time-out is detected and the moment the device tries to reconnect.
You can monitor the global device connection status as long as the individual processor connection status by looking at the value of the corresponding device variables. See the variables section below.
Troubleshooting connection problems: always double-check all Ethernet cables and connections. Make sure that the configuration in the control menu of the hardware processors is correct (address, gateway, net mask, ports) Also check that there is no faulty network equipment in the way.
Graphical User Interface
The MxM provides a comprehensive and powerful control panel where you can issue direct live commands and visually build presets for the project you are preparing. Programming is made easy by using the mouse only and by dragging components around the virtual screen area.
Control panel overview
Here is an overview of the different control panel areas, see the legend below:
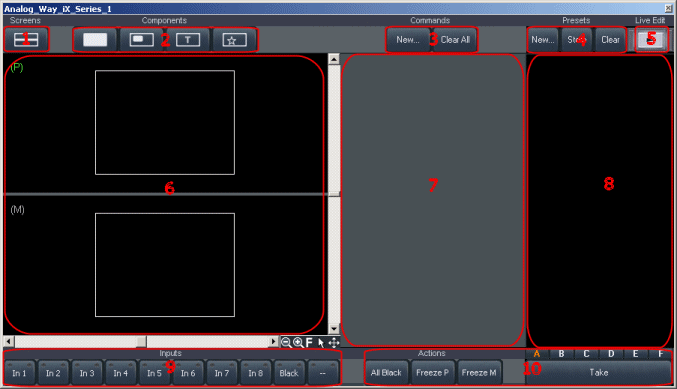
- Visualization options
- Components
- Command handling
- Preset handling
- Live edit button
- Screen area
- Command list
- Preset list
- Inputs and frames selection
- Action buttons
The P and M views:
The screen area is the place where you are going to actually work on. It consists of two distinct views of the projection surface. These views are a pixel-accurate representation of the current output resolution and soft-edge covered area.
The two views are labelled “P” and “M”, but even if these letters sound familiar, their meaning is slightly different than the one used for the hardware outputs.
“P” stands for “preview”. This view will always represent what is going to appear on your projection screen(s) when you will push the Take button. Think of it like a “what’s going to happen next” view. Sometimes what is displayed on the P view will be the same as what is actually displayed on the P outputs of the processor(s) but not all the time! The P view is a real preview but the P output is more like a convenience to preview live sources before switching them.
“M” stands for “main” but could also have been labelled “program” (but having two P’s would have been a mess!) This view will always represent what’s actually on your projection screen(s) and when you edit objects in this view, the changes will be executed live on the processors, that is, directly on screen. This is a very useful feature as it allows setting precisely your effects on the real projection surface (tuning exact PIP sizes for instance is easier to do directly on screen) By default, both views are the same because when there is no pending command, what’s going to happen if you press Take is…nothing! Thus the “P” view still represents what’s going to happen if you press Take, but in this case, nothing is going to happen so it has no change to display.
At a given time, only one of the two views is editable (the other one is locked) The editable view has its label coloured in green. Which view is editable depends on the current Take status. If Take is off, the “P” view is where you are going to work. If Take is on, the “M” view becomes active and any change on it will be live edited on screen (live editing on the “P” view will sometimes be shown on the “P” outputs but not all the time) View modes and visualization options: By clicking on the visualization options button, on the upper-left of the control panel, a drop-down menu appears:

You can choose to show both “M” and “P” views (default option) but alternatively, you can also choose to show only one of them, like for instance showing only the “P” view and using the projection screen(s) as your “M” view.
There is also a special mode where only the active (editable) view is shown. In this mode, the displayed view will flip each time you press the Take button.
It is also possible to select a vertical split, more suitable for vertical stacked projection systems.
Finally, there is an option to show or hide the soft-edge covering zone. Showing the soft-edge zone is useful to determine how a given effect (PIP for instance) will use the available resources: if a PIP is across an edge-zone, it will use the two processors on both sides of the zone.
If it is not on the edge-zone, it will only use the processor associated to the screen it is on.
Navigation and object manipulation
You can pan (scroll) the screen area and zoom in and out of it in order to quickly reach any part.

Panning is performed by using the two scroll-bars. Alternatively, you can press the “control” key while dragging the screen area with the mouse. Note that pressing the “control” key is strictly equivalent to temporarily selecting the “pan” tool.
The current mouse behaviour depends on the active tool.
By default the active tool is the selection tool and the “control” key toggles the pan tool while pressed. If you click on the crossed arrows icon at the bottom of the screen area, the pan tool becomes active. In this case, pressing the “control” key will toggle the selection tool.
You can select the selection tool back by clicking on the cursor arrow icon.
The selection tool allows selecting objects with the left-mouse button just by clicking on them.
By using the mouse wheel, one can zoom in and out. The same effect can be achieved by clicking on the “+” and “-” magnifier icons, but with coarser steps than with the mouse wheel.
Finally the “F” icon stands for “fit to screen” and allows to instantaneously revert the pan and zoom settings to “safe” values (i.e. the correct zoom ratio and pan to view all screens at once centered in the area) Components and commands: To perform actions on the processor(s) you have to create what are called “high level commands” (to distinguish them from the low level ones, which are described in a section below) These commands typically represent one action/effect on one or more processors.
Which processor(s) is/are targeted by the command depends on the actual command type and its settings. For instance, like we’ve seen above, an “open PIP” command could target a single processor if the PIP was entirely contained in a single screen, but could also target several processors if the PIP is to be opened across screens.
There are three ways to create commands with the control panel. The first one is to drag one of the four component buttons onto the screen area. Note that effect opening commands only are available this way.
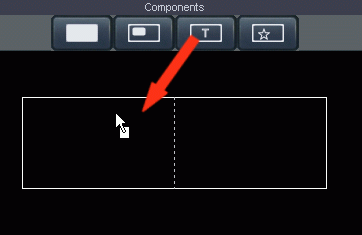
If the command can not be created, the mouse cursor will change into a “no drop” icon. Command creation availability depends on the resources currently free or in use, and is dynamic. For instance if you have a single mixer processor and you drag an “open PIP” command on its associated screen, you won’t be able to drag a second “open PIP” command, as both scalers are already in use (note that this example could be a bit confusing as double PIP are possible, but as they are a very special effect of the iX mixers, “open double PIP” is provided as a separate command) Graphical objects are added on the screen area to represent the result of the newly added command. If you drag a PIP component on the screens, a PIP graphical object (a small rectangle) will be created. This object can be further manipulated with the mouse or the command parameters controls, as explained in the next section.
The second way to create commands is to use the “new command” button in the command handling area. This button displays a drop-down menu containing the list of all possible commands. Individual commands are greyed out or not depending on their availability, in the same way as components can not be dragged if command creation is impossible.
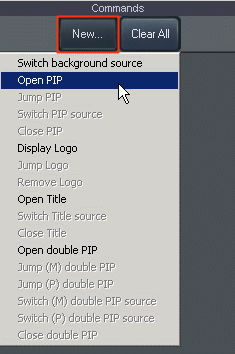
At any time, only commands that you can actually create will be available, thus prohibiting actions that would lead to an incompatible device state.
The third and last way to create command is by direct manipulation with the mouse of the graphical objects.
By right-clicking on an object, a popup menu appears containing object-related commands, like “move”, “close” and “switch source” for a PIP object. Also when an object has been opened it is possible to create “move” commands on-the-fly just by dragging the object itself (works for PIPs and Logos) The command list: Just below the command handling area is a zone called the command list. It is in fact a command stack. Every time a command is created, it is added to the stack. Note that command order inside the stack has some importance.
The picture below shows the command list with a few commands in it:

The currently selected command in the list is highlighted in green. Each time a command is selected, its associated graphical object(s) is/are selected too (shown by a green border around the object) The command list can be cleared at any time by clicking on the “clear all” button.
Please note also that new commands can be added only when the “P” view is active and editable. If the current Take status is on, you can’t add new commands until you either un-take or clear the command list (which resets the current Take status to zero) Selecting inputs and setting command parameters: All commands are shown as a small rectangle bar in the command list, with an arrow icon on the left. This is the collapsed form of the command. By clicking on the arrow icon or just by double-clicking on the command body you can expand it in order to display its parameters.

Some of the command parameters can be set by manipulating the associated graphical object with the mouse, like setting a PIP size and position. But advanced command parameters (and in fact, all non-visual parameters) are only available by expanding the command to show its parameters controls, which are a combination of sliders and edit-boxes or combo-boxes, depending on the actual parameter type.
Many commands take a source number as one of their parameters.
The source selection is of course possible by using the corresponding combo-box in the command controls, but you can also use the shortcut buttons found at the bottom left of the control panel.

Clicking one of the input buttons automatically selects this input as the source parameter of the currently selected command. Please note that the same buttons will be used to set the source of any command. In fact, these input buttons always reflect the selected command only: if for instance you have two “open PIP” commands, one with input #1 and the other with input #2, selecting either one of the commands in the command list will light the LED of the corresponding input button (in this case, either the first or the second button)
The last input button is for optional frame (overlay) assignment when the selected command allows it. This button selects the frame number to be displayed. By right-clicking on it, a popup menu allows to choose which frame will be used. By selecting the ‘none’ item, no frame will be displayed (default) Note: the button reflects the corresponding ‘frame parameter’ combo-box in the command panel.
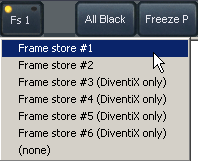
The take cinematic
The way commands are executed and the actual device state “advanced” is perhaps the trickiest part of the MxM, but once you have understood it, you should find it pretty easy to work with.
As we have seen before, the “P” and “M” views have a slightly different meaning than the “P” and “M” outputs of the processors. The “P” view is a real preview of the next device state while the “P” output of the processor is just a source preview for the pending effect.
When you add a new command, the “P” view is updated to reflect the device state you will get once you press the Take button on the control panel, and a source preview is sent to the “P” outputs if possible.
When you press the Take button, several things happen: First of all, the Take button stays pushed for the whole duration of the command(s) execution. All commands in the list are sent to the processor(s) When the execution is complete on all processors, the Take button is released.
Meanwhile, the “P” view becomes the current “M” view (they are flipped) as the preview state is now the program state. Notice that the “M” label becomes green and starts to blink so you know that from this point your are working directly on the “M” outputs, that is working live on the projection screen(s) The active LEDs on the input buttons (if any) are also flipped so that the right one on the button is lit and blinks, showing that this input is currently displayed on screen.
Here comes the tricky part: When you have reached this point, two paths are possible for you to take. The first one is to go back and revert to the previous state. For this, just press the Take button again and the device will un-take the whole command list contents. The “M” view will become the “P” view again, and any effect opened by the commands will be closed (and closing effects will be re-opened) This is really like a rewind feature and is extremely useful when you are preparing your commands: You can set some parameter, test its effects live on-screen, then revert back, change the parameter again and retest etc…
Then when you are done, you can take the other path, which is to consider that the current state is satisfying and declare it as the current device state, in order to prepare the next state transition (the commands that will happen afterwards) For this, either press the “clear all commands” button or select (recall) a valid preset. By doing so, the “M” view is copied into the “P” view (as we’ve seen, this happens when there is no command in the list, since the next state becomes the same as the actual state)
If you advanced the device state by recalling a preset, then the “P” view will also reflect the pending commands of the preset. In fact, when you recall a preset, the command list is internally cleared (strictly similar to pushing the clear all button) then rebuilt with the preset commands (strictly equivalent to manually adding the commands and building the next “P” view)
To summarize, think that you are going to build your show by defining “state increments”, which are one or more commands that make the current state evolve into the next one. We’ll see that presets are only snapshots of these command-lists / state-increments.
Synchro-take buttons

The Synchro-Take buttons allow sending a “Take” command to multiple devices at the same time. On the picture shown above pressing the “Take” button will send a “Take” command to both the current device (orange [A] button) and to another device (green [B] device).
When created, each device gets assigned a unique letter shortcut (from ‘A’ to ‘F’). The current device is displayed as an orange synchro-take button (note: this button can not be selected, it is always on) The remaining buttons represent the other devices instances. An hint telling the device name is displayed when the mouse cursor is over a synchro-take button.
Individual synchro-take buttons can be enabled or disabled at will. Synchro-Take buttons are green when selected.
When the take button is pushed, the take command is sent simultaneously to all devices having their synchro-take button enabled. Note that presets must have been previously recalled on all target devices (including the master one) These presets must of course be compatible with the processors states, otherwise the take will not happen on that particular device.
The live edit button:
You probably already noticed the green LED button on the upper-right of the control panel with a “play” icon on it. This button is called the “live edit” button. It has two functions.
Its first function is to give a visual indicator of the device connection status. When Manager is in stop mode, the live edit button is off. When you initialize a connection process by entering Manager run or debug mode, the live edit button starts to blink.
It will blink until all connection links to the processors are established, their configuration fetched and the eventual start-up actions performed. Then it should stay lit.
If the live edit button keeps blinking or suddenly turns off while previously on, you know you have a connection problem or a processor failure. Check the device and processor system variables to confirm the problem.
The second function of this button is to allow while being online to disable live edition. Just click on the button to turn it off and no more command will be sent to the processors (but the connection links are not broken, the device is still technically online)

Disabling live edition may be useful if for instance you are working online with other devices but don’t want to mess with your projection screen(s) while debugging other parts of your show.
You can re-enable live edition at any time. Note however that if you worked on the control panel with live edition off, then chances are the control panel and device states are desynchronized. If you want to refetch the current processor(s) configuration(s) you have to explicitly enter stop mode then run/debug mode again (in order to retrigger the connection cinematic)
Available high level commands:
We will now look into the high level commands details.
Each command will be described in the same way:
- Command name and description: the command being described
- Command target: where the command can be applied
- Command multiplicity: how many commands of this type can be executed at once
- Command exclusions: limitations, usage restrictions or incompatibilities
Keep in mind that command creation is possible only if the current processor(s) state(s) is compatible, hence many commands only apply under certain conditions: “close Title” for instance, must have a Title effect opened somewhere on one of the processors or you won’t be able to create it.
Also restrictions apply because the processors hardware resources are not unlimited: you can’t open both a PIP and the Title effect on a single mixer processor because it has only two scalers and one is used to display the background.
To add new commands to the command list the Take status must not be on, i.e. you can only add new commands when the “P” view is active and editable.
Select source for background
Command description: allows to switch the full-screen background source, either via a transition or via a source switch. Whether a transition or a switch is available depends on the current processor(s) state(s). Transitions are possible only if all processors have a full-screen source displayed on the “M” output and the second scaler free. If one processor in the stack has the second scaler used (by a PIP or a Title for instance) then source switch will be the only choice. This command also allows displaying frame stores above the full-screen source with a transparency setting. Many transition effects are available too.
Command target: always targets all processors in the stack
Command multiplicity: only one command instance per preset
Command exclusions: incompatible with any effect opening or closing command
Open PIP
- Command description: this command opens a holding PIP effect. The PIP can span across all processors if needed but can’t be placed on a processor which has no more free scaler. You can set the PIP size and position by using the mouse and manipulating the associated graphical object. PIPs have many options like mask cropping and border
- Command target: any processor having a free scaler.
- Command can target multiple processors at once
- Command multiplicity: only one open PIP per processor if PIPs are limited to a single processor, only one open PIP per preset if the PIP spans across all processors
- Command exclusions: incompatible with open title or switch background on same processor(s)
Jump PIP
- Command description: allows to move an already opened PIP
- Command target: must have an opened PIP on one or many processor(s)
- Command multiplicity: as many move PIP commands as there are opened PIPs
- Command exclusions: can’t move a PIP being opened or closed
Switch PIP source
- Command description:source switch of an opened PIP
- Command target: must have an opened PIP on one or many processor(s)
- Command multiplicity: as many switch PIP source commands as there are opened PIPs
- Command exclusions: can’t switch the source of a PIP being opened or closed
Close PIP
- Command description: close a previously opened PIP with a closing effect
- Command target: must have an opened PIP on one or many processor(s)
- Command multiplicity: as many close PIP commands as there are opened PIPs
- Command exclusions: can’t close a PIP being opened, switched or moved
Display Logo
- Command description: displays a logo on the background. The processor on which the logo will appear is specified by one of the command parameters, as long as the index of the logo to display
- Command target: any processor not in double PIP mode
- Command multiplicity: up to two command instances per processor, providing that no logo is already opened on the processor
- Command exclusions: incompatible with double PIP mode
Jump Logo
- Command description: moves a previously displayed logo
- Command target: must have a displayed logo on the target processor
- Command multiplicity: up to two command instances per processor, if two logos are displayed
- Command exclusions: incompatible with double PIP mode
Remove Logo
- Command description: removes a logo from the screen
- Command target: any processor having a logo currently displayed
- Command multiplicity: up to two command instances per processor, if there are two logos to close
- Command exclusions: incompatible with double PIP mode
Open Title
- Command description: opens the title effect on a single processor. Also used for the shadow title effect
- Command target: a single processor having a free scaler
- Command multiplicity: one per processor
- Command exclusions: incompatible with open PIP or switch background on same processor
Switch Title source
- Command description: switch the source of a previously displayed title
- Command target: a single processor having a pending title effect
- Command multiplicity: only one per processor
- Command exclusions: can not switch the source of a title being opened or closed
Close Title
- Command description: closes a previously displayed title
- Command target: a single processor having a pending title effect
- Command multiplicity: only one per processor
- Command exclusions: can not close a title being switched or opened
Open double PIP
- Command description: open the double PIP effect on all processors. Up to two PIPs per processor can be displayed by using this effect. All processors share the same background frame store
- Command target: always targets all processors in the stack
- Command multiplicity: only one per preset
- Command exclusions: incompatible with any opening or closing command or background switch
Jump M double PIP
- Command description: moves a currently displayed M-PIP
- Command target: any processor in double PIP mode
- Command multiplicity: as many as there are M-PIPs displayed
- Command exclusions: only available when in double PIP mode
Jump P double PIP
- Command description: moves a currently displayed P-PIP
- Command target: any processor in double PIP mode
- Command multiplicity: as many as there are P-PIPs displayed
- Command exclusions: only available when in double PIP mode
Switch M double PIP source
- Command description: switch the source of a currently displayed M-PIP
- Command target: any processor in double PIP mode
- Command multiplicity: as many as there are M-PIPs displayed
- Command exclusions: only available when in double PIP mode
Switch P double PIP source
- Command description: switch the source of a currently displayed P-PIP
- Command target: any processor in double PIP mode
- Command multiplicity: as many as there are P-PIPs displayed
- Command exclusions: only available when in double PIP mode
Close double PIP
- Command description: allows to leave the double PIP mode
- Command target: always targets all processors in the stack
- Command multiplicity: only one per preset
- Command exclusions: only available when in double PIP mode
Using the Presets
Creating and sending commands live “on the fly” is something possible with the control panel but the process is likely to be error-prone unless you really know exactly what you want beforehand. When error is not an option, or if your show will be played more than once (for instance a daily evening event during one week) you should use presets to ease your work.
Presets are very simple to understand once you know the device basics. In fact, if you have understood the command-list concept and the Take cinematic, then you are just one step away from using presets.
Presets are just “snapshots” of the command-list contents, allowing to save for a later restoring (called recalling) all the command parameters and settings. By saving presets one is able to build a complete effects sequence, and by recalling them one is able to run the show in a predefined way. Recall can be done manually (just by clicking on the preset name in the preset list) or programmatically by using low level recall and take cues (see section below)
To create a new preset, just click the “new” button in the preset handling area. The new preset is added at the bottom of the list. It is possible to organize presets by dragging them up or down in the list with the mouse.

If you click on a preset with the right mouse button, a context menu will appear showing other possible actions. Presets can also be renamed for clarity and deleted if they are not used anymore.

Clicking with the left mouse button on a preset will recall it. The recall process performs the exact same actions as if you added the commands in the list by hand: source preview(s) is/are sent on the “P” output(s) and the processor(s) is/are prepared for the upcoming Take.
To build a preset, just add new commands in the command list as described in the previous sections. When you are done, don’t forget to click the “store” button or your changes will be lost and you will end up with a blank preset (as it was when you first created it) If a preset has been modified, its name will be displayed in italic with a star “*” in front of it.
It is possible to recall a preset, then modify it, like changing an effect source on the fly, and Take it without saving, thus keeping your original settings.
On the right of the preset name is a small LED which color changes depending on the preset recalling availability: if the preset can be recalled (i.e. is compatible with the current device state) then the LED will be green. It will be red if a resource conflict prohibits the preset recall.
Using Low Level Cues
If you want to sequence your presets to create a predetermined and reproducible show, like those found in fixed installations or museums, or just if you want to perform specific actions not available via the device control panel, you have to use low level cues.
A cue is a particular device command instance and its associated parameters, executed by a Manager task. Most of this MxM commands are quite low level, that is, close to the hardware and communication protocol, hence the term of low level cues.
Nearly all commands of the iX protocol are available as separate low level cues. There are also some additional special commands that we will describe in details in this section.
The two most important special low level commands are “Recall Preset” and “Take Preset”. Used together, these two commands allow building one or multiple preset sequences, and running these sequences in a reproducible and timely fashion.
Recall cues are used to prepare a particular preset. Once a recall cue is executed, the associated preset is sent to all processors in order to update their preview if necessary, and prepare the upcoming preset execution (take)
Take cues are placed after a matching recall cue, in order to execute the recalled preset. They do not need any parameter and always take the latest recalled preset: if you put for instance two successive recall cues in a task, and just a single take cue after them, only the second preset will be taken. Each recall cue must have a matching take cue.
These two cue types allow to create complex sequences of any length by using the presets created with the control panel.
Note that when a preset has been recalled, its command parameters (like the PIP input source for instance) can still be overridden by using the control panel or other low level cues. It is possible to alter a preset content until the task reaches its associated take cue.
This is useful if for instance, you have to change something at the last moment to take an unpredicted event into account (like a source failure, a different routing configuration than the one initially planned etc…)
Note also that you have to leave enough time between the different recall and take cues. If the cues are too close from each others, the commands will be stacked by the device and executed one after the other. No command will be lost, but the execution delay will continuously rise as the device keeps getting late by waiting for the end of the previous command execution. This may be a concern for shows running 24h a day, as the memory usage will eventually get high over time.
Here is an example of a typical preset sequence:

The other low level commands cover all aspects of the iX machines, from source and image configuration to effect options selection, including all setup options, like Tally outputs assignments etc…
By combining “classic” preset recall/take cues together with other low level commands, it is possible to modify a specific preset “at runtime” and create creative and innovative effects.
Low level cues are also needed if your effects should be synchronized to an external trigger. For instance, a PIP position could be programmatically changed whenever a given Manager variable changes.
Device Commands
The following is the list of all commands available as low level cues. There are more than 255 commands nested in the command groups, all sharing the same parameter types: the actual command in group, the processor concerned by this command, and the command parameter.
Please refer to the “control code” appendix of your processor user manual to get the list of all the commands available. Most command names are self-explanatory but here are a few comments: Some commands are relative to the currently selected input. They usually have “selected_input” in their name. These commands work together with the “select_input_for_adjustment” command, which must be issued before the actual command.
Other commands have a “M” (Main) or a “P” (Preview) in their name, and are relative to the input currently displayed either on the M or P output.
Recall preset
Recall a previously stored preset by name. After the recalling process, the preset is ready to be taken. You can use the integrated wizard to select a name in the list instead of typing it.
- Preset name: [String] Name of the preset to recall.
Take preset
Take the previously recalled preset. If no preset has been recalled, the take cue has no effect. A given preset can only be taken once, that is, if you put two successive take–1 cues only the first one will be effective. In order to untake a preset, it must have been previously taken.
- Direction: [Integer] ‘1’ to take, ‘0’ to untake.
Selection commands
Group of commands relative to the processor front panel functions: input pre-selection, take, freeze etc…
- Command: [Enum] Specific command in group.
- Select device main mode
- Switch (M) input (or PIP bgnd)
- Switch (P) input (or PIP src)
- Take
- Freeze (M) output
- Freeze (P) output
- Set T-bar position
- Processor: [Integer] Target processor index, zero for all.
- Command value: [Integer] Actual command value.
Input commands
Group of commands relative to the input currently selected for adjustment.
- Command: [Enum] Specific command in group.
- Select input for adjustment
- Enable/disable selected input
- Change sel. input H-sync load
- Change sel. input type
- Change sel. input standard
- Set sel. input VCR mode
- Processor: [Integer] Target processor index, zero for all.
- Command value: [Integer] Actual command value.
Output commands…
Group of commands relative to the inputs currently displayed on the P or M outputs.
- Command: [Enum] Specific command in group.
- Select (M) output format
- Select (P) output format
- Select (M) output sync
- Select (P) output sync
- Select (M) output scr type
- Select (P) output scr type
- Select (M) test pattern
- Select (P) test pattern
- Select (M) output rate
- Select (P) output rate
- Processor: [Integer] Target processor index, zero for all.
- Command value: [Integer] Actual command value.
Image commands
Image aspect and settings commands.
- Command: [Enum] Specific command in group.
- Automatic centering (M)
- Automatic centering (P)
- Set horizontal position (M)
- Set horizontal position (P)
- Set vertical position (M)
- Set vertical position (P)
- Set horizontal size (M)
- Set horizontal size (P)
- Set vertical size (M)
- Set vertical size (P)
- Adjust brightness (M)
- Adjust brightness (P)
- Adjust contrast (M)
- Adjust contrast (P)
- Adjust color (M)
- Adjust color (P)
- Adjust hue (M)
- Adjust hue (P)
- Adjust sharpness (M)
- Adjust sharpness (P)
- Set Under/Overscan (M)
- Set Under/Overscan (P)
- Set input aspect ratio (M)
- Set input aspect ratio (P)
- Set zoom horiz. size (M)
- Set zoom horiz. size (P)
- Set zoom vert. size (M)
- Set zoom vert. size (P)
- Set zoom horiz. pos. (M)
- Set zoom horiz. pos. (P)
- Set zoom vert. pos. (M)
- Set zoom vert. pos. (P)
- Adjust red level (M)
- Adjust red level (P)
- Adjust green level (M)
- Adjust green level (P)
- Adjust blue level (M)
- Adjust blue level (P)
- Set num. of pixels / line (M)
- Set num. of pixels / line (P)
- Adjust pixels phase (M)
- Adjust pixels phase (P)
- Preset (M)
- Preset (P)
- Store
- Processor: [Integer] Target processor index, zero for all.
- Command value: [Integer] Actual command value.
Effects commands…
Group of commands relative to the current effect (aspect, options etc…)
- Command: [Enum] Specific command in group.
- Select effect
- Set effect duration
- Set effect horiz. position
- Set effect vert. position
- Set effect horizontal size
- Set effect vertical size
- Set shape horiz. position
- Set shape vert. position
- Set shape horizontal size
- Set shape vertical size
- Set effect options
- Set PIP border + frame
- Set border color
- Select effect opening type
- Select effect closing type
- Set effect opening duration
- Set effect closing duration
- Set main PIP horiz. pos.
- Set main PIP vert. pos.
- Set main PIP horiz. size
- Set main PIP vert. size
- Set main PIP mask h-pos.
- Set main PIP mask v-pos.
- Set main PIP mask h-size
- Set main PIP mask v-size
- Processor: [Integer] Target processor index, zero for all.
- Command value: [Integer] Actual command value.
Frame and logo commands
Group of commands relative to the frame stores and logos.
- Command: [Enum] Specific command in group.
- Set frame/logo mode (M)
- Set frame/logo mode (P)
- Assign logo1/frame (M)
- Assign logo1/frame (P)
- Assign logo2/frame (M)
- Assign logo2/frame (P)
- Sel. logo/fr for action (M)
- Sel. logo/fr for action (P)
- Disp. logo on sel. input (M)
- Disp. logo on sel. input (P)
- Set stor. area horiz. pos. (M)
- Set stor. area horiz. pos. (P)
- Set stor. area vert. pos. (M)
- Set stor. area vert. pos. (P)
- Set stor. area horiz. size (M)
- Set stor. area horiz. size (P)
- Set stor. area vert. size (M)
- Set stor. area vert. size (P)
- Set horiz. pos. of logo1 (M)
- Set horiz. pos. of logo1 (P)
- Set horiz. pos. of logo2 (M)
- Set horiz. pos. of logo2 (P)
- Set vert. pos. of logo1 (M)
- Set vert. pos. of logo1 (P)
- Set vert. pos. of logo2 (M)
- Set vert. pos. of logo2 (P)
- Set logo1 type (M)
- Set logo1 type (P)
- Set logo2 type (M)
- Set logo2 type (P)
- Stop the frame storing (M)
- Stop the frame storing (P)
- Set logo transparency (M)
- Set logo transparency (P)
- Set luma key level
- Set background color
- Set logo fade duration
- Set frame fade duration
- Processor: [Integer] Target processor index, zero for all.
- Command value: [Integer] Actual command value.
Control commands
Transition types, Tally control etc…
- Command: [Enum] Specific command in group.
- Set Tally1 input number
- Set Tally2 input number
- Set Tally3 input number
- Set 2:2 pull down corr.
- Erase all memories
- Set demo mode
- Set auto-lock
- Adjust fade red (M)
- Adjust fade red (P)
- Adjust fade green (M)
- Adjust fade green (P)
- Adjust fade blue (M)
- Adjust fade blue (P)
- Select transition type (M)
- Select transition type (P)
- Sel. action for synch lost
- Reset to default values
- Processor: [Integer] Target processor index, zero for all.
- Command value: [Integer] Actual command value.
Communication commands
Communication link setup commands.
- Command: [Enum] Specific command in group.
- Select port type
- Reset LAN parameters
- Store LAN parameters
- Select address/port to edit
- Set 1st byte of sel. addr
- Set 2nd byte of sel. addr
- Set 3rd byte of sel. addr
- Set 4th byte of sel. addr
- Set port of sel. address
- Set net mask
- Select protocol type
- Processor: [Integer] Target processor index, zero for all.
- Command value: [Integer] Actual command value.
Video output commands
Commands specific to the optional video output (OPT-iX-SDTV1)
- Command: [Enum] Specific command in group.
- Set frame rate reference
- Set input stability
- Set color tracking
- Set anti-flicker level
- Set underscan/overscan
- Set video output standard
- Set horizontal position
- Set vertical position
- Set horizontal size
- Set vertical size
- Processor: [Integer] Target processor index, zero for all.
- Command value: [Integer] Actual command value.
Soft-edge commands
Commands specific to the soft-edge blending option (CBD-UP)
- Command: [Enum] Specific command in group.
- Set covering size
- Set device pos. in screen
- Set effect pos. in screen
- Set sel. input ext. mode
- Set soft edge type
- Set soft edge status
- LUT loading control
- Set LUT parameter
- Adjust red for black lvl
- Adjust green for black lvl
- Adjust blue for black lvl
- Adjust right for black area
- Adjust left for black area
- Processor: [Integer] Target processor index, zero for all.
- Command value: [Integer] Actual command value.
Audio commands
Commands specific to the audio output option (OPT-iX-A)
- Command: [Enum] Specific command in group.
- Select audio source (M)
- Select audio source (P)
- Set audio mode (M)
- Set audio mode (P)
- Set master volume (M)
- Set master volume (P)
- Set mute (M)
- Set mute (P)
- Set mono/stereo mode (M)
- Set mono/stereo mode (P)
- Set sel. input audio level
- Set sel. input balance
- Set auxiliary source (M)
- Set auxiliary source (P)
- Processor: [Integer] Target processor index, zero for all.
- Command value: [Integer] Actual command value.
Read parameter
This command is a bit special. It allows retrieving the value of a given processor monitoring variable, even if this variable has not been selected for monitoring. The value is copied into the variable passed as the last parameter. Please note that this value is only accurate once the device has been online and all processor configurations fetched. While offline, this command returns the simulated value of the variable, which in most cases will be its default value. This is because not all variables are being simulated by the virtual machine, only the relevant ones. The other variables stay to their default value as long as the device is offline. Please also note that when online, this command does not send any update request to the processor. The latest variable value received is returned instead.
- Processor: [Integer] Target processor index.
- Parameter index: [Integer] Use the wizard to select the param.
- Return value: [Integer] Variable to hold the returned value.
Reset all to black
This is the same command as the button on the control panel, but available as a cue.
Device Variables
Here is the list of the static device variables, that is, variables which are present by default for monitoring and can not be deselected. These variables are mainly related to the global device status as long as to the individual processors status.
The other possible variables are selected for monitoring by using the monitor variables button of the MxM setup dialog, on a per processor basis. There are more than 255 of them, and thus they can’t be all described in this document. Please refer to the “control codes” appendix in your processor operating manual.
System_Status
[Enum] Global connection status of the whole device.
- “Not Online”: Not connected
- “Waiting for Processor(s)”: Connection in progress
- “Online”: Device is connected to all processors
- “System Failure”: A severe problem occurred and the system has failed
System_Error
[Enum] Information about the latest device error, if any.
- “No Error”: Last command was a success
- “Error”: An error occurred and has been handled
- “Unexpected Error”: An unknown error has occurred
- “Preset Conflict”: Preset recall or take error
Each processor may have many dynamic variables in order to monitor the hardware status and activity. But they also have three static system variables each, like the device has two global ones.
ConnectionStatus
[Enum] Current connection status.
- “Unconnected”: Standby, not connected
- “Connecting”: Connection in progress
- “Connected”: Connection established
- “Unconnecting”: Disconnection in progress
Activity
[Enum] Current processor activity.
- “Ready”: Processor is idle
- “Busy”: Command or processing in progress
- “Failure”: Processor has failed
Error
[Enum] Last processor error, if any.
- “No Error”: Last command was a success
- “Network Error”: An Ethernet error occurred
- “Serial Error”: A serial/COM error occurred
- “Command Timeout”: The last command timed out
- “Unexpected Error”: An unknown error occurred
Revisions
V 1.0.1
- Added: Support for Showmaster.
V 1.0.2
- Fixed: Preset commands are available in Showmaster though they cannot work because there is no Control Panel.
V 1.0.3
- Added: Support for Showmaster Pro.
V 6.0.0
- Modified: Support of Manager V6/Showmaster V2
V 6.0.1
- Fixed: Setup dialog doesn’t open on the correct screen on a multi-screen configuration.
V 6.0.2
- Fixed: Device variables are not reset after a project load (Requires Manager 6.0.3+).
V 6.1.0
- Added: Support for Showmaster LE & Showmaster XS platforms.
V 6.1.1
- Fixed: The MXM does not appear as certified under Manager.
V 6.1.2
- Fixed: The Setup dialog box is not always fully visible at the device creation time.
- Fixed: The ‘Set Processor Name…’ and ‘Select variables to monitor…’ dialog boxes can be displayed outside of the screen at the device creation time.
V 6.1.3
- Fixed: The Wizard dialog boxes can be displayed outside of the screen where Manager is shown.
V 6.7.0
- Improved: Support for High DPI displays (require Manager 6.7.0+ or Showmaster Editor 2.7.0+)
- Changed: Compatibility for Manager 6.7.0 and Showmaster Editor 2.7.0
